Welcome to Our Community

Some features disabled for guests. Register Today.

IndieLC

Discussion in '3D printers' started by Indieflow, Apr 11, 2015.

  1. Indieflow

    Indieflow Journeyman
    Builder

    Joined:
    Mar 28, 2014
    Messages:
    127
    Likes Received:
    134
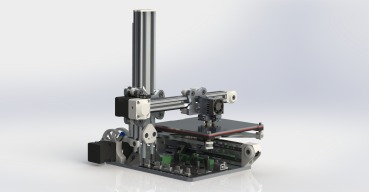
    Extruder assembly now on the build page :thumbsup:
     
  2. boutrous

    boutrous New
    Builder

    Joined:
    Jan 5, 2014
    Messages:
    10
    Likes Received:
    14
    Thank You
     
  3. Bad Sequel

    Bad Sequel Well-Known
    Builder

    Joined:
    Aug 19, 2015
    Messages:
    83
    Likes Received:
    32
    Thanx, man! :thumbsup::thumbsup:
     
  4. Bad Sequel

    Bad Sequel Well-Known
    Builder

    Joined:
    Aug 19, 2015
    Messages:
    83
    Likes Received:
    32
    Oh is that not just typical.. I had to get the steppers with cables just short enough to not pass under the smoothie board and up into the plastic connector. o_O:banghead:

    Cable lengths are great for everything except the Y axis. :duh:

    Oh well.. I will manage :)
     
  5. Indieflow

    Indieflow Journeyman
    Builder

    Joined:
    Mar 28, 2014
    Messages:
    127
    Likes Received:
    134
    Best plans always go to pot! :confused:

    Looking forward to pictures :thumbsup:
     
  6. Bad Sequel

    Bad Sequel Well-Known
    Builder

    Joined:
    Aug 19, 2015
    Messages:
    83
    Likes Received:
    32
    Simon, could you post pics on the heat bed / build platform assembly? Thanx.
     
  7. Indieflow

    Indieflow Journeyman
    Builder

    Joined:
    Mar 28, 2014
    Messages:
    127
    Likes Received:
    134
    Oops, didn't realised I hadn't posted the pictures with the new bed fitted yet! Main picture updated and assembly drawing and video all uploaded now :thumbsup:
     
  8. Bad Sequel

    Bad Sequel Well-Known
    Builder

    Joined:
    Aug 19, 2015
    Messages:
    83
    Likes Received:
    32
    Stock Indie I2 coming together..
    IMG_20160703_203350.jpg

    IMG_20160703_203402.jpg
     
    Kyo and Indieflow like this.
  9. Indieflow

    Indieflow Journeyman
    Builder

    Joined:
    Mar 28, 2014
    Messages:
    127
    Likes Received:
    134
  10. Bad Sequel

    Bad Sequel Well-Known
    Builder

    Joined:
    Aug 19, 2015
    Messages:
    83
    Likes Received:
    32
    Received my Cyclops plastic extruder thingy today. Mounted the cold side assembly on the X carriage.

    Also starting to wire the PSU to the Smoothie. I wonder how that goes when plugging it in for the first time. Poof? :nailbite:

    While working on this I started wondering about where to run all the cables that end up on the X rail. There are cables from End Stop, stepper motor, fan, and the hot end on the extruder. Need some ideas there...

    Also - I see the other Indies in this thread appear to have a fan or two blowing on the extruded plastic. Anyone got a tip for me on how to get that going? I have no parts on hand for that.

    Forgive my Noob - my I2 is the first printer I have been within 10 meters of.. ;)

    Edit: Simon, I'd love to see some pictures on how you wired the heated bed to the smoothie.

    IMG_20160704_204248.jpg

    IMG_20160704_204319.jpg
     
    Kyo likes this.
  11. Indieflow

    Indieflow Journeyman
    Builder

    Joined:
    Mar 28, 2014
    Messages:
    127
    Likes Received:
    134
    I did notice from your pictures that you don't have a voltage regulator fitted! Are you aiming to use two different power sources?

    Wiring is a personal preference thing really! I like to route my hotend, thermistor and fan wires along my bowden tube and my stepper and endstop wires down the Z-axis rail. Also the base has trenches machined in for the Y-axis and extruder wires to sit in nicely :) all really depends on how easily you wish to take the separate axis apart!

    IMG_0951_zpsbykqmb9n.jpg

    Fans are only required to cool certain plastics! For example if using PLA and you extrude on top of soft hot plastic (previous layer) then it will curl up if not properly supported from below! This can be combated by printing slower or correctly designing parts with overhangs of no more than 45 degrees (my designs use 50 degrees)! Fans can also be a bad thing when printing certain plastic like ABS so I have left this option open to builders by leaving a large section of the X carriage available for mounting fans if needed! I personally don't use them!

    Everyone starts somewhere and if your wondering it then others are also! :thumbsup:
     
    #191 Indieflow, Jul 5, 2016
    Last edited: Aug 2, 2017
  12. Bad Sequel

    Bad Sequel Well-Known
    Builder

    Joined:
    Aug 19, 2015
    Messages:
    83
    Likes Received:
    32
    Voltage Regulator - yeah, I've been scratching my head today on how to supply 5V to the Smoothie. I'd hate to be stuck having to power the board with an usb cable or paying for a separate 5V psu so I need to order that.

    Interesting read on the need for fans. Thanks. I'll get the thing running ,then worry about everything else... :thumbsup:
     
  13. Indieflow

    Indieflow Journeyman
    Builder

    Joined:
    Mar 28, 2014
    Messages:
    127
    Likes Received:
    134
    Sounds like a plan!
     
  14. Bad Sequel

    Bad Sequel Well-Known
    Builder

    Joined:
    Aug 19, 2015
    Messages:
    83
    Likes Received:
    32
    Yay! My I2 moved on all axis after powering and testing the jog controls in Pronterface! :thumbsup: That makes the wait for voltage regulator and a couple diodes worth it.

    Tried feeding it a gcode file but it went nuts complaining about stuff I have no idea what means yet. But whatever! IT MOVES! ;)

    Oh man this made my day! :)
     
  15. Indieflow

    Indieflow Journeyman
    Builder

    Joined:
    Mar 28, 2014
    Messages:
    127
    Likes Received:
    134
    Just wait until you start printing then and lose your life to watching it in amazement!
     
    #196 Indieflow, Jul 8, 2016
    Last edited: Jul 8, 2016
  16. Bad Sequel

    Bad Sequel Well-Known
    Builder

    Joined:
    Aug 19, 2015
    Messages:
    83
    Likes Received:
    32
    Progress has been made :)

    Volt regulator in place, also diodes behind the small mosfets. Apparently not doing so is a warranty breaker for the Smoothie..

    My two diodes were delivered at my door in a cardboard box big enough to hold four 0.5 liter cans of beer! o_O That is a lot of empty air for 2 grams worth of electronic gadgets. :)

    While wiring is still a mess I know the following works:
    - 3 axis steppers
    -1 extruder stepper. The other one I haven't figured out how to move in Pronterface.
    -extruder hotend + fan + thermistor. Already burned my hand on the extruder nozzle! :thumbsup:
    -headbed + thermistor
    -2 mechanical endstops.

    Still stuff on the todo list before first print:
    -Bowden tubes
    -Bed leveling
    -Figure out how to get the Hall-o endstop thing working. It's dead weight at the moment.
    -Get ethernet connection going.
    -Order consumables: filament, Kapton tape for the alu bed(?)
    -Create something to hold the filament spools
     
    mario likes this.
  17. Bad Sequel

    Bad Sequel Well-Known
    Builder

    Joined:
    Aug 19, 2015
    Messages:
    83
    Likes Received:
    32
    Yay! Got my Hall Effect endstop working. A certain someone had not done his reading and failed.... Fixed.

    Both extruders are pulling filament nicely. I think..
    When I get this thing printing replacement small gears for both extruders will be a priority. One of the small gears I got with the kit is at this time barely holding it's grub screw, the other forced to work with a dremel and a beating.

    One thing the extruder documentation does not show is that you need a M3 nut inside the gear to hold the grub screw properly. Without a nut the whole assembly is a no-go in my experience. My gears are, apparently, slightly off with regards to printing so the M3 nut installation was a PITA. There were excess material left in the bottom of the slot to hold the M3 nut, causing serious misalignment of the grub screw. Digging out the excess material was no fun at all..

    I do think my current assembly will hold until replacements are printed. :thumbsup:

    Todo for tomorrow:
    -Cleaning and levelling the bed, add Kapton tape.
    -Research on how to Zero the Z axis with the Hall-o endstop. I understand mechanical switches, but this Hall-o thing is a mystery to me o_O A tip or two will be appreciated! What is z-zero on a 3d printer anyway? 1 micrometer above bed or the bed surface?
    -Research on how to get octoprint up and running. I want to run this indie i2 while at work and be able to see what is happening via a webcam. *nerdgasm* ;)
     
  18. Indieflow

    Indieflow Journeyman
    Builder

    Joined:
    Mar 28, 2014
    Messages:
    127
    Likes Received:
    134
    Sounds strange, these little gears are normally rock solid!

    Whoops, well spotted! I will amend the video :confused:

    When designing plastic parts that hold nuts (no spanner required) you make them tight as any play will increase quickly allowing the nut to rotate! To combat the tight fit you push the nut into position with a soldering iron which causes the nut to melt the plastic to the perfect size. Here is a good example YouTube. Spare gears are always a good thing :D

    You want to be just able to slide a piece of paper between the bed and nozzle when homed in the Z-Axis!

    This SITE says it all regarding how they work and how to set them up.

    Great video for setup YouTube
     
    #199 Indieflow, Jul 14, 2016
    Last edited: Jul 14, 2016
  19. Bad Sequel

    Bad Sequel Well-Known
    Builder

    Joined:
    Aug 19, 2015
    Messages:
    83
    Likes Received:
    32
    *Facepalm* I should have thought about using the soldering iron sitting right next to the printer on the desk.. Thanks for the tip. Will do next time around. :thumbsup:

    Also, thanks for the links. Much appreciated!
     
  20. Bad Sequel

    Bad Sequel Well-Known
    Builder

    Joined:
    Aug 19, 2015
    Messages:
    83
    Likes Received:
    32
    First print gave me a laugh atleast..
    The small gear I wanted to print and the result in picture below. Looks functional enough... :ROFL:

    Now to try and figure out why the thing stopped pulling filament...

    IMG_20160715_231638.jpg
     
  21. Indieflow

    Indieflow Journeyman
    Builder

    Joined:
    Mar 28, 2014
    Messages:
    127
    Likes Received:
    134
    Did you go straight for printing the small gear before calibrating? :nailbite:

    If not how did your cubes, torture test etc come out?
     
  22. Bad Sequel

    Bad Sequel Well-Known
    Builder

    Joined:
    Aug 19, 2015
    Messages:
    83
    Likes Received:
    32
    No, I did check that the extruder would deliver a sensible lenght of filemant before plugging into the hot side of things and attempting a print. Asked for 100mm, 40mm and 5mm of feed and what was brought forth by the one working extruder was reasonably close to expected.

    The small gear was my test "cube". First two layers look nice though, but that is perhaps just the chamber holding melted plastic emptying out. It appears to me that feed drops or stops somewhere along the line after starting print.

    Next attempt tomorrow evening.
     
  23. Gasman

    Gasman New
    Builder

    Joined:
    Jun 20, 2016
    Messages:
    2
    Likes Received:
    0
    I'm looking to build one of these (I'm a total noob, it'll be my first 3D printer). Tried following the link to emaker but they now only sell one model. Have you decided which online market place you are going to use?
     
  24. Indieflow

    Indieflow Journeyman
    Builder

    Joined:
    Mar 28, 2014
    Messages:
    127
    Likes Received:
    134
    Hi Gasman, currently just sticking with selling parts via PM and email as it saves on fees etc. Send me a PM of what you want and I'll send you a quote and eta :thumbsup:
     
  25. Indieflow

    Indieflow Journeyman
    Builder

    Joined:
    Mar 28, 2014
    Messages:
    127
    Likes Received:
    134
    Inbound so hope you have all your other parts ready! :)

    FullSizeRender_zpsypp2i9w6.jpg
     
    #206 Indieflow, Jul 17, 2016
    Last edited: Aug 2, 2017
    Rogercw1, Kyo and mario like this.
  26. Bad Sequel

    Bad Sequel Well-Known
    Builder

    Joined:
    Aug 19, 2015
    Messages:
    83
    Likes Received:
    32
    Second attempt at printing never got started.
    Disassembled both my extruders and rebuilt them. Managed to get the M3 nuts in the small gears to line up better.

    Of course I just had to drop a grub screw on the floor and guess what: it's GONE. Spent much time searching for it with a big magnet to no avail. :banghead:

    So - I created my own replacement using offcuts from M3 screws.. Works like a charm! :thumbsup:

    Last discovery was that the large gear unscrews itself on one of the extruders. Need to figure out why. I got somewhat greasy fingers when reassembling it so I wonder if perhaps one of the bearings is having a breakdown and is leaking. If the hobbed bolt is stuck because of a bad bearing that could explain why the gear unscrews itself.

    Btw: for me the extruder pulls 100mm when asked to pull 100mm with the steps_pr_mm set to 609.89, not 645.16 that was in Simon's config file. Failed to mention that earlier. Why it should be different I do not understand as I believe we have the exact same motors.

    Anyway, hoping to try printing again tonight. If the thing do not extrude enough plastic again I would think there is something messed up with my gcode from Slic3r dropping filament feed because of user error. Being a total Noob I would not be surprised.
     
  27. Bad Sequel

    Bad Sequel Well-Known
    Builder

    Joined:
    Aug 19, 2015
    Messages:
    83
    Likes Received:
    32
    Hmm..

    Got further today. But at some point after the first couple layers the thing stops pulling filament at a sensible rate.

    I am not good at gcode but could this be the spot in the file? It's about 2/3rds from the beginning.. Exxx is extrusion rate, correct?


    Code:
    G1 X77.027 Y93.734 E2055.77295
    G1 E2054.27295 F2400.00000
    G92 E0
    G1 X67.026 Y86.946 F7800.000
    G1 E1.50000 F2400.00000
    G1 X66.989 Y86.936 E1.50199 F1800.000

    IMG_20160718_195603.jpg
     
  28. Indieflow

    Indieflow Journeyman
    Builder

    Joined:
    Mar 28, 2014
    Messages:
    127
    Likes Received:
    134
    Looks like your extruder is stripping your filament at the hobbed bolt! When it fails reverse the filament by hand and you should find the filament has a gouge out of it where the hobbed bolt has rotated.

    Now this can be caused by many reasons!

    One your idler might not be tensioned enough causing the hobbed bolt not to bite into the filament enough. A good test is to hand wind in some filament and then back it out and take a look. You should find that one side of the filament has nice even teeth marks in it and directly opposite you want a 0.5mm flat edge caused by the filament being squashed against the idler bearing. If not then adjust the m3 bolt tension.

    Two your hotend may not be at the right temperature to extrude at the speed you are printing! Best to get your hotend up to temperature and then hand wind through the filament paying attention to the force required. Then increase the hotend temperature in 5 degree jumps and see if the force required reduces. You want to find the sweet spot where the force required is minimal though the plastic isn't just pouring out of the hotend when no longer applying pressure. Once you find that perfect temperature for your filament re-calibrate your extruder steps at that temperature (I bet you'll see a difference!). After this try printing nice and slow say at 20mm/s and see how that goes.

    Three your hotend may start at the right temperature though drop as you extrude and go to a temperature too low for the filament before the electronics heats it back up! This would be down to your PID settings being incorrect, see PID Auto Tuning

    These are just a few things to start looking at ;)
     
  29. Bad Sequel

    Bad Sequel Well-Known
    Builder

    Joined:
    Aug 19, 2015
    Messages:
    83
    Likes Received:
    32
    Oh man..

    Something went seriously wrong last time. Found two clogged up heatbreaks on my Cyclops hotend.
    No fun at all.

    But, I should stop hijacking this thread I think and create another for my troubles..

    One question though - anyone got a something enabling the use of another hotend with the i2?

    Perhaps this one: v6 HotEnd Full Kit - 1.75mm Universal (with Bowden add-on) (12v)

    The Cyclops with it's two filament intakes might just be a wee bit overkill for a noob such as myself...
     
    #210 Bad Sequel, Jul 19, 2016
    Last edited: Jul 19, 2016

Share This Page

  1. This site uses cookies to help personalise content, tailor your experience and to keep you logged in if you register.
    By continuing to use this site, you are consenting to our use of cookies.
    Dismiss Notice