Welcome to Our Community

Some features disabled for guests. Register Today.

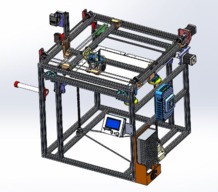
Dash-X 3D Printer: Innovative design

Discussion in '3D printers' started by Neil Rosenberg, May 21, 2019.

  1. Markal

    Markal New
    Builder

    Joined:
    May 5, 2018
    Messages:
    12
    Likes Received:
    1
    Looking forward to seeing your update Neil. If it is a significant redesign, in my opinion its probably worth posting it as Dash-X V2 to keep the two projects as stand alone and not confuse what is already a stable working design. Leave Dash-X V1 as it is.

    Just to feed back on my experience with adding a dual extruder with a single nozzle hotend to my Dash-X.

    The BIGTREETECH 2 In 1 Out Hotend Extruder Dual Color 1.75MM 40W - 24V I purchased was disappointing. It fitted the Dash-X after the modification of the mount spacing which was easy enough once I got long enough screws, but had to hollow out the fan shroud to fit the extra width. It works, sort of, but the problem is that to change colour, you have to retract the first filament almost completely out of the hot end to allow the 2nd colour filament to be fed in. This jambs in 4 out of 10 cases due to, I guess either the filament stringing, and the end of the filament sometimes swelling slightly and jamming, or the filament getting jammed on the internals of the 'Y' piece. Either way, it just became too frustrating in the end after spending weeks on different retraction settings & temperatures etc, but nothing seems to be able to cure what I feel is a flawed design. Doing a bit more digging for a solution, I found a number of people who reported similar findings, so I don't feel too embarrassed about not succeeding.

    I have ordered a different mixing hotend from the same manufacturer which does not require the retraction as the mix is in the nozzle so a minimum amount of retraction required. Not as convenient to fit to my Dash-X as it looks like it may need a redesign of the mount but will know better when it arrives. I opted to try this out next - BIGTREETECH 2-IN-1-OUT Mixed Color Hotend Bowden Extruder for Titan Bulldog 3D Printer Parts J-head Hotend 1.75mm Filament - Red 24V

    I will feedback once I receive it and I have it working.
     
  2. Steve the Kiwi

    Builder

    Joined:
    Apr 24, 2021
    Messages:
    4
    Likes Received:
    0
    I am making progress. Been a little slow due to other matters but I have been making sure that all is right. I had some trouble with X and Y axis when manually moving them. Was binding and I found things there were just not right so some tweaking and it is moving smooth. I have of late been working on the electrics and have just about all mounted bar 1 or 2 items. I need to post some photos of the layout.

    Ordering today the heating pad and print head.

    I am going to post a build of my version of the Dash X and feel this should be done. I will do as Neil has done and post files etc etc.
     
  3. dprice

    dprice New
    Builder

    Joined:
    Oct 23, 2019
    Messages:
    22
    Likes Received:
    8
    I finally got mine up and running a few weeks ago. I won't admit how much time I spent trying to get the Z direction correct....the bed kept moving down when I hit the Z up arrow button :rolleyes: . About the only mod was positioning the extruder over the center of the bed.

    I've almost got it dialed in enough to allow my wife to use it. I just have to figure out how to tell Marlin to allow the print cooler fan to come on automatically.

    I gave up on the dual color extruder after discovering it was quite a bit larger than the original and would require quite few mods that are beyond my rudimentary 3D modelling skills. It is the same one Markal is now waiting on. I'll be happy to test print the parts if someone can generate the files.

    20220331_182518b.jpg

    20220331_184359b.jpg 20220331_185838b.jpg
     
    Peter Van Der Walt and Markal like this.
  4. Markal

    Markal New
    Builder

    Joined:
    May 5, 2018
    Messages:
    12
    Likes Received:
    1
    I will happily share my files for the Dual hot end once I have got it working. I hope it will arrive before the end of April.

    As soon as I have anything useable, I will let you know.
     
  5. Neil Rosenberg

    Neil Rosenberg Journeyman
    Builder

    Joined:
    Dec 29, 2013
    Messages:
    180
    Likes Received:
    177
    Very VERY nice looking build! So happy you've got it running, I'm curious how good the print quality is. Perhaps you could post a photo or two of (pick a part)?

    Congrats!

    Neil

    P.S. Be sure to check out the Dash X Direct, recently posted. It's now got a Hemera Direct Drive, and printing quite well (and FAST!!!).
     
    Peter Van Der Walt likes this.
  6. Markal

    Markal New
    Builder

    Joined:
    May 5, 2018
    Messages:
    12
    Likes Received:
    1
    upload_2022-4-25_7-37-12.png

    I managed to get the first print out this weekend. It needs some fine tuning and there were a few challenges along the way, but I got something to print.

    Believe it or not, that is White and Blue, so I need to look at how to stop the blue contaminating the white.

    I had to replace my extruders as they were getting the filament so hot it would distort and come out the side. The New BMG extruders are much better.

    I had to write a little gcode file for loading and unloading the 2nd extruder as my Robin Nano would not see it with Marlin set up as mixing with 2 motors. I did get it to work as 2 steppers and one nozzle but prefer it as mixing.

    The fan shroud was a bit of a hack, but it works. Let me know if anyone wants the STL's and I will post them on Thingiverse.
     
  7. Gary Caruso

    Gary Caruso OpenBuilds Volunteer
    Staff Member Moderator Builder

    Joined:
    May 19, 2016
    Messages:
    1,185
    Likes Received:
    531
    very cool, is there a way to do a purge tower?
     
  8. Markal

    Markal New
    Builder

    Joined:
    May 5, 2018
    Messages:
    12
    Likes Received:
    1
    There is a purge tower Gary, just it did'nt show in the photo. This is sited by Cura at the extreme of the bed which you need to make sure your settings are right. I was out by 5mm on my bed size recorded in Cura and the drive belt was being stressed. I repositioned the placing setting in the profile by a few millimeters and all working now as it should. I still have not got the retraction settings and I think perhaps my Bed height quite right.

    I am using Pritt stick on the bed which is my go to insurance of good adhesion.

    upload_2022-4-26_7-2-1.png
     
  9. Neil Rosenberg

    Neil Rosenberg Journeyman
    Builder

    Joined:
    Dec 29, 2013
    Messages:
    180
    Likes Received:
    177
    Really nice build! Looking forward to seeing more of what you can make/do with it. BTW, what kind of heated bed did you go with?
     
  10. Markal

    Markal New
    Builder

    Joined:
    May 5, 2018
    Messages:
    12
    Likes Received:
    1
    Thank you Neil, and thank you for sharing your design. I used a 220V 750W 300*300mm Silicone Heating Pad and a Tronxy 330x330 magnetic bed.

    I don't think my aluminum bed is the most perfectly flat item in the world though.
     
  11. Mohamad Moussa

    Builder

    Joined:
    May 10, 2022
    Messages:
    2
    Likes Received:
    0
    Hi Neil, did you use " Xtreme Mini V Wheels" or "Delrin Mini V Wheels" for this build?
     
  12. Neil Rosenberg

    Neil Rosenberg Journeyman
    Builder

    Joined:
    Dec 29, 2013
    Messages:
    180
    Likes Received:
    177
    I used the standard Delrin Mini V wheels, but the Xtreme wheels would work as well, possibly better. So far I've seen no wear after thousands of hours of usage.
     
  13. Mohamad Moussa

    Builder

    Joined:
    May 10, 2022
    Messages:
    2
    Likes Received:
    0
    Hi. What screw did you use to attach the mini v wheels to the printed moving parts ( such as the Y far plate or the x right plate)? I would appreciate it if you could share a link to the product or state its dimensions. TYIA.
     
  14. Neil Rosenberg

    Neil Rosenberg Journeyman
    Builder

    Joined:
    Dec 29, 2013
    Messages:
    180
    Likes Received:
    177
    I used M5x25mm screws, this compensates for the buildup of thicknesses (plastic, wheel with bearings, washer).
     
  15. Shaun Visser

    Builder

    Joined:
    Oct 27, 2022
    Messages:
    1
    Likes Received:
    0
    Hey there. I'm also in the process of building this. I have a few extra questions after reading the discussions here. I'm gutting a CR-10 S5 to build this, and have most of the parts already. I am aiming for a print volume of 450x450x500.

    1: What complications am I looking at if I swop out all the 30t pulleys for 20t(closest pulleys I can source locally)? And then I'm also thinking of putting a 16t on the stepper for the Z axis as I only have Nema 17. That would relatively help with torque issues, as long as I keep an eye on speed.

    2: I'm going to cut the bed down to 450, and I see that you recommend putting in 4 lead screws. What else would need be done, along with the extra lead screw? Having 4 leadscrews is not that much different from the 4 crappy adjustment bolt/spring sets on the stock printer.

    Thanks for a great design, and I'm looking forward to posting pics here soon.

    PS: I altered some of the parts, slightly, to improve printing time without loosing strength/rigidity. All I did was place the parts in the orientation I was going to print, the filleted the vertical edges with a radius of 1mm, so less accelerations/decelerations required. This actually helped bring the print times down by 10-15% (example attached)
     

    Attached Files:

  16. Neil Rosenberg

    Neil Rosenberg Journeyman
    Builder

    Joined:
    Dec 29, 2013
    Messages:
    180
    Likes Received:
    177
    Hi Shaun, thanks for reaching out.

    I don't see any problem with 20t vs 30t, you just change the calculated steps/mm. The reason for 4 leadscrews (not essential) is based on my own experience with that large a bed. Flexing became a problem, one solution was to support the large bed from all four corners. You'll also need to be mindful of the amount of power needed to heat such a large bed, you may want to segment it into smaller pieces and only heat those areas that actually have parts on them. Our large bed drew an amazing amount of power, way more than a simple 15a circuit could provide.

    Best of luck with the build, looking forward to photos and hearing of your experiences.
     
  17. dprice

    dprice New
    Builder

    Joined:
    Oct 23, 2019
    Messages:
    22
    Likes Received:
    8
    I've been having issues with the extruder...swapped out a couple of drive units after they failed...upsized the motor to limit stalling (nozzle problem?). And the Ender style hot ends work until the don't due to clogging. So this morning I decided to look for a direct drive unit with an upgraded hot end even though I didn't know how to make it fit. Low and behold I see Neil has made the mod I was looking for...Dash X-Direct. I should have checked in sooner!
     

Share This Page

  1. This site uses cookies to help personalise content, tailor your experience and to keep you logged in if you register.
    By continuing to use this site, you are consenting to our use of cookies.
    Dismiss Notice