Welcome to Our Community

Some features disabled for guests. Register Today.

Cantilever Diode Laser Engraver V821

Discussion in 'Laser Cutters' started by David Bunch, Aug 17, 2021.
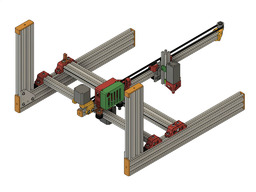
  1. Peter Van Der Walt

    Peter Van Der Walt OpenBuilds Team
    Staff Member Moderator Builder Resident Builder

    Joined:
    Mar 1, 2017
    Messages:
    14,038
    Likes Received:
    4,122
  2. David Bunch

    David Bunch Veteran
    Builder

    Joined:
    Oct 27, 2014
    Messages:
    623
    Likes Received:
    429
    I played around with that formula & think I put the numbers correctly in excel & added DeflectionCalculation_For_V-Slot.xlsx to the files area. See if my spreadsheet looks correct. I made it easy to change the numbers. I used Scientific Notation Converter (calculatorsoup.com) to convert to the format excel wanted. I will have to figure out how much of the weight of this machine is actually carried on the main beam. Guess I will exclude the weight of the back motor & mount as that should be carried on the back beam.

    [edit] I updated it with some minor corrections.
     
    #92 David Bunch, Sep 16, 2021
    Last edited: Sep 16, 2021
  3. David Bunch

    David Bunch Veteran
    Builder

    Joined:
    Oct 27, 2014
    Messages:
    623
    Likes Received:
    429
    I made a 1 meter long version today using 2 - 2040x1000mm for the main & back beam. I didn't have any 2020x1000 which is why I used the 2040. Looks like I have 850mmx430mm working area now & weighs in around 12lbs.
    IMG_1756_800x600.jpg
     
  4. David Bunch

    David Bunch Veteran
    Builder

    Joined:
    Oct 27, 2014
    Messages:
    623
    Likes Received:
    429
    I updated the build guide & BOM on thingiverse to cover the various options better. The BOM has a tab for each of the 8 configurations someone might use. I also updated the Files tab to include the latest zip of the thingiverse files. I am waiting for some dry weather to burn my stair stringer template cutouts.
     
  5. David Bunch

    David Bunch Veteran
    Builder

    Joined:
    Oct 27, 2014
    Messages:
    623
    Likes Received:
    429
    I cut my stringer template with the laser yesterday. After a few test burns on scratch piece of paper, I used 200mm/Min with 90% power with the 6W NEJE laser. It didn't quite burn thru in some spots, so the 2nd one I used 200mm/Min with 91% & that burned thru perfect. Since I had to burn this in 2 parts, I overlapped the 2 about 2" on each side the matching corner. They took about 10 minutes to burn each half of the template. I did have one minor error. I used 11.25" as the width of the board. The boards were actually 11-7/16" wide. That is not really a problem as the cut side is correct.
    IMG_1767_800x600.jpg IMG_1771_800x600.jpg IMG_1772_800x600.jpg IMG_1774_800x600.jpg
     
  6. David Bunch

    David Bunch Veteran
    Builder

    Joined:
    Oct 27, 2014
    Messages:
    623
    Likes Received:
    429
    I have been getting this message everytime I click on your site for the last few days from Malwarebytes 4.4.6. This is while using MS edge or firefox browser.
    InstagramBlock.jpg
     
  7. Peter Van Der Walt

    Peter Van Der Walt OpenBuilds Team
    Staff Member Moderator Builder Resident Builder

    Joined:
    Mar 1, 2017
    Messages:
    14,038
    Likes Received:
    4,122
    Malware bytes is becoming like AVG did a couple years ago - extortionist. The URL is part of facebook/instagram (fbcdn.com = facebook content delivery network) - I don't use Malwarebytes anymore, it fearmongers in the hope of getting your subscription fees (;
     
  8. David Bunch

    David Bunch Veteran
    Builder

    Joined:
    Oct 27, 2014
    Messages:
    623
    Likes Received:
    429
    O
    Ok, I will ignore it then.
     
  9. David Bunch

    David Bunch Veteran
    Builder

    Joined:
    Oct 27, 2014
    Messages:
    623
    Likes Received:
    429
    This guy came up with a good way to engrave bamboo pens from Amazon ($0.79 each) using horizontal X & Y axis.
     
  10. David Bunch

    David Bunch Veteran
    Builder

    Joined:
    Oct 27, 2014
    Messages:
    623
    Likes Received:
    429
    I had some problem printing what I call a stool for the turntable. I had 2 failed prints about 1/2 way thru. The nozzle hit the overhangs & pulled it off the bed the 1st time. The 2nd time, I used glue stick & it stayed on, but shifted the carriage when it hit this time, so had a layer shift. Since it is screwed to a piece of wood 1.5" thick, it didn't really need the reinforcement, so changed the design to just 45 deg braces at the top. It still hit legs when it was about 9 minutes before finishing it but was usable. I probably needed to have a lift Z after it reached a certain height along with a retract on layer change after a certain height to overcome this (Using PrusaSlicer 2.4 beta4). 20/20 hindsight, I probably would have made this stool in 2 parts & bolted them together. At any rate, it seems like this should work sufficiently.

    I had some left over 2x12s, so I cut the base out of this. The wood gives it a pound more weight & makes it more stable & brings the total weight of this to about 2 lbs. If it needs more stability, I will add another piece of wood to the bottom of that one.

    We have warm weather here for the next week, so should be able to get some engraving done.
    I clamped it down so I could drill the holes. They had to be at an angle to be able to drill & screw them in. The drill just barely fit. I am hoping to test it sometime today.
    @Mark Carew , I see a bamboo pen with the openbuilds logo in the near future.
    IMG_2114_800x600.jpg IMG_2115_800x600.jpg IMG_2117_800x600.jpg
     

    Attached Files:

  11. Mark Carew

    Mark Carew OpenBuilds Team
    Staff Member Moderator Builder Resident Builder

    Joined:
    Jun 28, 2013
    Messages:
    2,746
    Likes Received:
    2,412
    Your the best David! Thanks man it will be proudly displayed at OpenBuilds HQ
     
    Peter Van Der Walt likes this.
  12. David Bunch

    David Bunch Veteran
    Builder

    Joined:
    Oct 27, 2014
    Messages:
    623
    Likes Received:
    429
    I am just getting back to these pens. Here is what I came up with for your openbuilds pen. Is this the correct logo to use @Mark Carew ? Should I engrave my name on opposite side? I created a model of the pen in fusion & used a decal image to wrap around it so I could better see how the final would look.
    BambooPenOpenbuildsLogo.jpg
    Here is another design I am working on. I used the output from sandify.org for web and spider from a free dxf site.
    SpiderPen.jpg
     
  13. Mark Carew

    Mark Carew OpenBuilds Team
    Staff Member Moderator Builder Resident Builder

    Joined:
    Jun 28, 2013
    Messages:
    2,746
    Likes Received:
    2,412
    How cool man, this is great. The logo is perfect, yes please add your name and whatever saying you would like to see on the shelf of first forever! :)
    One day, when an OpenBuilds based sampler machine is responsible for finding that perfect sample that helps to end disease, this pen will be proudly be displayed on the shelf as part of the innovation that helped get us all here. :thumbsup: "Building a better future together!" < quote maybe?
    p.s. Love the spider one as well
     
    Peter Van Der Walt likes this.
  14. David Bunch

    David Bunch Veteran
    Builder

    Joined:
    Oct 27, 2014
    Messages:
    623
    Likes Received:
    429
    Barring no problems, I should get these 2 items engraved today & should be able to video the progress.

    Here is my simplified turntable for the pens. This makes it easier to keep the pen upright and allows for the laser to be closer also. I have a clamp bracket for the pen, but don't think it is needed. I made this final design without overhangs which is simpler to print & took the wood out also. The wood was not entirely flat. I will use a heavy rock in each corner for ballast. The base table has 5 plastic parts with M5x20mm screws and captive M5 locknuts in the legs to hold it together.
    IMG_2123_800x600.jpg
     
    Peter Van Der Walt likes this.
  15. David Bunch

    David Bunch Veteran
    Builder

    Joined:
    Oct 27, 2014
    Messages:
    623
    Likes Received:
    429
    Engraving of a spider & web wrapped around the bamboo pen came out well for the first pen engraving.
     
  16. David Bunch

    David Bunch Veteran
    Builder

    Joined:
    Oct 27, 2014
    Messages:
    623
    Likes Received:
    429
    I was just realizing last night that a 1/2" drill chuck would work well for these small objects & be easier to put in & take out. This one on Amazon handles 1.5mm-13mm which covers the ranges from toothpicks to a little beyond these bamboo pens. It also has 3 different types of shanks for mounting. It uses a keyed chuck, but probably only need to hand tighten with these wood & bamboo items. https://www.amazon.com/1-5-13mm-Converter-20UNF-Adapter-SDS-Plus/dp/B088NNVG38
    There is also a keyless version that goes from 2mm-13mm. 2-13mm Capacity Drill Chuck, 1/2-20UNF Mount Impact Driver Bits Chuck with 3/8"SDS-Plus Shank 1/4" Hex Shank 1/2 inch Socket Square Female Adapter(ZDJT 2-13MM 1 Packing) - - Amazon.com

    I would just 3d print a coupling to mount this to the motor. Looks like you can also get 1/4" to 5mm couplers that would make it a more rigid connection to the motor. Actobotics Set Screw Shaft Coupler (1/4" to 5mm)

    There are a few of the drill chucks on aliexpress, but the ones Amazon looked better.
     
    #106 David Bunch, Dec 31, 2021
    Last edited: Dec 31, 2021
    Peter Van Der Walt likes this.
  17. David Bunch

    David Bunch Veteran
    Builder

    Joined:
    Oct 27, 2014
    Messages:
    623
    Likes Received:
    429
    I also did the engraving of the openbuilds logo the same day as the spider & web, but that did not come out as well as I liked. I think that needs to be engraved with just the outline as the fill looks a little too much.
    Here is what those 2 pens look like.
    IMG_2125_800x200.jpg IMG_2126_800x200.jpg
     
  18. David Bunch

    David Bunch Veteran
    Builder

    Joined:
    Oct 27, 2014
    Messages:
    623
    Likes Received:
    429
    Here is a video of the engraving of the maze on the pen. I found some free artwork of a running squirrel, added it to the beginning of the maze & couldn’t resist adding a cute title for the video.
     
  19. David Bunch

    David Bunch Veteran
    Builder

    Joined:
    Oct 27, 2014
    Messages:
    623
    Likes Received:
    429
    I found the problem that was causing the openbuilds logo to not look as good. I had the rotary settings wrong. Although they worked, I noticed the engraver was moving faster along the X-axis than the rotary axis.
    The settings I had before were:

    $102=27.000 ;Z-axis steps per millimeter (Rotary Axis)
    243 in the Lightburn rotary mm per rotation

    I essentially had these backwards, but the numbers work out to more even ones now. Don't know how I missed that before, but it is correct now.
    The correct settings are now:

    $102=200 ;Z-axis steps per millimeter (Rotary Axis)
    32 in the Lightburn rotary mm per rotation (DRV8825)

    The bottom 2 pens were with the new settings. This is a full size image. Zoom into it and see what the ® looks like on the bottom pen. I also ran a video of this & if it came out well, will post it the next day or so.
    IMG_2133_Edit.jpg
     
  20. David Bunch

    David Bunch Veteran
    Builder

    Joined:
    Oct 27, 2014
    Messages:
    623
    Likes Received:
    429
  21. David Bunch

    David Bunch Veteran
    Builder

    Joined:
    Oct 27, 2014
    Messages:
    623
    Likes Received:
    429
    I had a thought yesterday that if someone wanted to have a setup just for using the rotary axis, this build could be a bit simpler. Here is a design I came up for that. It uses a 2020x500mm for the carriage axis. I might would use a 2040 instead since it is not cantilevered now. The other V-slots are 2040x250mm. These could beefed up more with 2060s instead. A 2080 to connect the 2020 would also give that carriage axis a lot more support. I test fit the V-slot yesterday using 4 - inside hidden corner brackets to connect the 2040s. Inside Hidden Corner Bracket - OpenBuilds Part Store
    This design has less hardware, the wheel count down to 4, less belt needed and only 2 stepper motors. This also puts the rotary axis turntable a lot closer to the table. Probably would need to put some weight on the sides to keep it stationary or screw it down.
    VerticalLE.jpg
     
  22. Mark Carew

    Mark Carew OpenBuilds Team
    Staff Member Moderator Builder Resident Builder

    Joined:
    Jun 28, 2013
    Messages:
    2,746
    Likes Received:
    2,412
    The pens are here and they look awesome!
    A big shout out David for taking the time to make these and for sharing them with us :thumbsup:
    Thank you
    Mark_Carew_OpenBuilds.jpg
     
  23. Giarc

    Giarc OpenBuilds Team
    Staff Member Moderator Builder Resident Builder

    Joined:
    Jan 24, 2015
    Messages:
    2,921
    Likes Received:
    1,620
    Wow! I fell behind on this one somehow. This build is great! I may use the drill chuck idea for a small rotary for my K40 for pens, but I think a dedicated pen laser engraver made out of all my offcuts of V-slot using your ideas presented here would a super fun, quick, and inexpensive project. Thanks.

    First pen: "World's greatest Brother"...for me, and I will definitely make a consolation prize pen for my brother. ;) I already have a great list of "prize" pens for co-workers. The first batch of 50 blank pens I ordered from your earlier link are already here.
     
  24. Mark Carew

    Mark Carew OpenBuilds Team
    Staff Member Moderator Builder Resident Builder

    Joined:
    Jun 28, 2013
    Messages:
    2,746
    Likes Received:
    2,412
    I also really like this build and you know we always need another machine to show off the OpenBuilds System here so I can see one of these being put together in the near future :)
    :D
    I Go for it Giarc going to be a cool build for sure! BTW if you need a small laser I was looking though everything here as we are moving in and I have one I can let go to a good home :) (PM me if your interested)
    All the best with the build :thumbsup:
     
    Peter Van Der Walt likes this.
  25. David Bunch

    David Bunch Veteran
    Builder

    Joined:
    Oct 27, 2014
    Messages:
    623
    Likes Received:
    429
    I will start a separate build log for that simple design once I print the couple of new parts needed.
     
    Giarc, Alex Chambers and Mark Carew like this.
  26. Mark Carew

    Mark Carew OpenBuilds Team
    Staff Member Moderator Builder Resident Builder

    Joined:
    Jun 28, 2013
    Messages:
    2,746
    Likes Received:
    2,412
    Very cool! thanks David:thumbsup:
     
  27. David Bunch

    David Bunch Veteran
    Builder

    Joined:
    Oct 27, 2014
    Messages:
    623
    Likes Received:
    429
    I have been wanting a Z-axis for the laser or rolling plotter for a while & started playing with a design the last couple of days. This uses an M6x70mm bolt for the Z-axis drive, M6x100mm smooth rod and a pancake nema 17 motor. I chose M6 instead of M8 to cut the weight down a little. It will probably be too heavy for the cantilever laser, but am thinking of adding another side to it if this works ok. The green bracket is bolted with 3 -M5 screws to the metal X-carriage. Rather than using metal bushings, I am going to try this design that is similar to the igus polymer bushings but designed into the bracket. My little sliding pen mount on the rolling plotter uses M3 rods from an old DVD drive & they move quite well without any bushings, so just having a nice sized M6 hole might work just as well for use with a laser or pen. I will do some test prints of different sections before printing all the parts. I will have to order the M6 bolt & M6 smooth rod. Here is my design so far. The only potential problem is the green bracket might need more support to keep the motor from wanting to lean over. There is 20mm of height that the smooth rods fit into on the green bracket. I am open to suggestions if you see something wrong with this design.
    LE_Z-Axis_Pancake_1jpg.jpg LE_Z-Axis_Pancake.jpg
     
    Peter Van Der Walt likes this.
  28. David Bunch

    David Bunch Veteran
    Builder

    Joined:
    Oct 27, 2014
    Messages:
    623
    Likes Received:
    429
    Someone pointed out in another forum that the motor & not the laser would be moving up & down. Not sure how I missed that. I also realized overnight that 2-M5 Nuts would hit the 2020 V-Slot. Glad I didn't print any of these yet. Back to the drawing board.
     
    Giarc and Peter Van Der Walt like this.

Share This Page

  1. This site uses cookies to help personalise content, tailor your experience and to keep you logged in if you register.
    By continuing to use this site, you are consenting to our use of cookies.
    Dismiss Notice