Welcome to Our Community

Some features disabled for guests. Register Today.

GRANITE 1.0

Discussion in 'CNC Mills/Routers' started by Michael.M, Sep 29, 2018.
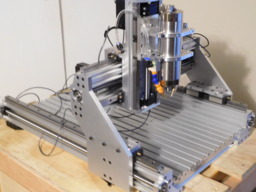
  1. Michael.M

    Michael.M Veteran
    Staff Member Builder Resident Builder

    Joined:
    Jan 21, 2017
    Messages:
    432
    Likes Received:
    264
    I appreciate the support too Tracy. I spent quite a while on designing & building this machine. At least it felt like it was a long time.
     
  2. Andreas Bockert

    Andreas Bockert Well-Known
    Builder

    Joined:
    Oct 1, 2017
    Messages:
    142
    Likes Received:
    78
    Did you simply slot them? One idea would be to do an adaptive clearing with a trochoidal tool path that is 3/8 or 1/2 inch (for 1 1/4" endmill). I've done this with 3mm stepdown (and I think this is conservative). It's not fast but the chips get more space and the DOC is greater...

    This is what I've been doing and has worked well in my very limited experience.
     
    Michael.M likes this.
  3. Michael.M

    Michael.M Veteran
    Staff Member Builder Resident Builder

    Joined:
    Jan 21, 2017
    Messages:
    432
    Likes Received:
    264
    Probably thr biggest benefit to an OpenBuilds machine is that you can buy everything you need for an affordable, running CNC. No need to manufacter anything. You get experience from building it and then you start to learn CAD & CAM. When you feel like upgrading, you can reuse many of the parts on your next machine.
     
    Mark Carew, Kyo, joe williams and 2 others like this.
  4. CNCMD

    CNCMD Journeyman
    Builder

    Joined:
    Jul 29, 2017
    Messages:
    148
    Likes Received:
    114
    Nice job Michael. I like how everything turned out.

    The size of the plates mean nothing to the capacity of the machine, I'm speaking in terms of those who doubt the abilities of openbuild machines. I can say that I have successfully milled 3/4" stock without issue. As Michael said, the challenge is and will always be chip evacuation.
     
    MaryD, Mark Carew and Michael.M like this.
  5. Michael.M

    Michael.M Veteran
    Staff Member Builder Resident Builder

    Joined:
    Jan 21, 2017
    Messages:
    432
    Likes Received:
    264
    Thanks buddy. I'm just going to have to enclose this machine so I can run an air nozzle wide open. Previously I was trying hard not to make a huge mess so I opened the nozzle just enough to remove some chips.
     
  6. CNCMD

    CNCMD Journeyman
    Builder

    Joined:
    Jul 29, 2017
    Messages:
    148
    Likes Received:
    114
    I'm currently upgrading to dual air nozzles!
     
    MaryD and Michael.M like this.
  7. Andreas Bockert

    Andreas Bockert Well-Known
    Builder

    Joined:
    Oct 1, 2017
    Messages:
    142
    Likes Received:
    78
    Are you concerned about chips getting onto the rails and into the bearing blocks?
     
  8. Michael.M

    Michael.M Veteran
    Staff Member Builder Resident Builder

    Joined:
    Jan 21, 2017
    Messages:
    432
    Likes Received:
    264
    Awesome dude! I have a second one also that I plan to use.
     
  9. Michael.M

    Michael.M Veteran
    Staff Member Builder Resident Builder

    Joined:
    Jan 21, 2017
    Messages:
    432
    Likes Received:
    264
    Yeah this is definitely a concern. I have actually seen bellows designed for linear rails or I could install shielding. The linear carriages do have rubber wipers but I don't want to chew those up.
     
  10. Michael.M

    Michael.M Veteran
    Staff Member Builder Resident Builder

    Joined:
    Jan 21, 2017
    Messages:
    432
    Likes Received:
    264
    centryco-bellows1097_0_0 (1).jpg

    I'm sure these aren't cheap though
     
  11. Andreas Bockert

    Andreas Bockert Well-Known
    Builder

    Joined:
    Oct 1, 2017
    Messages:
    142
    Likes Received:
    78
    It looks like y would be reasonably easy to shield from the bulk of the chips since your gantry is tall.

    X and z look more challenging.

    I don’t have a good sense for how delicate these things are...
     
  12. Michael.M

    Michael.M Veteran
    Staff Member Builder Resident Builder

    Joined:
    Jan 21, 2017
    Messages:
    432
    Likes Received:
    264
    They're heavy duty but you still want to avoid contamination. Chips could cause the bearing balls to jam up and stop circulating which would be very bad.
     
  13. Michael.M

    Michael.M Veteran
    Staff Member Builder Resident Builder

    Joined:
    Jan 21, 2017
    Messages:
    432
    Likes Received:
    264
    This machine uses the exact extrusions that I had on my Sphinx and even though the Y axis cbeams are tall, I still ended up with chips all over the top.
     
  14. CNCMD

    CNCMD Journeyman
    Builder

    Joined:
    Jul 29, 2017
    Messages:
    148
    Likes Received:
    114
    Finding bellows is difficult, I've been looking for solutions for both the linear rails and the ballscrews.
     
  15. Andreas Bockert

    Andreas Bockert Well-Known
    Builder

    Joined:
    Oct 1, 2017
    Messages:
    142
    Likes Received:
    78
    I was thinking you could attach some shields at the inside of Y. I.e. some plate that almost touch the gantry. It perfect but at least the chips would have a higher obstacle to clear.
     
  16. Andreas Bockert

    Andreas Bockert Well-Known
    Builder

    Joined:
    Oct 1, 2017
    Messages:
    142
    Likes Received:
    78
  17. Michael.M

    Michael.M Veteran
    Staff Member Builder Resident Builder

    Joined:
    Jan 21, 2017
    Messages:
    432
    Likes Received:
    264
    Maybe they're just showing different models. It looks like they can do custom orders.
     
  18. Mark Carew

    Mark Carew OpenBuilds Team
    Staff Member Moderator Builder Resident Builder

    Joined:
    Jun 28, 2013
    Messages:
    2,745
    Likes Received:
    2,410
    @Michael.M this what the OpenBuilds machines making machines is all about! Man you have done an amazing job on this bad boy its a work of art and I am excited to see it in action. Great job brother. There are so many ideas and techniques used in this build that will help many Builders along the way to creating great machines, so thank you for sharing!
    BTW if you guys are looking to custom make some billows check this bellows maker resource out.
     
    Michael.M and joe williams like this.
  19. GrayUK

    GrayUK Openbuilds Team Elder
    Staff Member Moderator Builder

    Joined:
    May 5, 2014
    Messages:
    1,668
    Likes Received:
    627
    They don't look bad at all! :D
     
  20. Michael.M

    Michael.M Veteran
    Staff Member Builder Resident Builder

    Joined:
    Jan 21, 2017
    Messages:
    432
    Likes Received:
    264
    Oh that's awesome! I was wondering if this could be done. Thank you Mark.
     
    Mark Carew likes this.
  21. pek

    pek Journeyman
    Builder

    Joined:
    Apr 17, 2017
    Messages:
    196
    Likes Received:
    130
    Beautiful Michael, lots of details and techniques used, love it! I was wondering why you are using Delrin at some place like the stepper standoffs?
     
  22. Michael.M

    Michael.M Veteran
    Staff Member Builder Resident Builder

    Joined:
    Jan 21, 2017
    Messages:
    432
    Likes Received:
    264
    Thank you! I found a huge block of delrin on eBay for a really great price. The motor standoffs are 55mm on my machine so the standard aluminum standoffs wouldn't work. Plus this stuff is incredibly tough and machines nicely with little effort. Maybe it will dampen some vibration too.
     
  23. Michael.M

    Michael.M Veteran
    Staff Member Builder Resident Builder

    Joined:
    Jan 21, 2017
    Messages:
    432
    Likes Received:
    264
    Some of these parts on this machine called for a pretty decent sized chunk of material to start with whether it be aluminum or plastic. I designed the entire machine first then wrote down overall measurements of required materials. Ebay was the first place I looked for cutoffs or drop cuts. The block of delrin I found measured 2"x3" and I think it was 2' long so it covered most of the thicker parts I needed. Plus I had never machined anything like this so I didn't want to waste expensive aluminum if they didn't work out. The only delrin parts I'm not 100% confident about are the Y axis ball nut blocks. They are rigid and machined to a tight fit but I wonder if there would be any compression under load.
     
    #54 Michael.M, Oct 4, 2018
    Last edited: Oct 4, 2018
  24. pek

    pek Journeyman
    Builder

    Joined:
    Apr 17, 2017
    Messages:
    196
    Likes Received:
    130
    I see your point, thanks for the clarification. Yes I think for the motors is good but might be nice to switch later on to aluminum for the ball nuts...
     
    Michael.M likes this.
  25. GrayUK

    GrayUK Openbuilds Team Elder
    Staff Member Moderator Builder

    Joined:
    May 5, 2014
    Messages:
    1,668
    Likes Received:
    627
    As I said on another thread, I found this great supplier in the UK, for Plastics of every type, including (Delrin /Acetal / P.O.M.) in small sizes too!
    Acetal Rod and Sheet | Plastic Sales Ltd
    As you say, it is easy and great to work with, especially for prototyping. Very rigid and stable.
    A lot of my machine will be using it until I settle on a final configuration.
     
    Michael.M likes this.
  26. Michael.M

    Michael.M Veteran
    Staff Member Builder Resident Builder

    Joined:
    Jan 21, 2017
    Messages:
    432
    Likes Received:
    264
    Looking back, I realize a few parts could be downsized and machined from smaller stock and I would actually like to design the plates to work with the pre made ball nut blocks in the future. Some of the plates could also be machined from thinner stock.
     
  27. GrayUK

    GrayUK Openbuilds Team Elder
    Staff Member Moderator Builder

    Joined:
    May 5, 2014
    Messages:
    1,668
    Likes Received:
    627
    Better to be over than under :D
     
  28. Michael.M

    Michael.M Veteran
    Staff Member Builder Resident Builder

    Joined:
    Jan 21, 2017
    Messages:
    432
    Likes Received:
    264
    Just as a heads up. If anyone is wanting to use the common 1605 ballscrews with thd cbeams like I did, you have to completely dissasemble the ball nut and grind the flanges. While grinding, you have to constantly quenching the nut in water otherwise you risk deformation of the ball tracks inside. Also, it can be a pain to repack the ballnut. If anyone needs help, I learned a few tricks along the way. I also had to straighten my longer ballscrews with a set of V-blocks and a dial indicator which would work for any bent leadscrew. I didn't even know they had a slight bend until I was in the final assembling stage.
     
    Rob.C and GrayUK like this.
  29. NeeqOne

    NeeqOne Well-Known
    Builder

    Joined:
    Mar 3, 2018
    Messages:
    46
    Likes Received:
    27
    Has the size of your working area changes after the upgrade?
     

Share This Page

  1. This site uses cookies to help personalise content, tailor your experience and to keep you logged in if you register.
    By continuing to use this site, you are consenting to our use of cookies.
    Dismiss Notice