Welcome to Our Community

Some features disabled for guests. Register Today.

C-Beam cnc

Discussion in 'CNC Mills/Routers' started by Kyo, Jun 24, 2016.
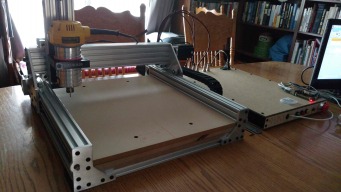
  1. Metalguru

    Metalguru Veteran
    Builder

    Joined:
    Dec 29, 2015
    Messages:
    752
    Likes Received:
    547
    You would get a resolution of .005mm. That is not in any way the same as accuracy!

    Resolution is the number of pieces or parts that the movement can be broken down into without any instability in the measurement. It can be expressed in a number of ways, the two most common being:

    1. Decimal Places ie .005mm
    2. Parts/Divisions/Counts ie 1 part in 1000

    Accuracy tells you how closely the movement will match the ‘true’ value. Any mismatch between the actual and the ‘true’ value is usually referred to as the ‘error’.

    There are several sources of error in a CNC machine, including screw pitch, stepper motor step consistency, flex in the system, backlash, etc. The sum of all these is the total error. Error may change with direction of movement, speed, cutting forces, etc. The sum of all the error terms is ideally a constant. In this instance, the error can be quite easily compensated for to improve the accuracy. However, from the list above, it is obvious that some of these terms will vary. Thus, your accuracy can vary with the operation you are performing at the time.

    Increasing the resolution tends to give users the illusion that they have greater accuracy, when in fact this is not the case. Increasing the resolution does not affect the accuracy at all, since the amount of error is not changed.

    MG
     
    ITNavigate likes this.
  2. ITNavigate

    Builder

    Joined:
    Feb 4, 2018
    Messages:
    5
    Likes Received:
    0
    Thanks for the terms @Metalguru .
    Resolution and accuracy. If I had used them in my earlier post I would have expressed myself better.

    Knowing that a resolution far finer than what I need is achievable (theoretically) in this case means that I should be able to achieve the accuracy that I need.

    It is all moot now, as I have started purchasing parts for my own CNC ....
     
  3. Gummix

    Gummix New
    Builder

    Joined:
    Nov 3, 2017
    Messages:
    2
    Likes Received:
    0
    Hello,
    first i want to say "Geart Work!" and thanks for sharing it.

    I plan my first CNC Mill (Cause i have to wait for the 3D Printer Parts and now have time to plan the new project^^).
    I have 3 questions atm.:
    - I live in Germany so its a bit more difficult to get all the parts, did someone have a tip for a shop in Germany or Europe?
    - which milling motor you use?
    - chrisclub1 sells 2 version of the plate sets on Ebay KYO Sphinx CNC 8 Plate set, V2
    and 2" Taller Kyo Sphinx CNC 8 Plate Set, V2
    Is it better to choose the taller Version (gives more processing height i think?) or the standart? If the taller Version is better did it need changes in the BOM?

    Thanks and Greetings from Germany
     
    #483 Gummix, Feb 11, 2018
    Last edited: Feb 11, 2018
  4. Gummix

    Gummix New
    Builder

    Joined:
    Nov 3, 2017
    Messages:
    2
    Likes Received:
    0
    Nobody who can help me?
     
  5. CNCMD

    CNCMD Journeyman
    Builder

    Joined:
    Jul 29, 2017
    Messages:
    148
    Likes Received:
    114
    Here is a place in the UK: RepRap 3D Printer Parts Supplier - V-Slot CNC - Ooznest

    Milling Motor - Many use either a standard wood working router, like a Dewalt 611. Another common, but more costly option would be a water cooled spindle.

    The plate decision is based on usage of the machine. Many would say, and that the lower plates result in a more rigid machine as there is less flex in shorter plates, and therefore better for milling aluminum.
     
    Michael.M likes this.
  6. Chillimonster

    Chillimonster Well-Known
    Builder

    Joined:
    May 6, 2015
    Messages:
    153
    Likes Received:
    81
    Been gathering parts for my Sphinx build over the last week.

    Plates set is currently in customs awaiting clearance :-(
    C-Beam on back order at Ooznest so that will be next week,

    Rest of construction parts are hear and all sorted ready to go.

    But a few questions if I may....

    Is there any advantage to using a 'hanging' belt driven stepper on the Z as opposed to going for a direct mounted stepper on the top (Apart from the height saving)?

    Also single or twin anti-backlash nut blocks? I've seen a few reports of issues when running two due to tightness?

    Steppers.... Whats recommended for this build and where to buy (UK) (Will be running DQ542MA Drivers on a 24V PSU?

    Spindle - I currently use a Kress 1050FME on my Ooznest Ox, which will be sold with the Ox when i sell it over the next couple of weeks. I'll be sticking to an air cooled spindle so what the recommended one these days. Need something that is reasonably quiet if possible.

    There are bound to be more questions I start to organise the build in my head over weekend :)

    Thanks in advance

    Chris
     
  7. Metalguru

    Metalguru Veteran
    Builder

    Joined:
    Dec 29, 2015
    Messages:
    752
    Likes Received:
    547
    MG
     
  8. Chillimonster

    Chillimonster Well-Known
    Builder

    Joined:
    May 6, 2015
    Messages:
    153
    Likes Received:
    81
    Thanks.

    Will have a look at the dewalt over weekend. Looks a cheaper option than the kress and better clamping solutions as well.

    Not thought about using two standard but blocks and taking the backlash out that way. Good call!
     
  9. Metalguru

    Metalguru Veteran
    Builder

    Joined:
    Dec 29, 2015
    Messages:
    752
    Likes Received:
    547
    There is a caveat, the gantry plates have to have the mounting holes for two nut blocks, like the C-Beam XL plates. Not sure if Sphinx plates have that option.

    MG
     
  10. beardyblair

    beardyblair Well-Known
    Builder

    Joined:
    Aug 1, 2016
    Messages:
    59
    Likes Received:
    72
    The very short answer is yes, mine has and will make PCBs. Its all in the tolerances of the build, the lead screws and the setup. The first few we etched required a lot of work to get it right, even after flattening the plate we had to pack the PCBs with ciggy papers to get them "flat". Turns oout it was the PCBs, we now use a probe and some software to map the PCB and convert the gcode to match. The "slop" in your lead screws is your biggest problem. I use the double backlash nut option and oversized motors. Hope this helps.
     
  11. Chillimonster

    Chillimonster Well-Known
    Builder

    Joined:
    May 6, 2015
    Messages:
    153
    Likes Received:
    81
    Just starting on my build (1000 x 1000)

    Plates finally arrived after being stuck in customs for over a week.

    I was thinking about the 27mm bolts that are needed and cutting down the 30mm and thought why not use the 30mm with an external 3mm spacer.

    Works perfectly.

    Still weighing up the pros and cons of single vs double anti backlash nuts though.
     

    Attached Files:

    Michael.M, Jdog and Kyo like this.
  12. Metalguru

    Metalguru Veteran
    Builder

    Joined:
    Dec 29, 2015
    Messages:
    752
    Likes Received:
    547
    Double nuts for sure. Way better.

    MG
     
    Kyo likes this.
  13. SnakeLegs

    SnakeLegs New
    Builder

    Joined:
    Mar 5, 2018
    Messages:
    2
    Likes Received:
    0
    This looks amazing! I think this is going to be my first CNC build! Excellent work!

    My apologies if this has already been answered, but I've been looking through this build for about an hour now and can't seem to find it. Is there a ballpark total cost anywhere?

    Thank you!
     
  14. SnakeLegs

    SnakeLegs New
    Builder

    Joined:
    Mar 5, 2018
    Messages:
    2
    Likes Received:
    0
    Ok, nevermind. I just went through the BOM and calculated everything based on the included links. Looks like the grand total (not including shipping from the Open Build Part Store) is $1,599.95.

    Anyone have any sense of how the prices on the Open Build store compare to other sources. Some things seem very reasonable, and some seem quite expensive to me. But it's been a few years since I've priced out this stuff.

    Thanks,
    SnakeLegs
     
  15. Chillimonster

    Chillimonster Well-Known
    Builder

    Joined:
    May 6, 2015
    Messages:
    153
    Likes Received:
    81
    Just sorting my electronics for my 1000 x 1000 Sphinx

    Laptop —-> Arduino —-> DQ542MA —-> Nema 23 (265 oz)

    First off thanks for a superb connection guide kyo.

    However I have a problem when doing a dry run set up on the bench

    On my old dual belted ox I could quite happily run at 4000mm min all day long. But I tended to run at 3500mm minute

    However not so on the current setup
    I have tried to run at 4000mm (loose steppers on bench) and it ramps up to speed and ‘stalls’

    Not that I am going to run it at that speed but still happens at 3500.

    At 3000mm min it will run fine and have done a full 30 min dry run on the bench without issues.

    I have tried different microstepping with the same results. And happens on all controllers / axis / steppers

    I am thinking that although the steppers are more powerful the pps is lower resulting in the problem I’m getting.

    Pics of old and new steppers attached.
     

    Attached Files:

  16. NeeqOne

    NeeqOne Well-Known
    Builder

    Joined:
    Mar 3, 2018
    Messages:
    46
    Likes Received:
    27
    I am thinking of building a 1000mm x 750mm Sphinx. Does it matter if the X or Y is the longer side? Thanks.
     
  17. Kyo

    Kyo Veteran
    Staff Member Builder Resident Builder

    Joined:
    Feb 27, 2014
    Messages:
    673
    Likes Received:
    699
    Either axis can be used as the longer axis just depends on your projects and available space. I know of at least one build that went with a 750 Wide x-axis and kept the standard 500 y-axis. I prefer to make the x-axis ( moving gantry ) the shortest due to the increased rigidity / shorter span between y plates. A longer y-axis is relatively simple given it is a fixed axis that does not move. However either option is possible.
     
    Michael.M and NeeqOne like this.
  18. John Christian Lien

    Builder

    Joined:
    Dec 14, 2016
    Messages:
    20
    Likes Received:
    9
    So i have a question for Kyo. My C-Beam Sphinx are now done and running. I added the spoilerboard today and surfaced it using a 37mm surfacing bit. After the job is done i am left with tiny ridges on the spoilerboard. Wondering how i should go about for fixing this? Someone on facebook said that my machine might need tramming, but is there such a function on the c-beam sphinx?

    Added a picture of my cut settings in easel, however the "depth per pass" is not 4mm. I had already cut of 3.9mm before. So the real "depth per pass" is 0.1mm. 29136172_10155137575280614_613713550577238016_o.jpg 32835008_10155289676940614_4762638648409587712_o.jpg 33121557_10155289677040614_3551818592355876864_o.jpg 33302291_10155289676830614_6823056003580297216_n.jpg
     
  19. Davey Rance

    Builder

    Joined:
    Mar 4, 2015
    Messages:
    32
    Likes Received:
    16
    Tramming is the process of making sure that your spindle is square and straight up and down. Normally it is done using very thin shims.
     
    Kyo likes this.
  20. wiremonkey

    Builder

    Joined:
    Mar 23, 2017
    Messages:
    40
    Likes Received:
    12
    In Kyo's design, you can tilt the z-axis assembly in the x direction by loosening the screws that hold the x-axis wheel assembly to the z assembly. Put a square from a level spoil board. The y tramming can be adjusted by loosening the 8 screws that hold the c-beam to the gantry plates. There is enough play that you can tilt the whole c-beam back and forth in the y direction to get it level. Sorry if this was self-evident. If for some reason you can't achieve squareness with these two adjustments, then you'd have to add some shim stock to get it right. Good luck!
     
    Michael.M and Kyo like this.
  21. John Christian Lien

    Builder

    Joined:
    Dec 14, 2016
    Messages:
    20
    Likes Received:
    9
    Thanks for the info so far. If i were to loosen those 8 screws that hold the c-beam to the gantry plates i would need to take down the x-axis (y-axis in usa) to be able to get to the screws between those two plates.. Seems like an afterthought on the design as many other cnc machines have adjustmentscrews on the front, so you dont have take a lot of the machine apart.. I have sent my c-beam xl gantry plate and the spindle holder to a local machine shop for some modifications, so that i can adjust it side to side with 4 bolts. If successful, i will post a video in my c-beam machine thread. I can also post a picture under here if permited.

    Also.. With the kyo design.. How do I square up the X and Y axis if they are say a mm out of alignment?
     
  22. wiremonkey

    Builder

    Joined:
    Mar 23, 2017
    Messages:
    40
    Likes Received:
    12
    If you square up those many, hard to get at, m5 screws that hold the Z assembly to the X assembly, you should be good to go. It can be tricky to get it exact, hell, even slight variations in the tension of the eccentric bushings can skew things a bit. The next step toward enlightenment would be to use something like linear rails, more expensive, and pre-level the mounting surfaces with an epoxy or by filing or shims.
    I'm not sure I understand your final question. Can you elaborate and be more specific.
    Cheers,
    Tyler
     
  23. John Christian Lien

    Builder

    Joined:
    Dec 14, 2016
    Messages:
    20
    Likes Received:
    9
    I would love to go with linear rails as well.. but i have built Kyo's machine now, and intend on using that as long as possible. Here is a video that somehow answers my question, but its when he makes the final adjustments (at the end of the video) i get confused, since he is using a different system than me.. He is using some sort off ballscrew and i am using leadscrews.

     
    Jdog and Kyo like this.
  24. Metalguru

    Metalguru Veteran
    Builder

    Joined:
    Dec 29, 2015
    Messages:
    752
    Likes Received:
    547
    It's exactly the same principle, regardless of the type of drive. His machine uses Rack and Pinion drive, and he is just adjusting the position of one side of the gantry so it is square. With a rack and pinion, there is a gear on the motor, and a rack (straight gear teeth instead of round) on the axis. All he does is rotate the motor a bit using a "spanner" to move the axis.

    You can do the same thing by just grabbing the flex coupling on your motor and rotating it to move only one side of the axis. I usually do this by just putting the gantry close to the front, and using a precision rule to measure the distance from the gantry plate to the end of the Y rail extrusion on each side. They should be equal. If not, just manually rotate one of the Y axis leadscrews until the measurements are equal, and your gantry is square.

    Note that crashing your machine into the end stops can cause this to shift, so unless you have hard stops like he does you may have to repeat this process regularly. I always check for square as above just before doing a critical job to make sure the gantry is square.

    MG
     
    Kyo likes this.
  25. John Christian Lien

    Builder

    Joined:
    Dec 14, 2016
    Messages:
    20
    Likes Received:
    9
    Thanks for all the info Metalguru! That actually sounds very logical when i think about it lol.. Thanks a bunch! One few detail though.. When i adjust one of the couplings, wont it just "spring back" to where it was once i start to run it?

    I dont have any hardstops as of yet, but i do have 2 limitswitches per axis.. Maybe i should add some hardstops aswell?

    - John.
     
  26. Metalguru

    Metalguru Veteran
    Builder

    Joined:
    Dec 29, 2015
    Messages:
    752
    Likes Received:
    547
    No, it won't spring back unless your gantry wasn't assembled square to begin with, ie the ends of the c-beam weren't cut square. You should have your enable lines on the stepper drivers wired up so the controller keeps some motor current in the motor even when it is stopped. Usually, the stepper driver has a setting for hold current which is turned on when the enable line is de-asserted. This prevents things like spring back and moving the axis if it gets bumped during operation.

    By rotating the motor by hand, you are just adding or subtracting a couple of steps from just that motor. When the controller moves the motors, they will remain in synch.

    Hard stops are handy in some cases, but in order for limit switches to work properly the hard stops can't actually make contact before the limit switches. It's usually one or the other. You could disable the limit switches, square the gantry against the hard stops, and then re-enable the switches.

    I find it easier just to use the measuring method.

    MG
     
  27. Metalguru

    Metalguru Veteran
    Builder

    Joined:
    Dec 29, 2015
    Messages:
    752
    Likes Received:
    547
    No, it shouldn't "spring back". Each side of the Y axis is driven independently, the controller doesn't know if you do a manual adjustment on one of the motors. It will stay in synch unless something happens to cause one motor to lose steps.

    I would highly recommend using the Enable function on your stepper drivers and wiring them up to the GRBL controller motor enable output. This causes the controller to disable the motors when they are not moving, and the stepper driver usually either has an automatic hold current function or a switch setting that keeps a low current on the motors when they are not moving. This "locks" the motors and prevents the motors from losing synch if the gantry is bumped, etc.

    As far as hard stops, if you have limit switches it's hard to get the stops and switches adjusted so they work together. Normally, the machine hits the limit switches in order to prevent it crashing into the hard stop, so the limit has to activate first. In this case it won't ever get to the hard stop. You could disable the limits, run the machine up against the hard stops, then re enable the limits. This is a bit of a pain, so I just prefer the measurement method.

    MG
     
  28. James_Hopkins

    Builder

    Joined:
    Jul 16, 2015
    Messages:
    28
    Likes Received:
    6
    Where can I find a fusion 360 drawing of the phinx?
    I’m going to start cutting the plates and use fusion 360 for cad and cam. I can’t seem to get the sketch up file into fusion so I can cut it out on my C-beam.
     
  29. Kyo

    Kyo Veteran
    Staff Member Builder Resident Builder

    Joined:
    Feb 27, 2014
    Messages:
    673
    Likes Received:
    699
    Files and drawings tab top of this build. Within the zip you will find the fusion files for the plates..
     
  30. James_Hopkins

    Builder

    Joined:
    Jul 16, 2015
    Messages:
    28
    Likes Received:
    6
    I cant open the file till i get home tonight but i see the fusion 360 files now.
    are these the Rev 2 plates that are 2" taller?
     

Share This Page

  1. This site uses cookies to help personalise content, tailor your experience and to keep you logged in if you register.
    By continuing to use this site, you are consenting to our use of cookies.
    Dismiss Notice