Welcome to Our Community

Some features disabled for guests. Register Today.

The Plastic Beast CoreXY Printer

Discussion in '3D printers' started by cdsmith12, Feb 28, 2018.
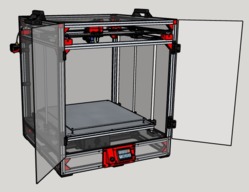
  1. cdsmith12

    cdsmith12 New
    Builder

    Joined:
    Aug 19, 2016
    Messages:
    6
    Likes Received:
    15
    cdsmith12 published a new build:

    Read more about this build...
     
  2. Gregg du Plessis

    Builder

    Joined:
    Jun 8, 2017
    Messages:
    1
    Likes Received:
    0
    Hi - So I'm highly interested in building one of these printers - can you tell me, You designed it to use 2 lead screws - but I see you've added 2 more in your last pictures - any further updates? Thanks
     
  3. cdsmith12

    cdsmith12 New
    Builder

    Joined:
    Aug 19, 2016
    Messages:
    6
    Likes Received:
    15
    When I originally put it together I had a total of 4 lead screws. I didn't think this was necessary and I wanted to use smoothieware, so I went to 2. works fine with 2
     
  4. Triphazard

    Builder

    Joined:
    Sep 21, 2017
    Messages:
    1
    Likes Received:
    0
    I really like the look of this build and was thinking this is perfect for my needs and want to build it.

    Just wondered what the youtube video was, as it says its not available.

    Cheers.

    Trip
     
  5. Kevon Ritter

    Kevon Ritter Veteran
    Builder

    Joined:
    Apr 30, 2015
    Messages:
    597
    Likes Received:
    293
    Did you ever get this build running? I'm curious about the overall rigidity. I have a surprisingly similar design, but smaller (260x260x435). Except, I'd opt for cast corners instead of printed.

    Aside from that, axial fans don't do good as compressors, and can even experience complete flow reversal. There are a million similar part cooling shroud designs everywhere, but how many actually check to see if they are working?! Make sure your part cooler is actually blowing. Check out this example.
     
  6. adonai

    adonai New
    Builder

    Joined:
    Apr 6, 2018
    Messages:
    2
    Likes Received:
    0
    Hi, analyzing project, I feel you miss talk about two things, how did you glue heatbed on aluminum plate and Y endstop... Could you show us?
     
  7. Matthew Austin

    Builder

    Joined:
    May 29, 2018
    Messages:
    2
    Likes Received:
    0
    Adonai - The silicone pad has an adhesive layer, so you just peel and stick.
     
  8. Matthew Austin

    Builder

    Joined:
    May 29, 2018
    Messages:
    2
    Likes Received:
    0
    I'm curious as to the layout of the print platform. Your specs call for a 505mm x 505mm table, but the t-slot is 505 x2 and 460 x2. You're 5mm out of square. Is this intentional? is there supposed to be an overlap on short side? Just curious.
     
  9. CSVeldman

    CSVeldman New
    Builder

    Joined:
    Apr 9, 2018
    Messages:
    4
    Likes Received:
    0
    Hi Chris, thanks for this built, it looks awesome and just what I'm looking for. I've been considering to build mine for some time...and I'm busy putting the BOM together. Am I interpreting the BOM incorrectly? You show
    12 x 2020_3_Way_Corner
    4 x 2020_2_Way_Corner

    I count the other way round.

    4 x 2020_3_Way_Corner
    12 x 2020_2_Way_Corner

    Is this a BOM typo or am i reading the plans wrong?

    Ian
    [email protected]
     
  10. cdsmith12

    cdsmith12 New
    Builder

    Joined:
    Aug 19, 2016
    Messages:
    6
    Likes Received:
    15
    I have not been around for a while so this answer is really late. The heater was self adhesive, so I just cleaned the bottom of the Heatbed and stuck it on. It has been on for almost 2 years with no issues.

    The X and Y endstop brackets and switches are visible in the pictures, so I am not sure what you need me to explain.
     
    #10 cdsmith12, Jan 1, 2019
    Last edited: Jan 1, 2019
  11. cdsmith12

    cdsmith12 New
    Builder

    Joined:
    Aug 19, 2016
    Messages:
    6
    Likes Received:
    15
    My numbers are correct. The bottom 2 levels and the top level all have 4 3 way corners each, the gantry level has 2 way corners due to the motor and rod holders.
     
  12. CSVeldman

    CSVeldman New
    Builder

    Joined:
    Apr 9, 2018
    Messages:
    4
    Likes Received:
    0
    Hi Chris

    Yes indeed, your numbers are correct.
     
  13. CSVeldman

    CSVeldman New
    Builder

    Joined:
    Apr 9, 2018
    Messages:
    4
    Likes Received:
    0
    Chris

    Comment:
    Can you make an example Smoothie Config file available. I'm sure it will be of benefit to all.

    Question:
    I should have asked this before I started my build: Do yo know if the firmware is compatible with "Repetier Host"?
     
  14. cdsmith12

    cdsmith12 New
    Builder

    Joined:
    Aug 19, 2016
    Messages:
    6
    Likes Received:
    15
    Actually, I had been having some jamming problems at the end of the Bowden tube at the E3D v6. I tried fans and adjusting retraction time and length, but still having issues.

    Due to the lack of support for the MKS Sbase firmware, just yesterday, I started setting up Marlin 2 for the MKS Sbase. I just stated so it will most likely take me a few days, but I will update when I get it going.

    And yes both Smoothieware and Marlin are compatible with Repeiter Host
     
  15. CSVeldman

    CSVeldman New
    Builder

    Joined:
    Apr 9, 2018
    Messages:
    4
    Likes Received:
    0
    When I started with 3D printing, at one stage I had hot-end jamming problems...It showed symptoms that the nozzle was clogging up. What actually happened was that the hot-end was heating up...not cooling enough, so the filament before the nozzle goes soft and can't be pushed through.

    My E3D v6 with it's 12 V fan seems okay...I do get that my nozzle clocks up some times, but that is when I use a 0,4 mm nozzle for filaments like CarbonFill, by Form Furura (love this filament for parts) or Woodfill. I now use 0,5 mm nozzle for these filaments.

    Maybe you could use a laser thermometer to measure the hot-end temperature? They are quite cheap online and handy...
     
  16. Daniel Stewart

    Builder

    Joined:
    Jan 27, 2020
    Messages:
    9
    Likes Received:
    3
    #16 Daniel Stewart, Aug 5, 2021
    Last edited by a moderator: Aug 5, 2021
  17. Peter Van Der Walt

    Peter Van Der Walt OpenBuilds Team
    Staff Member Moderator Builder Resident Builder

    Joined:
    Mar 1, 2017
    Messages:
    13,989
    Likes Received:
    4,107
    Check the Files and Drawings tab above, the original Builder seems to have posted the CAD models there, and you can open it in Sketchup Make 2017 (Free) and see for yourself?
     
  18. Daniel Stewart

    Builder

    Joined:
    Jan 27, 2020
    Messages:
    9
    Likes Received:
    3
    that what exactly i did and i dont see the y endstop bracket. is it inside the hotend assembly??
     
  19. Daniel Stewart

    Builder

    Joined:
    Jan 27, 2020
    Messages:
    9
    Likes Received:
    3
    just found it via filter wasnt east but i got it.now according to picture the one side of belt seems to cross is that correct?
     
  20. Mohamed Alaaeldin

    Builder

    Joined:
    May 14, 2022
    Messages:
    1
    Likes Received:
    0
    can you send the link of the video
     
  21. capnobvious66

    Builder

    Joined:
    Nov 6, 2023
    Messages:
    1
    Likes Received:
    0
    This build seems AMAZING. Thank you for putting it up here and all the work you put into it. Im really new to 3d printing in general. I started around 4 months ago and am already 3 printeres deep lol. I found your build and decided to give it a shot. Im just getting started. I have cut the aluminum last night and have the 2020_3_Way_Corners priting while I'm typing this. Cant wait to get it up and running!
     

Share This Page

  1. This site uses cookies to help personalise content, tailor your experience and to keep you logged in if you register.
    By continuing to use this site, you are consenting to our use of cookies.
    Dismiss Notice