Welcome to Our Community

Some features disabled for guests. Register Today.

My first printer

Discussion in '3D printers' started by Jacques D, Dec 13, 2017.
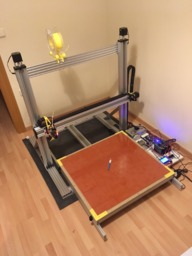
  1. Jacques D

    Jacques D New
    Builder

    Joined:
    Oct 9, 2016
    Messages:
    49
    Likes Received:
    13
    Jacques D published a new build:

    Read more about this build...
     
  2. JustinTime

    JustinTime Veteran
    Builder

    Joined:
    Dec 18, 2013
    Messages:
    758
    Likes Received:
    253
    Wow!!! €2000 is a lot of money. You can buy excellent printers for less than that. Why did you decide to go this route?
     
  3. Scotty Orr

    Scotty Orr Journeyman
    Builder

    Joined:
    May 21, 2015
    Messages:
    315
    Likes Received:
    177
    Nice-looking printer (heavy duty)! Regarding your "ghosting": I am guessing that the face you are showing the camera had the ripples parallel (as opposed to perpendicular) to the printbed, correct? If so, then if that "Y" face was facing one of the sides while printing, it is most likely your X-axis that is causing the problem. You might check backlash on that axis. (If the Y was facing the front or back of the printer, then I would agree it is a problem with your Y-axis.)
     
  4. Scotty Orr

    Scotty Orr Journeyman
    Builder

    Joined:
    May 21, 2015
    Messages:
    315
    Likes Received:
    177
    I just looked again - that first picture indicates that the face shown was facing up when printed. In that case, it could be also an extrusion problem (even though there may be some motion issues as well).

    What was the exact orientation of that part when you printed it? If it was facing up, and all 4 sides look good (flat), then it's likely and extrusion problem.
     
  5. Jacques D

    Jacques D New
    Builder

    Joined:
    Oct 9, 2016
    Messages:
    49
    Likes Received:
    13
    Well, I did underestimated the price. And once you start building a printer, there is no going back, not really. You can't ship the parts back for refund. So I had two choices: I give up the project, or I bite the bullet and spend more money to complete the build.
    Additionally, I had to buy a few equipment (tools are quickly expensive), and I made a few rookie mistakes that made the final price tag increase. If I had to build exactly the same printer now, with my knowledge and tools, it would probably cost 10 to 20% less. Still expensive, I know.

    Why didn't I buy an on-the-shelf printer ? Because I didn't find the printer I wanted in my price range (at least the price range I had in mind at the beginning of the project), and because I kinda wanted to design and build my own printer. Even if I used an existing design, I still had to think a lot on how to design and build my printer, and troubleshoot all the problems that came along... I learned so much more than if I had bought an on-the-shelf printer ! This is worse the price, according to me.


    Regarding the calibration cube, on the first photo of the printer: the X face was facing the photographer, the Y face was facing the "electronic board", and the Z face was upward.
    I really believe the ghosting comes from the heavy Y carrier, as all the improvements I made on this carrier improved the ghosting.
    I will double check the X-axis to be sure, but I really don't think it is the problem.

    EDIT : here is a photo of how the cube is positioned. I know the cube is crooked, but it is an old photo of an old cube, and it has been fixed since!
    X faces the photographer, Y is on the right, Z on top.

    IMG_3238.JPG
     
    #5 Jacques D, Dec 13, 2017
    Last edited: Dec 14, 2017
  6. Scotty Orr

    Scotty Orr Journeyman
    Builder

    Joined:
    May 21, 2015
    Messages:
    315
    Likes Received:
    177
    Simplify3D has a very good (pictoral) print quality trouble-shooting guide at Print Quality Troubleshooting Guide | Simplify3D Software
    RepRap.org also has one. You might check these to see if anything looks similar to what you are seeing.

    I would try printing some test cylinders (both solid and shells) as well as some shell cubes to get more samples. (Cubes oriented at 45 degrees might be worthwhile too.) I would also try different rolls of filament (from a different manufacturer if possible).

    Just so you know, I've had to do this sort of trouble-shooting a lot of times - and sometimes it can be pretty tricky to nail down exactly what is causing the problem. Here's a printer I designed and built: QuorXZ: A String-driven, Core XZ Printer

    Good luck!
     
  7. Jacques D

    Jacques D New
    Builder

    Joined:
    Oct 9, 2016
    Messages:
    49
    Likes Received:
    13
    Thanks for the tips!
    I won't be able to work on the beast before January, because the computer with everything related to 3d printing is unavailable right now.

    I'll try to keep this post up to date if I can get better results (which are, in my opinion, already pretty good, but I'm sure we can do better).
     
  8. DirkDG

    DirkDG New
    Builder

    Joined:
    Nov 9, 2016
    Messages:
    7
    Likes Received:
    0
    Hi Jacques

    In the meantime I have also my printer up and running. Same build as yours.
    My first prints were very good but once you start printing things that need a lot of movement I noticed that everything started to shift.
    I changed the accelaration from 3000 to 100 and now everything is fine. This will ad some print time but it is more important to have quality prints.

    Regards

    Dirk
     
  9. Jacques D

    Jacques D New
    Builder

    Joined:
    Oct 9, 2016
    Messages:
    49
    Likes Received:
    13
    Hello DirkDG,

    Thank you for the info! I can go up to 2000 mm/s/s without skipping steps, but I currently run at 1000 mm/s/s. X and Y jerk settings are currently at 10 mm/s.
    My biggest problem on my build is that big heavy Y-axis : with so much weight, I have ghosting problems.

    I don't have a lot of time right now to work on the printer, but I would like to try to add a second C-beam linear actuator to drive the Y axis, in order to improve my ghosting problem. I will probably use one of the actuator from the Z axis, to test before investing (if I can feel an improvement).
     
    #9 Jacques D, Jan 11, 2018
    Last edited: Jan 11, 2018
  10. Jacques D

    Jacques D New
    Builder

    Joined:
    Oct 9, 2016
    Messages:
    49
    Likes Received:
    13
    Quick update : I am trying the TMC2130 stepper driver, for now only on the X-axis. I will explain below how I wired it to my Rumba board, while being able to keep the LCD (it was the "tricky" part). This is still work/test in progress so be careful if you decide to give it a try

    As I said, I did not find the time to test everything, or even to play with all the functions. I haven't print anything yet with this stepper driver : I I only move X using the LCD controller.
    So far, SpreadCycle mode works, and StealthChop mode kind of works. In StealthChop mode, the motor runs properly (speed/acceleration OK, no skipped steps), but the problem is that it is way louder than SpreadCycle, or even my old M542 external stepper driver! I suspect some sort of resonance, but I still have to investigate.
    Why do I suspect resonance ? Because when I apply some sort of force in the opposite direction of the motion (if I try to "brake" the motion), the noise gets way way quieter !

    Maybe the problem comes from the fact that the motor runs faster than on most printers. Typically, to run at 50 mm/s, my motor needs to rotate at 375 rpm. On a Prusa clone (with belt and pulleys), it rotates 4 to 5 times slower to reach the same 50 mm/s speed.
    Maybe the TMC2130 is not capable to handle such speeds in StealthChop mode?

    Tonight, I will try to run the motor without load, and see if the noise is still loud or not.

    EDIT : I tried to run the TMC2130 in standalone mode, but the loud noise was still present.
     
    #10 Jacques D, Jan 11, 2018
    Last edited: Jan 11, 2018
  11. Jacques D

    Jacques D New
    Builder

    Joined:
    Oct 9, 2016
    Messages:
    49
    Likes Received:
    13
    In this post, I describe how I wired the TMC2130 for the X axis.

    This is a work in progress ! I haven't fully tested this method, so please be careful if you decide to give it a try.


    I started by looking at Tom's video (link below). Rumba is a derivative from the Ramps so it wasn't too difficult to wire the TMC2130. But, as Tom explains, you need to use the AUX2 connector (EXP2 for Rumba). Problem : I use this connector for my LCD controller.
    So I did some research to wire the TMC2130 without disconnecting the LCD.

    Basically, you need to use the SCK/MISO/MOSI pins from the ISP1 connector (which is not too far from the EXP2 connector), and define a pin from the EXP3 connector to plug the X CS pin. For that I decided to use the PC6 (A14) pin (Digital pin 31).

    Rumba_pinOut.png

    Next, you need to add a line in Marlin, in the file pins_RUMBA.h :
    #define X_CS_PIN 31

    To wire Y CS (or if you want to use another pin for X CS), you will find the pin mapping of the ATmega2560 chip (used in Rumba) here : Arduino - PinMapping2560
    For example, you can use the PC7 (A15) pin (digital pin 30) for Y CS, and add the line #define Y_CS_PIN 30 to pins_RUMBA.h

    Finally, make all the changes in Marlin that Tom describes in his video, and it should work.

    Again, I haven't tried everything. In particular, I did not print anything yet.
    However, currently the LCD controller is functional (although I haven't tried the SD card yet), and the X axis does move if I command it through the LCD controller.

    EDIT : according to this article : Arduino - SPI and if I understand properly, it is okay to use the ISP1 pins for SCK/MOSI/MISO :
    EDIT 2 : As you probably understood, I did not wire the endstop pin of TMC2130 (I want to keep my regular mechanical endstop), but that is pretty straightforward if you follow Tom's video.

     
    #11 Jacques D, Jan 11, 2018
    Last edited: Jan 11, 2018
  12. DirkDG

    DirkDG New
    Builder

    Joined:
    Nov 9, 2016
    Messages:
    7
    Likes Received:
    0
    Hi Jacques

    I will also try to improve my axes by adjusting or adding different lead screw nuts.
    I also have seen that it is possible to install the lead screw in tension. Now it is compression and they are not completely straight.
    Keep you informed about my progress too.
     
  13. Jacques D

    Jacques D New
    Builder

    Joined:
    Oct 9, 2016
    Messages:
    49
    Likes Received:
    13
    Exactly ! The parts I printed help, but it would be better if the leadscrew was in tension.

    Please keep me in touch!
     
  14. Jacques D

    Jacques D New
    Builder

    Joined:
    Oct 9, 2016
    Messages:
    49
    Likes Received:
    13
    DirkDG,

    If you have time to explain (or show) your idea on how to install the leadscrew in tension, I would appreciate !

    Thank you,
    Jacques

    EDIT: maybe the printed part I currently use to stabilize the screw could do the job, but it would probably fatigue and fail at some point. Maybe if I beef it up ?
     
    #14 Jacques D, Jan 11, 2018
    Last edited: Jan 11, 2018
  15. Jacques D

    Jacques D New
    Builder

    Joined:
    Oct 9, 2016
    Messages:
    49
    Likes Received:
    13
    Hello,

    Update on the TMC2130 : I was not able to reduce the very loud noise in StealthChop mode. I tried the same driver on the Y-axis, but it was also loud. I also tried to run the X motor without load, but it stall. Note that Trinamic does warn that this can occur with an unloaded motor.

    I can see two reasons for that loud noise:
    - a mistake of the wiring and/or the configuration of Marlin,
    - or "simply" that the TMC2130 is not suited for my printer (Nema 23 motors instead of the usual Nema 17, and high rpm).
    Or maybe both ?

    I suspect the second reason, but if someone can confirm (or correct !) my wiring, I would appreciate!
     
    #15 Jacques D, Jan 18, 2018
    Last edited: Jan 18, 2018
  16. Jacques D

    Jacques D New
    Builder

    Joined:
    Oct 9, 2016
    Messages:
    49
    Likes Received:
    13
    I also tried to put the leadscrew of the Y-axis in tension, using my printed parts.

    On each side of the C-beam linear actuator, I simply put the locking nut against the bearing that we see in the picture below, and tried to tension the leadscrew.

    I then printed a cube, but my ghosting problem is still present...

    Note that the printed parts were not design for that in the first place (they were only design to stabilize the screw with a bearing) so I could not tension the screw much, without risking to break the part.
    Would it help to tension the screw more ? Maybe, but I'm skeptic... I guess there is no way to suppress that problem with such a heavy bed...
    Unless you have suggestions?

    IMG_3885.JPG
     
    #16 Jacques D, Jan 18, 2018
    Last edited: Jan 18, 2018

Share This Page

  1. This site uses cookies to help personalise content, tailor your experience and to keep you logged in if you register.
    By continuing to use this site, you are consenting to our use of cookies.
    Dismiss Notice