Welcome to Our Community

Some features disabled for guests. Register Today.

OX Heavy Duty Build

Discussion in 'CNC Mills/Routers' started by Gary Caruso, Dec 11, 2016.
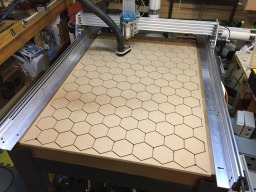
  1. Gary Caruso

    Gary Caruso OpenBuilds Volunteer
    Staff Member Moderator Builder

    Joined:
    May 19, 2016
    Messages:
    1,185
    Likes Received:
    531
    Had one of those AHA! moments yesterday! (I'm sure its obvious for you Pro's! :D )

    The plan all along was to figure out a simple way to go from SVG to cutting quick and simple being the key.. I thought I could use Easel from Inventables to do this, but didn't try it until yesterday.
    First try it didn't see my port? that's weird, reboot still not, installed the easel driver.. Ok now its working, Easel didn't even change my calibrations which I was worried about, because they use a 1 start acme screw not a T8*4 like we use. Easel can work with any GRBL machine, it's super simple and quick for this kinda thing, for making dimensional parts I like SketchUCam better.
    Here is the Process;
    1) find an image on the web (or draw yourself) drop it into Inkscape (free graphics program)
    2) Path/Trace Bitmap.. edge detection works well, adjust the threshold until you get the detail level you want (select the live preview box)
    3) Hit the Ok button, then delete the original pic which will be over the trace
    4) select the image go to Path/Dynamic Offset (i think this cleans it up some more)
    5) save the pic as an SVG (standard for Inkscape)
    6) open easel, Import SVG
    7) size the image to the work peice
    8) select the image, and set the depth of cut
    9) pic your bit, what i like to do is use a custom bit, make it 0.003" so Easel will not say the bit is too big for the fine lines(im using a small v-bit anyway) Pick your feeds and the usual setup, for this kinda thing i find that shallow is good, so 0.03" and in one pass is fine.
    10) Cut! all said this can be done in 10min

    Most of this is lifted from this video, but I change it by putting the svg direct into Easel which handles the G-code part.


    Here is what i did last night on some scrap MDF, it's about 6" square, took 4min to cut at 40IPM, with one pass 0.03" DOC and 10k RPM on the makita, engraving type cheap v-bit.
    IMG_3196.JPG
    from this... for personal test use only of course
    photo.jpg
     
    GrayUK likes this.
  2. Giarc

    Giarc OpenBuilds Team
    Staff Member Moderator Builder Resident Builder

    Joined:
    Jan 24, 2015
    Messages:
    2,912
    Likes Received:
    1,619
    I do something similar, but I use Fengrave, a free software. You can choose either v bit or regular engraving. To get the most accurate size, I crop the picture right at edge of the item I want engraved. You can actually skip the inkscape part and just load a bitmap. But, I like how inkscape's trace bitmap function makes the image look.
     
  3. Gary Caruso

    Gary Caruso OpenBuilds Volunteer
    Staff Member Moderator Builder

    Joined:
    May 19, 2016
    Messages:
    1,185
    Likes Received:
    531
    Thanks Giarc, Looks like i have to figure out F-engrave now too :) Easel is trying to incorporate V-carving soon
     
  4. Giarc

    Giarc OpenBuilds Team
    Staff Member Moderator Builder Resident Builder

    Joined:
    Jan 24, 2015
    Messages:
    2,912
    Likes Received:
    1,619
    Another way I am learning to carve photos into wood is using Fusion 360, but the photo/logo has to be in the .svg format. So far I have been able to get the drawing and the cam to look like it should work, but I get errors when trying to export the CAm to grbl.
     
  5. Gary Caruso

    Gary Caruso OpenBuilds Volunteer
    Staff Member Moderator Builder

    Joined:
    May 19, 2016
    Messages:
    1,185
    Likes Received:
    531
    Thanks Craig, I'm slowly trying to figure out Fusion.

    got my Dust shoe/boot.. thingy.. done tonight! more pics going into the build page..

    IMG_3208.JPG
     
  6. Giarc

    Giarc OpenBuilds Team
    Staff Member Moderator Builder Resident Builder

    Joined:
    Jan 24, 2015
    Messages:
    2,912
    Likes Received:
    1,619
     
  7. EfrainLenisMaturano

    Builder

    Joined:
    Mar 8, 2017
    Messages:
    9
    Likes Received:
    0
    pl
    please could you to indicate the box size?? Do you have any sketch??
     
  8. Gary Caruso

    Gary Caruso OpenBuilds Volunteer
    Staff Member Moderator Builder

    Joined:
    May 19, 2016
    Messages:
    1,185
    Likes Received:
    531
    For the torsion box? It is 49" long 37.5" wide and 4" thick. I do have a sketchup drawing. I can post next week. I am out of town this week.
     
    EfrainLenisMaturano likes this.
  9. EfrainLenisMaturano

    Builder

    Joined:
    Mar 8, 2017
    Messages:
    9
    Likes Received:
    0
    Ok thank you so much.
     
  10. EfrainLenisMaturano

    Builder

    Joined:
    Mar 8, 2017
    Messages:
    9
    Likes Received:
    0
    sorry for the confuse, I need the drive electronic box for the nema 23, please.
     
  11. Gary Caruso

    Gary Caruso OpenBuilds Volunteer
    Staff Member Moderator Builder

    Joined:
    May 19, 2016
    Messages:
    1,185
    Likes Received:
    531
    12x10x5" is the electronics, no problem
     
    EfrainLenisMaturano likes this.
  12. Gary Caruso

    Gary Caruso OpenBuilds Volunteer
    Staff Member Moderator Builder

    Joined:
    May 19, 2016
    Messages:
    1,185
    Likes Received:
    531
  13. Gary Caruso

    Gary Caruso OpenBuilds Volunteer
    Staff Member Moderator Builder

    Joined:
    May 19, 2016
    Messages:
    1,185
    Likes Received:
    531
    The hex pattern, looks cool, and to spread out the vacuum over a larger area, the torsion box is a vacuum table.
     
    GrayUK likes this.
  14. Giarc

    Giarc OpenBuilds Team
    Staff Member Moderator Builder Resident Builder

    Joined:
    Jan 24, 2015
    Messages:
    2,912
    Likes Received:
    1,619
    It does look cool!
     
  15. Gary Caruso

    Gary Caruso OpenBuilds Volunteer
    Staff Member Moderator Builder

    Joined:
    May 19, 2016
    Messages:
    1,185
    Likes Received:
    531
    Working on a birch ply F-clamp so far prototype working out well, helped me get more up close and personal with the SketchUCam "join G-code" feature.
    Had to do the pockets in one file then the cutout, and joint the files, worked great!
    more pics to come when it's done and cleaned up i will share the files.
    Loving the 3/16" bit, just rips though the 3/4" Baltic birch. doing 0.125" DOC, at 50IPM, could go faster or deeper for sure.

    IMG_3437.JPG IMG_3446.JPG
     
  16. Gary Caruso

    Gary Caruso OpenBuilds Volunteer
    Staff Member Moderator Builder

    Joined:
    May 19, 2016
    Messages:
    1,185
    Likes Received:
    531
    turned out good for a prototype, couple things I want to change but this is perfectly use-able.

    IMG_3454.JPG IMG_3455.JPG IMG_3456.JPG IMG_3457.JPG IMG_3458.JPG IMG_3459.JPG
     
    Joe Santarsiero, GrayUK and Molioni like this.
  17. Molioni

    Molioni New
    Builder

    Joined:
    Jul 15, 2016
    Messages:
    3
    Likes Received:
    2
    That F-clamp is awesome, as is the build. Thanks for sharing
     
  18. Gary Caruso

    Gary Caruso OpenBuilds Volunteer
    Staff Member Moderator Builder

    Joined:
    May 19, 2016
    Messages:
    1,185
    Likes Received:
    531
    Been really busy with work, but have been cranking out some fidget spinners for my kids, fun little projects. Going from drawing to cutting with my kids gives them some appreciation for the machine and they start to see what is possible. Now they come to me almost every day with new project ideas. The material is from Inventables, don't bother with the spinner kit, just get the 12x24" sheets of the 1/4" thick HDPE they have a bunch of color combinations, and use roller-blade bearings for the spin part.. the steel balls on mine are 8mm BB's got them from the trash at work! To make the bearings spin free take the shields off and dissolve the grease with mineral spirits. The black one was the first one just to test the fit. using a 2 flute up cut 1/8" and 1/16" carbide 50 IPM and 1/16" DOC
     

    Attached Files:

    GrayUK likes this.
  19. WildBill

    WildBill Well-Known
    Builder

    Joined:
    Feb 4, 2017
    Messages:
    52
    Likes Received:
    40
    I mad a dual purpose fidget spinner, spin it or open beer bottles. I saw the design some time back and can't remember where. IMG_0430-resizedM.jpg
     
    GrayUK and Grantman like this.
  20. Gary Caruso

    Gary Caruso OpenBuilds Volunteer
    Staff Member Moderator Builder

    Joined:
    May 19, 2016
    Messages:
    1,185
    Likes Received:
    531
    very cool bottle opener! and i like the idea of a utility spinner!
     
  21. Gary Caruso

    Gary Caruso OpenBuilds Volunteer
    Staff Member Moderator Builder

    Joined:
    May 19, 2016
    Messages:
    1,185
    Likes Received:
    531
    Did some Trochoidal milling today, just doesn't seem possible when it starts cutting that DOC, amazing..
    Using Estlcam to make the g-code, makes trochoidal cutting so easy!. Draftsight for the dxf file, UGS Platform for control. If you don't know what or why trochoidal is used Estlcam.com has a great video explaining why you want it for metal cutting.
    Got these sweet 1/8" carbides for $4 each on ebay, 3 flute is much stronger than 2 flute makes these nice little ribbon chips in the 6061.
    3flute here ebay link

     
    GrayUK likes this.
  22. GrayUK

    GrayUK Openbuilds Team Elder
    Staff Member Moderator Builder

    Joined:
    May 5, 2014
    Messages:
    1,668
    Likes Received:
    627
    I love watching Estlcam creating a thread. :)
    It's a hell of a good program, especially for the price! :thumbsup::thumbsup:
    Gray
     
    Grantman likes this.
  23. Gary Caruso

    Gary Caruso OpenBuilds Volunteer
    Staff Member Moderator Builder

    Joined:
    May 19, 2016
    Messages:
    1,185
    Likes Received:
    531
    Finished my new mount today, mostly happy with the outcome.
    I cut the mount hoops before i tried Climb cutting ( :banghead: ). I did the mount plate (1/4" part) in climb with a 5% finish pass and that makes a huge difference in the surface finish (no kidding).
    Also i would move the clamp bolt a bit so it doesn't interfere with the mounting bolt under it, so right now there are 3 bolts on each hoop instead of 4. Plenty strong but could be better.
    For the finish i used my wire wheel on the hoops and just scotch-brite green on the plate, file to break the edges. Maybe next time i'll try a chamfer.
     

    Attached Files:

    Grantman likes this.
  24. Smfuller

    Smfuller New
    Builder

    Joined:
    Jan 8, 2018
    Messages:
    2
    Likes Received:
    0
    Like the build do u have the file for the hex spoiler board
     
  25. Gary Caruso

    Gary Caruso OpenBuilds Volunteer
    Staff Member Moderator Builder

    Joined:
    May 19, 2016
    Messages:
    1,185
    Likes Received:
    531
    yes, I should do it over in estlcam, as sketchucam made the path all over the place, but it worked.. Two files one is the holes the other is the hex path. What you need will differ depending on the size of your waste board.
     

    Attached Files:

  26. Smfuller

    Smfuller New
    Builder

    Joined:
    Jan 8, 2018
    Messages:
    2
    Likes Received:
    0
    Awspme thanks working on my veey first build hopefully i can figure out how to do this spoiler board lol
     
  27. Gary Caruso

    Gary Caruso OpenBuilds Volunteer
    Staff Member Moderator Builder

    Joined:
    May 19, 2016
    Messages:
    1,185
    Likes Received:
    531
    Haven't posted much on this build in a while.
    Ox has been working great, switched software to 100% Estlcam for CAM and machine control and I use Draftsight, Autocad, or Inkscape to make the drawings.
    Here is a recent project cutting some baltic birch.
    Spindle speed is at 3.5 on the makita (about 19k rpm), 3mm DOC, 1800mm/min, 3/16 2 flute upcut, makes some strings but the edge is real clean.
    I used 8mm long 2mm thick tabs on the cutouts.

     
    Giarc, GrayUK and MaryD like this.
  28. Gary Caruso

    Gary Caruso OpenBuilds Volunteer
    Staff Member Moderator Builder

    Joined:
    May 19, 2016
    Messages:
    1,185
    Likes Received:
    531
    Just did a new spindle hoop as one of mine cracked (still usable), was a design flaw.. so new one leaves more meat for the clamp screw.
    Was trying a new formula for cutting this 1/2" plate on my belt driven machine.. can't slot that deep even with a 1/4" endmill, too much chatter.
    last time i had good luck with a three flute 1/8" endmill, using 1000mm/min and 4mm depth per pass (yes 4mm, Trochoidal Milling) and 50% tool width 5% tool dia cut per loop.

    This time I wanted to do it in two passes, so I tried 6.5mm depth per pass. Had one heck of a time, keeping the aluminum from welding to the 3 flute! Had to stop every minute to clean the bit.
    I think at 6.5mm depth the 3 flute can't keep up with chip removal.
    Switched to the O-flute 3mm from drillbitsunilimted.com and had no more issues, running the makita at 4 setting on rpm's.
    Finish pass is 500mm/min and .08mm engagement with 6.5mm depth per pass. Using Climb Milling, finish is better for me that way.
    Cheers
    Gary

     
    Giarc and GrayUK like this.
  29. Giarc

    Giarc OpenBuilds Team
    Staff Member Moderator Builder Resident Builder

    Joined:
    Jan 24, 2015
    Messages:
    2,912
    Likes Received:
    1,619
    This is great info since I use Estlcam and have the Makita. Thank you!
     
  30. Gary Caruso

    Gary Caruso OpenBuilds Volunteer
    Staff Member Moderator Builder

    Joined:
    May 19, 2016
    Messages:
    1,185
    Likes Received:
    531
    Finished the new improved Makita mount Sunday, turned out good.
    things I could still do better,
    1) finish pass should be with the 3 or 2 flute endmill not the o-flute (o-flute makes a rough texture finish, like 120 grit)
    2) I need to start doing chamfer operations instead of hand filing to break the edges.
    3) Cut a blank on the table saw, CA glue it to some MDF and then not have to use tabs.

    Estlcam is awesome! in case you already didn't know..
    On the second hoop I wanted to run the 3 flute mill finish pass on the inside of the hoop, but I already moved it...
    So I used the "center find probe" feature on Estlcam for the first time, Worked Great! very impressive and easy to use.
    Wish I would have took video of it because it was so cool and easy. I was able to use the center as a start for a new file to run a finish pass on the inside of the hoop.
    Cheers
    Gary
     

    Attached Files:

    Scotty Orr, GrayUK and Rick 2.0 like this.

Share This Page

  1. This site uses cookies to help personalise content, tailor your experience and to keep you logged in if you register.
    By continuing to use this site, you are consenting to our use of cookies.
    Dismiss Notice