Welcome to Our Community

Some features disabled for guests. Register Today.

Software speed control of a brushless dc (Bldc) motor from Mach3.

Discussion in 'Other Builds' started by Tweakie, May 21, 2014.
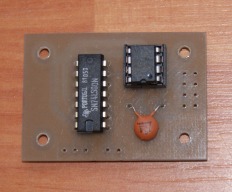
  1. Tweakie

    Tweakie OpenBuilds Team
    Moderator

    Joined:
    Jan 18, 2014
    Messages:
    784
    Likes Received:
    326
    Tweakie published a new build:

    Read more about this build...
     
  2. 3DMON

    3DMON New
    Builder

    Joined:
    Nov 8, 2013
    Messages:
    51
    Likes Received:
    22
    I am looking forward to this. I've never played with PIC though.
    Cool stuff Tweakie!
     
  3. Tweakie

    Tweakie OpenBuilds Team
    Moderator

    Joined:
    Jan 18, 2014
    Messages:
    784
    Likes Received:
    326
    Hi 3DMON,

    Very nice to see you here - I have been following your exploits on the Phlatforum over the last few years with great interest. :thumbsup:

    This project will start to unfold as I get further along. So far I have only tested with a servo but I have now ordered a replacement outrunner for my Pond Flier - when it arrives (from China) I will perhaps be able to get down to some serious testing.

    I have isolation routed a couple of simple circuit boards (always make a spare) and one will be assembled up later on in the week - so far so good. ;)

    Tweakie.

    DSC01710a.jpg
     
  4. bit53b

    bit53b New
    Builder

    Joined:
    Mar 4, 2014
    Messages:
    24
    Likes Received:
    5
    brilliant :)

    what type of copper clad board are you using there for milling, is it HP?
     
  5. Tweakie

    Tweakie OpenBuilds Team
    Moderator

    Joined:
    Jan 18, 2014
    Messages:
    784
    Likes Received:
    326
    It's fibreglass but the actual grade of the material is unknown.

    Tweakie.
     
  6. David the swarfer

    David the swarfer OpenBuilds Team
    Staff Member Moderator Builder Resident Builder

    Joined:
    Aug 6, 2013
    Messages:
    3,275
    Likes Received:
    1,833
    strange coincidence, I was just thinking about this last week. except I'm thinking Arduino based hardware and was also thinking about monitoring the motor speed 'somehow' and using PID to maintain speed under load. could be just a coil next to the motor to generate a few volts that can be read into the A/D.

    a sideways thought is that a 450 size helicopter motor would be just about right for a spindle, light weight, high RPM, not expensive.
     
    Mark Carew likes this.
  7. Tweakie

    Tweakie OpenBuilds Team
    Moderator

    Joined:
    Jan 18, 2014
    Messages:
    784
    Likes Received:
    326
    Great thinking David - there has to be many different possibilities by which an outrunners speed can be computer controlled.
    I certainly like the PID idea of feedback to maintain speed under load. :thumbsup:

    Tweakie.
     
  8. Tweakie

    Tweakie OpenBuilds Team
    Moderator

    Joined:
    Jan 18, 2014
    Messages:
    784
    Likes Received:
    326
    Robert Hummel likes this.
  9. Robert Hummel

    Robert Hummel Custom Builder
    Moderator

    Joined:
    Nov 14, 2013
    Messages:
    978
    Likes Received:
    714
    What software do you use to generate the code for your PCBs as that is part of the puzzle I need to complete my Stinger PCB mill :)
    I know eagle has a plug in that generates g-code but have yet tried it
     
  10. Tweakie

    Tweakie OpenBuilds Team
    Moderator

    Joined:
    Jan 18, 2014
    Messages:
    784
    Likes Received:
    326
    Hi Robert,

    Eagle is best for auto layouts but for simple circuits like this I use FrontDesign for the .bmp then Aspire to vector the outline and create the GCode.

    Tweakie.
     
  11. Tweakie

    Tweakie OpenBuilds Team
    Moderator

    Joined:
    Jan 18, 2014
    Messages:
    784
    Likes Received:
    326
    After demonstrating the prototype to a friend, he suggested that a manual override switch (controlling the outrunner’s speed with a potentiometer) would be a nice addition as it would then also allow usage by those without PWM availability from their machine controllers.


    As the PIC12f683 incorporates an Analog to Digital module it would be a simple enough task to add a switch (Manual / Automatic) and then use a potentiometer (potential divider between 0V and 5V) to create the necessary 1mS to 2mS output pulses to drive the outrunner’s ESC.

    The switch and potentiometer could, of course, be substituted with a single rotary switch and fixed resistors to produce off and 3 or 4 pre-set speeds for the outrunner – there are many possibilities here.


    A further suggestion was made (on another forum) to use a GOV / ESC for the outrunner’s control as this could allow for (more or less) constant RPM under varying load conditions. GOV / ESC’s do require a bit of software setting-up but those using them with RC Heli’s tell me it is very easy to do and they work extremely well indeed. I have never used one so I need to do a bit more investigation into this possibility.


    Tweakie.
     
    Mark Carew likes this.
  12. 3DMON

    3DMON New
    Builder

    Joined:
    Nov 8, 2013
    Messages:
    51
    Likes Received:
    22
    Good ideas there Tweakie. I'm still following this thinking I will still build one some day. I was looking into programming PIC and I was hoping to find a simple inexpensive DIY or one I can buy programmer. What are you using for programming the chip?

    I've used gov mode in esc's in my heli's and that is a good idea. It isn't hard to do as the esc manual will tell you how to get into it.
     
  13. Tweakie

    Tweakie OpenBuilds Team
    Moderator

    Joined:
    Jan 18, 2014
    Messages:
    784
    Likes Received:
    326
    I am still using an extremely old Peter Crowcroft design PIC programmer but there are plenty of newer designs (complete with the prog. software) available on the bay - extremely cheap from China.

    Thanks for the info - I will start searching for a cheap GOV / ESC to experiment with. :)

    Tweakie.
     
  14. Robert Hummel

    Robert Hummel Custom Builder
    Moderator

    Joined:
    Nov 14, 2013
    Messages:
    978
    Likes Received:
    714
    Doing some awesome work here bud!
    :thumbsup:
     
  15. Tweakie

    Tweakie OpenBuilds Team
    Moderator

    Joined:
    Jan 18, 2014
    Messages:
    784
    Likes Received:
    326
    Thanks guys.

    I have now updated the build, adding a new circuit diagram to show the potentiometer speed control and PWM / Manual selector switch positions and I have also added a new HEX file (under the files tab) which covers the software changes as mentioned in post #11.

    Tweakie.
     
  16. Tweakie

    Tweakie OpenBuilds Team
    Moderator

    Joined:
    Jan 18, 2014
    Messages:
    784
    Likes Received:
    326
    This is the test rig that I have been using which shows the the PWM / Manual switch and the variable speed potentiometer fitted. As mentioned in the build the potentiometer could, if desired, be replaced with a rotary switch and fixed resistors giving x number of pre-set speeds.

    Tweakie.

    a1.jpg
     
  17. Mark Carew

    Mark Carew OpenBuilds Team
    Staff Member Moderator Builder Resident Builder

    Joined:
    Jun 28, 2013
    Messages:
    2,745
    Likes Received:
    2,410
    Nice setup Tweakie! Makes it so simple and easy to follow, thank you for sharing
    Mark
     
  18. Tweakie

    Tweakie OpenBuilds Team
    Moderator

    Joined:
    Jan 18, 2014
    Messages:
    784
    Likes Received:
    326
    Thanks Mark.

    I have now updated the files section of the build to add the Mach3 Gcode file for isolation routing the prototype PCB (as shown in post #3).

    Tweakie.
     
    Jestah and Robert Hummel like this.
  19. luisge

    luisge New
    Builder

    Joined:
    Oct 4, 2014
    Messages:
    6
    Likes Received:
    1
    Nice job! Thanks for sharing!
    luisge
     
  20. Macchp

    Macchp New
    Builder

    Joined:
    Mar 14, 2014
    Messages:
    42
    Likes Received:
    5
    Very nice job, Tweakie. Appreciated.
    I'll be using it in an upcoming OX build.
    Any possibility to share the PIC source code? I'll be interested in looking at it for another project I have in mind.
    (assembly is ok).

    BTW, anyone tested it with Cnc Xpro V2 and Grbl 0.9g yet?
     
  21. David the swarfer

    David the swarfer OpenBuilds Team
    Staff Member Moderator Builder Resident Builder

    Joined:
    Aug 6, 2013
    Messages:
    3,275
    Likes Received:
    1,833
    just so you all know, I am working on a 'clone' of this gadget for Arduino. I'll post the circuit and code when it is working.
     
    Jestah likes this.
  22. Tweakie

    Tweakie OpenBuilds Team
    Moderator

    Joined:
    Jan 18, 2014
    Messages:
    784
    Likes Received:
    326
    Way to go David.:thumbsup:
    Overall, the Arduino is easier for most folks to program so it will make for a better project for others to follow.

    Tweakie.
     
  23. Macchp

    Macchp New
    Builder

    Joined:
    Mar 14, 2014
    Messages:
    42
    Likes Received:
    5
    Good to know, David. I'm doing the same in the free time.
    I'll look forward to see what you will come out with.

    The original one with my cnc xPro didn't work, so I'm re-engineering the software keeping the same electronics.
    I managed to make it working, but far from being perfect and usable. I'm close, but still some fix and optimization is required.
    Free time, even if required, is always missing, so the progress is very slow. :(
    May be I'll end using your solution. :thumbsup:
     
  24. David the swarfer

    David the swarfer OpenBuilds Team
    Staff Member Moderator Builder Resident Builder

    Joined:
    Aug 6, 2013
    Messages:
    3,275
    Likes Received:
    1,833
    GRBL outputs a flat line 0 level when the motor is stopped, and I still have to check what happens at full speed. I am writing my code to handle this flat line state. Must still look to see what MAch3 and LinuxCNC do.
     
  25. Macchp

    Macchp New
    Builder

    Joined:
    Mar 14, 2014
    Messages:
    42
    Likes Received:
    5
    My experimental platform is based on GRBL Controller 3.0 and CNC xPRO.

    What I saw so far with my limited tools is that when the motor runs full speed, I get a pulse width close to 128 uSec (it might be 125) that decreases with the decrease of the speed until very, very short pulse that I cannot measure.
    As you said, at motor stop (M05 or S000), no signal at all.

    Summarizing, with motor running, the PWM cycle time is 128 uSec, and the duty cycle is spanning from 0 to 100% (or close). That's what I based my code on. (sorry if the terminology is not correct, I'm not an expert and try to explain while I'm learning).
    With those parameters I was able to make the ESC working, but especially at full speed the motor is not running smoothly. Need to see what happen.

    I didn't find if and how the output frequency is customizable from GRBL, so I started from the assumption it is not, and modified the micro code.
     
  26. David the swarfer

    David the swarfer OpenBuilds Team
    Staff Member Moderator Builder Resident Builder

    Joined:
    Aug 6, 2013
    Messages:
    3,275
    Likes Received:
    1,833
    according to this
    https://github.com/grbl/grbl/issues/328
    the pwm frequency can be changed to a lower value, this will make the minimum pulse length longer and then we can measure it reliably.
    it can even be set low enough to drive the ESC directly at 250Hz or so, but I am not convinced that is a good idea as the ESC will not inialize properly until it gets a steady 1ms pulse.
     
  27. Macchp

    Macchp New
    Builder

    Joined:
    Mar 14, 2014
    Messages:
    42
    Likes Received:
    5
    Thanks David. That will be a next trial if I cannot sort out it without re-compiling and re-flash the Xpro.

    Just tested my latest version of the program. It works pretty good with manual control, and connected to xPro it is ok from the command S000 to S900 (xPro is pre-set with S command from 0 to 1000). Above it, the program is not fast enough to catch the low level of the PWM, and loose control. At the max speed, xPro is giving a low level for just 0,5 uSec. Really tough to catch.
     
  28. Robert.sims

    Builder

    Joined:
    Jan 22, 2014
    Messages:
    29
    Likes Received:
    18
    Hi Tweakie
    First of all thanks for a great build. I am at the moment waiting for the er11 collet to make Roberts spindle.
    and thought I would use your idea for speed contol.
    I made the circuit on a prototype board and it works just great. So I thought I would cut the circuit board on my mill .

    Being careful I ran the gcode through my backplot programme and it makes the cuts backwards.
    as though the board is upside down. as the pic below
    Am I doing somthing wrong
    Thanks
    Bob

    board 1.png


    Sorry false alarm had my setting wrong in the prog :banghead::banghead::banghead:
     
    #28 Robert.sims, Feb 5, 2015
    Last edited: Feb 5, 2015
  29. Tweakie

    Tweakie OpenBuilds Team
    Moderator

    Joined:
    Jan 18, 2014
    Messages:
    784
    Likes Received:
    326
    There is always something that is sent to fool us. :ROFL:

    Good fortune with your project Robert. :thumbsup:

    Tweakie.
     
  30. David the swarfer

    David the swarfer OpenBuilds Team
    Staff Member Moderator Builder Resident Builder

    Joined:
    Aug 6, 2013
    Messages:
    3,275
    Likes Received:
    1,833
    determined some things this morning:
    the default PWM frequency is too high to be read reliably by the standard Arduino pulseIn() library call.
    said frequency can be slowed down using this info
    https://github.com/grbl/grbl/issues/328
    and setting the prescaler to 0x07 (1024) which makes the shortest pulse roughly 20us which should be easily measurable.
    however
    when set to max speed the PWM flatlines at 5 volts, and the documentation does not tell us what pulseIn() will do with that. it should timeout, but I don't know yet what it will really do. if the Eishkom power would stay on long enough I might get a chance to run some test code and find out. good thing I bought 2 Arduinos....

    also pushed up the numbers in GRBL and still havn't found acceleration nor top speed where a bare Nema23 will stall or lose steps (even with me holding the shaft for all I'm worth). think I have it up to 24000mm/min and 1200mm/s/s now and will push it more later. so far impressed with the BigEasyDriver on 24 volts.
     

Share This Page

  1. This site uses cookies to help personalise content, tailor your experience and to keep you logged in if you register.
    By continuing to use this site, you are consenting to our use of cookies.
    Dismiss Notice