Welcome to Our Community

Some features disabled for guests. Register Today.

Upgrading the “old” C-Beam machine

Discussion in 'CNC Mills/Routers' started by Ronald van Arkel, May 24, 2016.
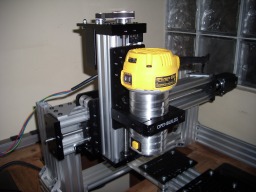
  1. Ronald van Arkel

    Staff Member Builder Resident Builder

    Joined:
    May 7, 2014
    Messages:
    472
    Likes Received:
    245
    Also, you can check out the resources: C-Beam™ Machine - Plate Maker and don't forget to take a look at the build videos too before you start putting all together ;).
     
  2. Moag

    Moag Veteran
    Staff Member Builder Resident Builder

    Joined:
    Mar 16, 2016
    Messages:
    183
    Likes Received:
    294
    Something kind of like this hey Kyo ;)
    @Z-Gantry v6.png
     
    Synths, silopolis, eddiejr and 4 others like this.
  3. Kyo

    Kyo Veteran
    Staff Member Builder Resident Builder

    Joined:
    Feb 27, 2014
    Messages:
    673
    Likes Received:
    699
    That is a awesome render!
     
  4. Ronald van Arkel

    Staff Member Builder Resident Builder

    Joined:
    May 7, 2014
    Messages:
    472
    Likes Received:
    245
    @Moag, that looks shiny, what software was used to get that render? :eek:

    I've just got into rendering with SketchUp and Vray 2.0 (demo):
    Promoveo_2016_0_6_510.jpg
     
    eddiejr likes this.
  5. Moag

    Moag Veteran
    Staff Member Builder Resident Builder

    Joined:
    Mar 16, 2016
    Messages:
    183
    Likes Received:
    294
    Fusion with a bit of playing around with the Appearance tab of the Step models and some time.;)
     
  6. Kyo

    Kyo Veteran
    Staff Member Builder Resident Builder

    Joined:
    Feb 27, 2014
    Messages:
    673
    Likes Received:
    699
    Nice ! both of your renders look so good. They put my export .png from sketchup to shame lol
     
  7. Moag

    Moag Veteran
    Staff Member Builder Resident Builder

    Joined:
    Mar 16, 2016
    Messages:
    183
    Likes Received:
    294
    That's totally awesome @Ronald van Arkel, your models in Sketchup was my main inspiration mate.:D
     
  8. Ronald van Arkel

    Staff Member Builder Resident Builder

    Joined:
    May 7, 2014
    Messages:
    472
    Likes Received:
    245
    upload_2016-6-30_1-29-28.png

    :D:p

    SketchUp sucks, pain in the behind for clean meshes, but it could be done, still, not any day soon again ;). We need a detailed DeWalt 611 and Bosch Colt, and not just STL to SKP; too many triangles :S. If some one feels like spending 3 to 4 weeks for each model it would be great :D.
     
  9. Moag

    Moag Veteran
    Staff Member Builder Resident Builder

    Joined:
    Mar 16, 2016
    Messages:
    183
    Likes Received:
    294
    Yep it's a bit like that, come over to the dark side Ronald.:p:);)
     
  10. Bob K

    Bob K New
    Builder

    Joined:
    Jun 2, 2016
    Messages:
    55
    Likes Received:
    20
    Yes, a 3 mil spacer makes it much better. A 4 mil spacer is definitely too much.

    thanks

    Bob
     
  11. Metalguru

    Metalguru Veteran
    Builder

    Joined:
    Dec 29, 2015
    Messages:
    752
    Likes Received:
    547
    Hey Bob:

    That looks like a #6 Robertson screwdriver you are using as a test rod...

    You must be Canadian, Eh?;)

    Yeah, you need those 3mm spacers under the nut blocks.
     
  12. Metalguru

    Metalguru Veteran
    Builder

    Joined:
    Dec 29, 2015
    Messages:
    752
    Likes Received:
    547
    Hey Ronald van Arkel:

    I just got an email back from Trish at the Parts Store, apparently they have withdrawn the belt drive reductions parts because:

    "We have been working on testing these parts and aren't happy with the results so we removed them from the OpenBuilds Part Store while we revisit them."

    You know anything about this?
     
  13. Metalguru

    Metalguru Veteran
    Builder

    Joined:
    Dec 29, 2015
    Messages:
    752
    Likes Received:
    547
    So how come this thread just got all mixed up timewise? The posts are all in a different order than they were yesterday... Some new posts are on page 1, and older posts on page 2?
     
  14. Ronald van Arkel

    Staff Member Builder Resident Builder

    Joined:
    May 7, 2014
    Messages:
    472
    Likes Received:
    245
    @Metalguru,

    Yes I was told the same today. I'm sure they still will sell them to you if you ask. I believe it has something to do with the large pulley being pulled towards the motor, still, if you have a 16mm drill you can just slap a bearing in the "belt reduction plate"; I know I will ;).

    Posts are in the same order, nothing got changed (not joking).

    -Ronald
     
  15. Metalguru

    Metalguru Veteran
    Builder

    Joined:
    Dec 29, 2015
    Messages:
    752
    Likes Received:
    547
    Maybe its just me.
    I was confused.
    Happens when you get old.
    Don't ever get old...
     
  16. Ronald van Arkel

    Staff Member Builder Resident Builder

    Joined:
    May 7, 2014
    Messages:
    472
    Likes Received:
    245
    Age is how you feel :D.
     
  17. Metalguru

    Metalguru Veteran
    Builder

    Joined:
    Dec 29, 2015
    Messages:
    752
    Likes Received:
    547
    Yeah, tell that to my knees...
     
  18. Metalguru

    Metalguru Veteran
    Builder

    Joined:
    Dec 29, 2015
    Messages:
    752
    Likes Received:
    547
    Hey Ronald van Arkel:

    Do you have the SketchUp model for that mounting plate? I haven't been able to find it...
    It looks like, from the pictures, that the hole in the plate is already more than 16mm.

    So, I'm not clear on the problem, that pulley is just substituted for the flex coupler, no? Its only a few mm from the existing bearing, is flex on the lead screw the issue or what? Would it help to use one of those flat 3 piece thrust bearings between the pulley and the C-beam end plate? I have a few of those kicking around somewhere...
     
  19. Ronald van Arkel

    Staff Member Builder Resident Builder

    Joined:
    May 7, 2014
    Messages:
    472
    Likes Received:
    245
    The hole where the Acme sticks out is 11mm:

    upload_2016-7-1_0-1-24.png

    The belt replaces the flex-coupling. The Acme rod gets pulled towards the motor and the belt might get un-lined when doing rapids as there is no tension pulley (3x 625 bearings works nicely)/spring. I believe that it's easy to add an eccentric spacer to the pulley for adjusting belt tension, plus adding the bearing will solve some flexing in the Acme screw. I believe bearings are your business, if I recall well, so you can easily find a good solution to this. Still, OpenBuilds wants to provide well working parts out of the box and this most likely is why they are not found in the shop at this time. OpenBuilds Mexico does have a few of these parts in stock but I tell people to use this setup only for the Z-axis (no high advances needed ;) ). I also recommend to add a plane where a set-screw will sit down on the Acme screw.

    -Ronald
     
  20. Metalguru

    Metalguru Veteran
    Builder

    Joined:
    Dec 29, 2015
    Messages:
    752
    Likes Received:
    547
    Thanks Ronald!

    Can you upload the actual model file, or point me to where I can download it, so I can do some simulations in Sketchup?

    No, I'm not in the bearing business, although I pretend to know something about them.;)

    I would think the slots for adjusting motor position would be enough for tensioning without adding the complexity of eccentrics and locking mechanisms, no?

    I do have some of those diamond shaped pillow block bearings, they may do the trick, although they are quite thick. I think the small 3-piece thrust bearings or perhaps just an additional 625 might do the trick... Since most of the force is radial instead of thrust, I am leaning towards the diamond shaped bearing. Only thing is it will raise the pulleys up by quite a bit and we may have problems with length of the motor shaft. That's why I need the model, and come to think of it, models of the pulleys as well if you have them.

    And, I am only planning this for the Z axis anyway at this time. I think the 2:1 speed reduction would be too much for the X and Z axis, it would slow the machine down significantly.
     
  21. gwandad

    gwandad Well-Known
    Builder

    Joined:
    May 12, 2014
    Messages:
    69
    Likes Received:
    55
    Don't whinge about getting old! Make the most of it, it will stop soon enough!
     
  22. Metalguru

    Metalguru Veteran
    Builder

    Joined:
    Dec 29, 2015
    Messages:
    752
    Likes Received:
    547
    I never whinge. Whatever that is...
     
  23. Jim S

    Jim S Well-Known
    Builder

    Joined:
    Jan 2, 2016
    Messages:
    41
    Likes Received:
    37
    Any news on this front? I've got a project in the works that would benefit from the belt reduction system. I'm looking forward to buying some!
     
  24. Metalguru

    Metalguru Veteran
    Builder

    Joined:
    Dec 29, 2015
    Messages:
    752
    Likes Received:
    547
    Jim S:

    Only Mark Carew would have the answer to that question.

    I believe SMW3D has the pulleys and plates in stock. Nope, just checked, they don't show any stock. The only place that has stock that I can see is Fuzztech.ca, a Canadian OpenBuilds dealer. You can probably get the pulleys and belts from Stock Drive Products, and possibly make the plate yourself?

    See My Solution to Belt Reduction Issues for my mods to the existing plate to make it more reliable. I picked up the set from Fuzztech.

    Good Luck!
     
    Jim S likes this.
  25. Ronald van Arkel

    Staff Member Builder Resident Builder

    Joined:
    May 7, 2014
    Messages:
    472
    Likes Received:
    245
    @Metalguru, I didn't see your topic earlier, but what you did with the 16x8x5 bearing is indeed what I was talking about. I saw you also took a file to the Acme screw to make a plane for the setcrew tip.

    @Jim S, I believe you can still get them from the OpenBuilds partstore if you tell them that you know that the plate isn't 100%. I personally like these plates and with some adjustments they are fine to use, hence, I never complained about it when I used it in my build, and yes, I'm picky ;). You have a nice looking avatar photo, something that holds 3 "arms", what is that?

    -Ronald
     
  26. Jim S

    Jim S Well-Known
    Builder

    Joined:
    Jan 2, 2016
    Messages:
    41
    Likes Received:
    37
    I haven't taken proper photos or published it yet, but I designed a hotrodded Delta 3D printer that I'm just putting the finishing touches on. I'll make a post just for it so that I don't hijack this one too badly :)

    Please forgive the "prototype" style wiring and blue tape. It's much more finished now, I just don't have decent pictures.

    [​IMG] [​IMG] [​IMG]
     
    Mark Carew, Kyo and Ronald van Arkel like this.
  27. Metalguru

    Metalguru Veteran
    Builder

    Joined:
    Dec 29, 2015
    Messages:
    752
    Likes Received:
    547
    Nice build Jim! Wow that thing is heavy duty...

    That's not v-slot, is it 80/20? But using v-slot wheels?
     
  28. Jim S

    Jim S Well-Known
    Builder

    Joined:
    Jan 2, 2016
    Messages:
    41
    Likes Received:
    37
    You're correct, it's not OpenBuilds rail. It's 1"x2" extrusion from FazTek (supposedly they were started by former 80/20 employees who weren't happy with the QC, plus they're a local company to me).
    These are Trick Trucks from the Trick Laser company, which are designed to use V-Wheels on 1" extrusions for Rostock Max 3D printers.

    [​IMG]
    [​IMG]

    I'll start a thread just for this build. I'll edit this post with a link to it when I've got it written up.
     
  29. Ronald van Arkel

    Staff Member Builder Resident Builder

    Joined:
    May 7, 2014
    Messages:
    472
    Likes Received:
    245
    Alright, after 3 months (I believe) I've got the bed of the machine in. It's 3/8" machined on both sides to 8.5mm. Spacing of the holes is 30mm. Now I'll need to get the cables, 1/8" collet and bits in to start making our own plates in OpenBuilds Mexico. We already have an older industrial CNC machine but it's slow and doesn't understand new G-code, plus it's clunky and bits/end-mills are hard to get/expensive. Might be a project to retrofit something modern soon ;).

    Some pictures:

    IMG_0103.JPG IMG_0102.JPG IMG_0101.JPG IMG_0100.JPG

    Sure I could polish the plate but it will scratch again as it's just 1100-T5 Aluminium.
     
    Synths, Kyo and Mark Carew like this.
  30. Ronald van Arkel

    Staff Member Builder Resident Builder

    Joined:
    May 7, 2014
    Messages:
    472
    Likes Received:
    245
    Hi Rick, I think it's clear now why I used the screws with the head down and the lock-nut up; gives more clearance underneath the machine and it's easier to fasten the nuts. The holes are big enough to put a socket in, yes, I thought about that ;).

    -Ronald
     

Share This Page

  1. This site uses cookies to help personalise content, tailor your experience and to keep you logged in if you register.
    By continuing to use this site, you are consenting to our use of cookies.
    Dismiss Notice