Welcome to Our Community

Some features disabled for guests. Register Today.

C-Bot

Discussion in '3D printers' started by Carl Feniak, Sep 29, 2014.
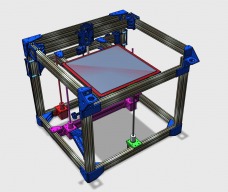
  1. Carl Feniak

    Carl Feniak Journeyman
    Builder

    Joined:
    Mar 18, 2014
    Messages:
    654
    Likes Received:
    246
    Yes that would be easier for me! If you didn't I would want to add it to the permanent files so it doesn't get lost in the forum.
     
  2. Elmo Clarity

    Elmo Clarity Journeyman
    Builder

    Joined:
    Jan 17, 2015
    Messages:
    505
    Likes Received:
    149
    Wheel Tightener by ElmoC
     
  3. Spiffcow

    Spiffcow Well-Known
    Builder

    Joined:
    Dec 27, 2015
    Messages:
    214
    Likes Received:
    92
    For the OpenSCAD and/or license legality folks: any preference on how to release an OpenSCAD library? I said I would start one soon and plan to follow through, but I'm not sure what would be of much use to the C-Bot stuff directly.. So far I have some key constants thanks to @Carl Feniak and a pretty nifty collection of functions for making VSlot extrusion openings and corresponding screw holes. The extrusion library seems more of a general purpose thing, where the constants file seems too limited to make into a library.

    Also, does anyone have opinions on licensing? Creative Commons is more of a content license, but would maybe be appropriate for a constants file.. I was thinking of making the VSlot library LGPL, but unfortunately there's no real linking system in OpenSCAD, so I'm not sure that would be correct either. I plan on releasing all my actual mods as GPL... would anyone object to the library files being GPL as well?
     
    #2643 Spiffcow, May 30, 2016
    Last edited: May 30, 2016
  4. AK Eric

    AK Eric Journeyman
    Builder

    Joined:
    Mar 31, 2015
    Messages:
    179
    Likes Received:
    129
    General FYI: Spent the whole long weekend getting RepRap Firmware installed on my Due/RADDS : it's been a... journey. Not 100% working yet, but I did make a pretty verbose guide to the process if anyone else ever wanted to give it a shot:
    Installing RepRap Firmware on RADDS

    And I have printed one cube :)
    Looks like I may have issues in my config other users don't that's causing my problems, but at least I can print again ;)
     
  5. wackocrash5150

    wackocrash5150 Well-Known
    Builder

    Joined:
    Jun 9, 2015
    Messages:
    102
    Likes Received:
    48
    Just a little semi-noteworthy project I'm attempting with my C-Bot. You see, I picked up Smoothieboard X5 a while back for my delta and really liked the ease of configuration file and all the extra outputs and pins. I have a few fans ect ... all with M-codes for them. Well I'd like the same thing for my C-Bot but can't bring myself to splurge for another Smoothieboard when the Arduino/RAMPS is perfectly capable. I looked at the RRD fan extender but it only runs 12V (I run 24V). My potential solution was picking up a 4 channel relay and controlling it with unused servo pins (need one for the BLTouch) and the PS_ON pin. Gave it a test run last night using the Marlin M42 commands. I plan on adding some shortcut buttons in OctoPrint through the plugin. I'll get some pictures when I get a chance bit it looks like I'll be able to control my PSU, a bed cooling fan and my LED lights from it. :)
     
    Carl Feniak likes this.
  6. Balu

    Balu Well-Known
    Builder

    Joined:
    Apr 14, 2014
    Messages:
    81
    Likes Received:
    30
    I'm just putting together my C-Bot virtually (experimenting with Fusion360) and I have a quick question: The idler back plate for the XY gantry has two holes with a chamfer on one side. How do these have to be oriented (top/bottom / inside/outside) and what are they for?

    Are they supposed to push the wheels down when you tighten the bolts?
     
  7. Austin Seagers

    Austin Seagers Well-Known
    Builder

    Joined:
    Oct 13, 2015
    Messages:
    88
    Likes Received:
    48
    An RRD fan extender will be fine @ 24V if i've ID'd the chip correctly :) I have one myself at home, and will double check the markings on that tonight if I remember
    http://www.infineon.com/dgdl/irf8313pbf.pdf?fileId=5546d462533600a40153560d38521d63
     
    #2647 Austin Seagers, Jun 2, 2016
    Last edited: Jun 2, 2016
    wackocrash5150 likes this.
  8. wackocrash5150

    wackocrash5150 Well-Known
    Builder

    Joined:
    Jun 9, 2015
    Messages:
    102
    Likes Received:
    48
    Bottom/outside. Yes (correct me if I'm wrong) but they're supposed to help tension/tighten the wheels to the extrusion by pushing the wheels up as you tighten (within reason) and also help prevent them loosening easily. When assembling, consider using Elmo's clamp as well Wheel Tightener by ElmoC
    You'll find the same chamfer design on the other axis as well.
     
    Balu and Carl Feniak like this.
  9. Chris Roadfeldt

    Chris Roadfeldt Journeyman
    Builder

    Joined:
    Dec 29, 2015
    Messages:
    182
    Likes Received:
    102
    FWIW - I GPL'd the generator and any of the supporting libraries I wrote for it. I choose it so others can benefit from my work and feel free to contribute if they wanted. I also choose the GPL so that any changes made to the code have to push back out to the community. You can go the BSD license route if you don't want that particular requirement. I did not look over the Creative Commons license, so I can't speak to it. Oh one last thing, I chose GPL V2 for a particular reason, though that escapes me at the moment... Not very helpful I know, but something to be aware of.
     
    Spiffcow and wackocrash5150 like this.
  10. Spiffcow

    Spiffcow Well-Known
    Builder

    Joined:
    Dec 27, 2015
    Messages:
    214
    Likes Received:
    92
    I went to the CC page to read about how it relates to software licenses, and they have a section that suggests GPL for software licenses. I'm pretty sure CC is really only meant for content, which is something the OpenBuilds people might want to look into, since they don't support GPL for builds..

    I think I'll just go with GPL2 or GPL3 (have to research to figure out which). I *think* I can still license the STLs as CC Share Alike, since those would be content, not code. With something like OpenSCAD the line between content and code is a bit blurry though.

    Let me know if you remember the reason you felt v2 was the better choice.
     
  11. Austin Seagers

    Austin Seagers Well-Known
    Builder

    Joined:
    Oct 13, 2015
    Messages:
    88
    Likes Received:
    48
    Hi all,

    Sorry about the wall of text.

    I've been using my own design of a simple bowden extruder for a while now with my C-Bot (V/T-slot bowden extruder by austingeorge), and have found a few small niggles with it that i wanted to fix with a new design.

    The problem with the previous extruder are that the clamp, between gear and bearing outer race inherantly squashes the filament to an oval shape when tightened. Excessive and repetitive retracts were effectively rolling my filament to fit the half-ecliptical shape of the gap between the drive gear and bearing.

    When the filament got rolled to be very flat, the force with which the filament was pushed into the drive gear teeth was reduced, and eventually ended up stripping the filament, and no engagement, stopping the gear from pushing filament, and causing a failed print. Increasing minimum retraction distance helped with this on parts with lots of retracts, but didn't completely alleviate the issue.

    Second to this, as the filament was being rolled, it's widest point started to exceed the ID of the bowden tube it was being pushed into. This increased the friction in the bowden cable, and meant the extruder needed more torque and grip to force the filament through the tube.

    Here's the old extruder with it's MK8 drive gear butted-up against the idler bearing, which is the crux of the issue.
    http://i.imgur.com/ZDG71p7.jpg

    I decided to design a new extruder to remove these issues, and give the greatest engagement, and grip on the filament, without deforming the filament such that it would not fit through the bowden tube. I also wanted to up the torque a bit just in case also.

    Fast forward a month or so, and here's a video of the first test of the new extruder moving. Note the mutual gears on the far left will eventually be mounted inside the housing. Rather than on the far left as shown.


    As well as a second gear to engage with the filament and reduce flattening, the tooth profile of the drive gears are specified to be cut with a groove to both guide the filament, and double the contact points between the filament and drive gears. (not shown in video)
    http://i.imgur.com/OPLKRRj.jpg
    http://i.imgur.com/XMk4FVU.jpg
    The lower gear is vertically stationary, and the upper gear will be squashed into the lower gear (and filament) by a small clamp on the left-side bearing. Both shafts are fixed on the right side of the assembly. There's quite a few spacers left to print to keep everything in the right place on the shaft, but this gives a good idea of how the extruder will work.

    To get to this point, although it was born out of frustration of failed prints, i got a lot of inspiration from these links:
    Jevon's 3D Printer Design
    C_D's Dual Drive Bowden Extruder by C_D
    Double Barrel Extruder by anfroholic

    Jevon's blog is well worth a read, but sadly hasnt been updated in a while. Imitating what he's done is out of reach of anyone not having access to some nice machinery unfortunately, but his design goals are very similar.

    The other two thingiverse links show similar ideas, but either with higher component count, or requirement to cut and hob your own drive gears. My design uses a common drive gear, and can be cut with a thin tool on a dremel, saw, or in this case, lathe. Depth of cut is irrelevant, it's the width of the cut that is important.

    Hopefully this will allow me to run my 1.2mm volcano and 0.4 e3D nozzles at higher volumetric, and significantly reduce the chance of stripping and failed prints.

    I'll no-doubt upload to thingiverse when I've run the extruder for a while. But in the meantime, I'd be interested to hear your thoughts.
     
  12. Carl Feniak

    Carl Feniak Journeyman
    Builder

    Joined:
    Mar 18, 2014
    Messages:
    654
    Likes Received:
    246
    The reason I designed my extruder with a spring loaded idler arm is to prevent the ovaling you are describing. If the filament is becoming oval to the extent you are describing then the spring is too tight. If it is stripping out then there is a hotend issues. The extruder you said you were using has a direct bolt which gives little feedback on the force being applied to the filament and little flexibility for variations in filament diameter (it has to squish it into an oval if it is slightly oversized). Though I could see the opportunity to add a spring behind the bolt head with a longer M3 bolt.
    The dual gear setup looks pretty cool, but I don't see it solving the issues you are describing. It will provide more grip on the filament for sure, but I have been able to get enough grip with single toothed pulley without over squishing the filament.
    I do see the design of mine and the one you linked to having issues with long bowden setups or fast print speeds. Personally, I think a geared MK7 setup would be adequate if that was the case as an MK7 pulley has more surface area in contact with the filament but will also have less mechanical advantage compared to the MK8 pulley (hence a geared setup).
    Just my thoughts.
     
  13. Austin Seagers

    Austin Seagers Well-Known
    Builder

    Joined:
    Oct 13, 2015
    Messages:
    88
    Likes Received:
    48
    Thanks Carl :)

    I agree with you regarding the non-sprung idler arm on my previous design. It's difficult to judge the pressure on the filament with no spring to gauge it. I also didn't mention that i was planning to have the upper gear sprung on this new design (possibly a piece of rubber or a spring like you said. Yet to experiment).

    Also, yes, two drive gears is probably excessive and a geared MK7 is probably adequate on long bowdens (mine are just over 1m for each toolhead) or for whatever reason where back-pressure is high. I'll admit to that being from the frustration of failed prints and wanting this one to definitely not have the same issues. Plus, reading Jevon's blog really sold me on the idea of two gears.
     
    #2653 Austin Seagers, Jun 3, 2016
    Last edited: Jun 3, 2016
    Carl Feniak likes this.
  14. Carl Feniak

    Carl Feniak Journeyman
    Builder

    Joined:
    Mar 18, 2014
    Messages:
    654
    Likes Received:
    246
    Yeah, they do look pretty cool. I'll take another look at them later today as my last reply was a bit rushed as I headed out to work... you made me late! ;)
     
  15. Spiffcow

    Spiffcow Well-Known
    Builder

    Joined:
    Dec 27, 2015
    Messages:
    214
    Likes Received:
    92
    So over the last 2 days I finally got around to disassembling my C-Bot and reassembling with my redesigned parts (an updated version of my Bottom Frame Corners for Modified C-Bot by spiffcow, plus a similar 'T' bracket, X/Y motor mount brackets, and a front mounted no-wheels Z slider).. No idea if it's going to actually help with shaking, but it was insanely easy to assemble and square! Basically everything fits so tightly that you *can't* assemble it without it being square, and you can assemble the whole frame before using a single screw. The entire frame minus the back corners and Y bar took about an hour and a half to assemble and square.

    I verified that parallel sides are exactly the same length, and diagonals were within 1mm (maybe better, I had to use my wife's sewing measure because all my tape measures are in imperial units), and the the added front Z sliders move freely and don't bind as long as you move them together (I kept the wheels on the back, but will be replacing it soon). And that's without any effort to make it square beyond pushing the corners together :)

    I'm going to put the electronics back together tonight and hopefully have pics and a Thingiverse entry by this weekend.
     
    #2655 Spiffcow, Jun 3, 2016
    Last edited: Jun 3, 2016
  16. Carl Feniak

    Carl Feniak Journeyman
    Builder

    Joined:
    Mar 18, 2014
    Messages:
    654
    Likes Received:
    246
    Nice, looking forward to the pics. Did you have any issues with printing the V-slot "groove" on the underside of the vertical slot?
     
  17. Spiffcow

    Spiffcow Well-Known
    Builder

    Joined:
    Dec 27, 2015
    Messages:
    214
    Likes Received:
    92
    Yeah, I wasted a lot of plastic before I gave in and used supports.. The corners print "okay" without supports but setting supports at 60 degrees saves a lot of time on post-processing with only a minimal increase in the amount of plastic used. The stepper corner brackets definitely need full supports though. On the Z slider and the 'T' bracket I have an optional flag for a flat top, but I have found that the shame of using supports is a small price to pay for a better functional result.

    I have a bug in my corner generator that caused the corners to not be perfect images, but it's mostly cosmetic since there's plenty of support on both ends. I'll fix that before the "release" this weekend.
     
  18. craftygeek

    Builder

    Joined:
    May 1, 2015
    Messages:
    9
    Likes Received:
    0
    I'm finally in the last stages of my build (just the z probe setup left).
    This will be my first bowden setup, can anyone give me a rough ball park to start with for retraction settings with 1.75mm filament?
     
  19. Carl Feniak

    Carl Feniak Journeyman
    Builder

    Joined:
    Mar 18, 2014
    Messages:
    654
    Likes Received:
    246
    5mm (will depend on actual tube length and filament used though). I've gone up to 8mm in my setup but had occasional issue where it would jam on return.
     
  20. craftygeek

    Builder

    Joined:
    May 1, 2015
    Messages:
    9
    Likes Received:
    0
    Great thanks - that gives me a point to start from instead of shooting blind :)
     
  21. AK Eric

    AK Eric Journeyman
    Builder

    Joined:
    Mar 31, 2015
    Messages:
    179
    Likes Received:
    129
    When I built my C-Bot, I noticed that on the back side of the hotend gantry, my belts were 'reversed' compared to the front: The 'bumpy-bits' on the front belts bolt into the grooves on the gantry, but on the back side, based on how the belts are routed, it's opposite: The flat side of the belt is pressed against the gantry. And it's worked fine so far.

    But after discussion in another forum post, it dawned on me that the 'bumpy bits' of the belts are also rubbing against a whole bunch of the idler pulleys too, and arguably that "bump-bump-bump" could somehow come across as bad print artifacts. Just a theory.

    Today I re-routed my lines, putting a 180 deg twist into each along the top left\right Y extrusions so that all belts at all times only touch idlers with the smooth side. Even with the twist they fit fine into the extrusion slot.

    I've just started doing prints again, and I've not noticed any sort of amazing print quality increase. But I wanted to put it out there since I hadn't seen that mentioned before in this discussion. Plus... are there any downsides to this twist? I can't see any myself, but I'd like to hear about them if they exist.
     
    #2661 AK Eric, Jun 4, 2016
    Last edited: Jun 4, 2016
  22. Elmo Clarity

    Elmo Clarity Journeyman
    Builder

    Joined:
    Jan 17, 2015
    Messages:
    505
    Likes Received:
    149
    I don't think the "bump-bump-bump" across an idler pulley is going to cause any problems. The teeth are close enough together that the belt never gets closer or further away from the pulley because of the teeth. Now if the teeth were further apart, then I could see it causing some issue. About the only thing I worry about in this arrangement is that the teeth may compress over time because of the tension pulling them into the pulley.
     
  23. Chris Roadfeldt

    Chris Roadfeldt Journeyman
    Builder

    Joined:
    Dec 29, 2015
    Messages:
    182
    Likes Received:
    102
    I run from 3-5mm depending on the filament. PLA - 3 PETG - 4-5. That said, I think I can go lower on both, probably .5 - 1mm.

    Retraction speed matters too, depending on the filament again. I prefer a very fast retract with a little less overall length. I also add in a vertical z hop during retraction with PETG.
     
  24. Carl Feniak

    Carl Feniak Journeyman
    Builder

    Joined:
    Mar 18, 2014
    Messages:
    654
    Likes Received:
    246
    What do you set your retraction speed too?
     
  25. Carl Feniak

    Carl Feniak Journeyman
    Builder

    Joined:
    Mar 18, 2014
    Messages:
    654
    Likes Received:
    246
    I don't see an issue with twisting it, especially over the length of your bed size. If I knew these existed (below) I could of incorporated these. But the design would need some minor tweaking for alignment of the belt.
    As Elmo said, I do think that the belt teeth are tightly enough spaced that the effect is minimal. That said, this would be an improvement:
    16T 3mm Diameter Bore GT2 Idler Pulley For 3D Printer Accessory Part
    (I didn't search for the cheapest price)
     
    Balu and AK Eric like this.
  26. wackocrash5150

    wackocrash5150 Well-Known
    Builder

    Joined:
    Jun 9, 2015
    Messages:
    102
    Likes Received:
    48
    Well I took the leap and designed my own part ..... kinda sorta. When I got to looking at the BLTouch mount that I printed and after bugging Chris to updated his hotend generator, it turns out that TechGirl's mount won't even fit my setup ... lol So even though I'm a CAD noob, thought I'd take a shot at modding the hotend holder and extending off that in 123D. Made a mock-up in PLA and it looks like it'll do the trick. I'll upload the stuff when I can, but thought you guys (and gals) might want to see a pic. Let me know what you think and I'd be happy if someone more savvy in 123D could clean it up a bit. Credit to Carl's original 123D files for the starting point. It's pretty straight forward and I imagine that it could be modified for other setups.


    image.jpeg
     

    Attached Files:

    #2666 wackocrash5150, Jun 5, 2016
    Last edited: Jun 5, 2016
    AK Eric and Carl Feniak like this.
  27. Carl Feniak

    Carl Feniak Journeyman
    Builder

    Joined:
    Mar 18, 2014
    Messages:
    654
    Likes Received:
    246
    You could also design and print a toothed sleeve to fit between the two flanged bearings. Or even a design that uses normal M3 bearings.
     
  28. Chris Roadfeldt

    Chris Roadfeldt Journeyman
    Builder

    Joined:
    Dec 29, 2015
    Messages:
    182
    Likes Received:
    102
    30-40mm/s, nothing too crazy.

    Sorry folks for not getting the generator updated. Been jammed up 24/7.... Will update when it's ready. :)
     
  29. StupendousMan

    Builder

    Joined:
    Jun 7, 2016
    Messages:
    5
    Likes Received:
    1
    I want to build a CBot with a ~500mm cube build area, and two direct drive extruders.

    Should I move up to bigger extrusions, to be able to maintain high speeds with the extra weight and size? Gantry only, or frame too? What else should I think about? Is good quality 6mm belt rigid enough, or do I want bigger?

    Sorry if this has already been discussed, I haven't read all of the thread yet.
     
  30. Spiffcow

    Spiffcow Well-Known
    Builder

    Joined:
    Dec 27, 2015
    Messages:
    214
    Likes Received:
    92
    If you're serious about it, I am currently working on a reimplementation that supports configurable extrusion sizes (update on that still incoming, I hit a few snags with the Z slider and my schedule filled up with other obligations).
     

Share This Page

  1. This site uses cookies to help personalise content, tailor your experience and to keep you logged in if you register.
    By continuing to use this site, you are consenting to our use of cookies.
    Dismiss Notice