Welcome to Our Community

Some features disabled for guests. Register Today.

CNC xPRO Driver

Discussion in 'Other Builds' started by Spark Concepts, May 25, 2014.
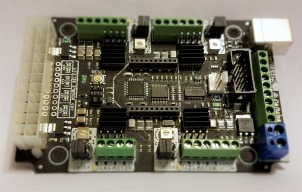
  1. snokid

    snokid Journeyman
    Builder

    Joined:
    Oct 11, 2014
    Messages:
    335
    Likes Received:
    104
    Hard limits are to stop motion if the machine tried to travel too far. So if a switch get's tripped it shuts down the machine stopping all motion even the spindle if you have that wired in.
    But I believe in order for hard limits to work you still need to do a homing cycle before anything will move.
    I don't run switches on either of my machines. if you happen to overtravel the steppers just stall, no harm is done.

    I went down to my shop and recorded some video showing some g-code run thru my ox and the settings just waiting for it to upload to youtube will post the link as soon as it's done.
     
  2. snokid

    snokid Journeyman
    Builder

    Joined:
    Oct 11, 2014
    Messages:
    335
    Likes Received:
    104

    video #1 had the second uploading on my phone will take a couple more minutes....
     
    Mark Carew likes this.
  3. snokid

    snokid Journeyman
    Builder

    Joined:
    Oct 11, 2014
    Messages:
    335
    Likes Received:
    104
  4. Firetruckguy

    Builder

    Joined:
    Aug 30, 2014
    Messages:
    23
    Likes Received:
    15
    Wow thanks for the video!I'm out in the shop and going to make the changes as suggested. I'll see if I can turn a board into saw dust.
     
  5. Firetruckguy

    Builder

    Joined:
    Aug 30, 2014
    Messages:
    23
    Likes Received:
    15
    Snokid thanks did some test runs tonight and I'm very close, just need to tune up on G-code and how grbl panel works. I ran the openbuilds logo and it sends Y axis all the way across the table When I hit the reset button it comes back to where I zeroed my machine and starts cutting like it should. I actually cut the majority of the logo and it looked pretty close. I'm missing a step after I zero my machine, I'm going to spend some time reviewing some of the posts and reading up on G-code. I'm 100 times closer tonight than last night, probably not going to be any homemade Christmas presents this year. thanks for all your help as well as John M
     
    John Meikrantz likes this.
  6. snokid

    snokid Journeyman
    Builder

    Joined:
    Oct 11, 2014
    Messages:
    335
    Likes Received:
    104
    hmm...
    sounds like your not zeroed..
    move your machine (lower right corner for this example, can be other places) then just touch the work piece with the bit.
    next click zero xyz button. if the dro doesn't go to 0,0,0 then disconnect and reconnect that should get you 0,0,0
    load your g-code
    then press play.
    should be all that's to it.

    if it's not working I think it has something to do with the limit switches and the homing cycle bits....

    I should of showed it but there is a reason I don't have limit switches. you don't need them. If you goof up and let one of the axis crash into the end of it's travel one of two things will happen. belt will slip, motor will stall..... the belt slipping isn't the best for the machine, but it's not the end of the world. motor stalling doesn't really do anything.
    The stepper driver doesn't know the motor is loosing steps and just keeps sending the move till it's done. it's doing this. sending a pulse to the coils really doesn't matter if the motor doesn't move as there is no feedback.

    once you get the hang of it over travel really isn't a problem.
    I do have to say homing is kind of cool, but also really not needed.
    I don't need to have the bit at an exact place for 0,0,0 for what I do, but there is a simple way to get that every time...
    Bob


  7. Firetruckguy

    Builder

    Joined:
    Aug 30, 2014
    Messages:
    23
    Likes Received:
    15
    Disconnected all of my limit switches I think I was not zeroing my machine in the correct order. I think I was loading the G Code and then zeroing, not sure if that matters or not. I used a piece of paper and slid it under my bit and lowered until it touched and back it off. Everything worked perfect as far as I can tell other than I think it cut too deep on the first pass I assume this is how the code was written because It dropped the Z and moved over to where it was cutting the part. If I were fluent in G code I probably could have seen it before I started cutting, Oh well that comes with experience.

    One question I have is I built a Probe plate and I'm not sure where to wire it to the X Pro? I assume it would wire to the Z axis limit? and then to ground? I'm running the latest grbl Version v0.9i just went off the code of the video in previous post but in the grbl wiki it seems they list it as G38.3, G38.4 and G38.5 I typed in G38.2 Z -.5 F1 hit send and it didn't stop when it hit my plate. I verified I had continuity in my wiring and connectors. I read earlier posts a few people have hooked it up but not a lot on how to connect also not much on X Pro Wiki

    IMG_7131[1].JPG IMG_7130[1].JPG

    IMG_7144[1].JPG
     
  8. snokid

    snokid Journeyman
    Builder

    Joined:
    Oct 11, 2014
    Messages:
    335
    Likes Received:
    104
    ok probing no problems you are almost there....
    g38.2 z-.5 f1
    g92 z.01
    don't forget you can also use g38.2 x-.5 f1
    then g92 x.01

    I try not to use units mm or inches so whatever you use isn't going to confuse anyone, but it's confusing me on video!!! lol
    The documentation isn't the best for the cncxpro but I will cover it both in a picture and video.

    not sure what is the problem with the beginning of the cut but make sure you don't have the tabletop is zero checked in sketchucam.
    also you should run all your g-code thru camotics CAMotics you will see error's before you run the machine. Also being new "air cuts" are your friend....
    xPRO20pinout.jpg Screenshot 2015-12-24 04.10.31.png Screenshot 2015-12-24 04.12.54.png
     
    Mark Carew likes this.
  9. Rob Mitchell

    Rob Mitchell Well-Known
    Builder

    Joined:
    Nov 29, 2015
    Messages:
    105
    Likes Received:
    35
    As a beginner who uses Mac OS, I like the idea of running Chilipeppr or similar browser based cam software.

    I have ordered a CNC XPRO V2 controller. I will be using NEMA 23 steppers and 24v supply (non ATX). This is my first OX CNC build.

    Can I use Chilipeppr or similar with this controller? Is there anything I should be aware of?

    Thanks
     
  10. snokid

    snokid Journeyman
    Builder

    Joined:
    Oct 11, 2014
    Messages:
    335
    Likes Received:
    104
    yes you can use browser based software no problems.
    another one I'm aware of is XYZBots - GRBLWeb
    I do have to say I have tried to use browser based grbl software, I didn't like it. No real reason though.
    plenty of people seem happy with chilipeppr so give it a whirl....
    Bob
     
  11. gwandad

    gwandad Well-Known
    Builder

    Joined:
    May 12, 2014
    Messages:
    69
    Likes Received:
    55
    I use gr-bl with X Pro & love it. I was using Chillipeppr with tiny G & found it very difficult to use, plus had no broadband access in the workshop. I found lots of help with both scenarios
    but the XPro suited my simpler mind & I had it working in no time flat. My OX CNC moved from an instrument of torture to an instrument of pure joy.
     
  12. John Meikrantz

    John Meikrantz Well-Known
    Builder

    Joined:
    Nov 2, 2014
    Messages:
    169
    Likes Received:
    56
    I'm also an xpro/grbl user, and pretty happy with things. I gave up on Chilipeppr too. Currently using cnc.js, which is kind of like Chilipeppr, but runs locally with no internet required. cheton/cnc.js · GitHub
    I run this on a Raspberry Pi that is connected to xpro, and then use a browser on my Mac to access. You can also run it natively on Mac, Windows, linux, etc.

    Second option that I use if plugged directly into xpro is bCNC, which is by far the most powerful grbl control software that I've found. It's a little more intimidating because of all the options, but not too difficult to get basic things done. vlachoudis/bCNC · GitHub. It's python based and runs on just about any OS.

    Both are actively being developed, and developers are very responsive to feedback and getting bugs fixed.
     
  13. Catawissa_CNC

    Builder

    Joined:
    Aug 30, 2014
    Messages:
    12
    Likes Received:
    22
    I'm just getting started with my first Ox build using the xPro and wanted to be able to mount the xPro controller board and the Spark Concepts 400w spindle control board in a wiring enclosure on DIN rail. I printed these mounting boards and DIN rail clips on my 3d printer. Anyone interested I will post the .stl files. The DIN rail clips attach using M3.12 x 6mm plastic screws from McMaster-Carr part #99397A616. I also use the same screws to fasten the board to the plastic mount. All parts are printed in ABS plastic.
    McMaster-Carr

    Shown below are pictures of the xPro v2 Control Board Mount...
    If you need more information regarding printing these objects go to: Spark Concepts xPro v2 Controller Board DIN Mount by Arctic_Ox
    xPro v2 Mount Plate.JPG DIN Rail Mount Clip.JPG xPro v2 Mount Assembly Top.JPG xPro v2 Mount Complete.jpg

    Shown below are the pictures of the Spark Concepts 400w Spindle Control Board Mount. This uses the same DIN rail mount clip.
    If you need more information regarding printing these objects go to: Spark Concepts 400w Spindle Control Board Mount by Arctic_Ox

    400w Spindle Control Board Mount Assembly Top.jpg DIN Rail Mount Clip.JPG 400w Spindle Control Board Mount Assembly Complete.jpg 400w Spindle Control Board Mount Assembly Side.jpg

    Hopefully somebody can make use of these....
    Any questions...let me know...thanks :)
     

    Attached Files:

  14. Rob Mitchell

    Rob Mitchell Well-Known
    Builder

    Joined:
    Nov 29, 2015
    Messages:
    105
    Likes Received:
    35
    Can anyone recommend CAM software that will work on my Mac OSX machine. I'm using the CNC XPRO v2 board.

    Thanks
     
  15. Julius

    Julius Well-Known
    Builder

    Joined:
    Nov 13, 2015
    Messages:
    193
    Likes Received:
    61
    you should be able to get HSMexpress, right? Sketchucam should also work


    Can someone give me the quick n dirty of why someone would use this board instead of a gshield? All I see is 50$ v 350$ and some more pins most people cant use?
     
  16. snokid

    snokid Journeyman
    Builder

    Joined:
    Oct 11, 2014
    Messages:
    335
    Likes Received:
    104
    I don't know what your talking about 350, the cncxpro is 120.00....
    as far as the pins I also don't see the difference....
    it's kind of a chevy vs ford thing....
    either board will work just fine....
     
  17. Rob Mitchell

    Rob Mitchell Well-Known
    Builder

    Joined:
    Nov 29, 2015
    Messages:
    105
    Likes Received:
    35
    I have one of those 24v power supplies advertised here in the parts store. On the back it has three inputs (screws) for connecting to 110v mains. If I'm using a regular lamp power cord cutoff it will only have two wires. Which do I connect? I see N, L and ground symbol.

    Also, do you guys use a fuse and diode between power supply and CNC Xpro v2 board power input?

    Thanks
     
  18. snokid

    snokid Journeyman
    Builder

    Joined:
    Oct 11, 2014
    Messages:
    335
    Likes Received:
    104
    I did forget one little thing...
    the cncxpro allows 4 stepper motors, the gshield only does 3.
    so if you are using is on an ox you have to hook 2 motors to 1 driver...
     
  19. snokid

    snokid Journeyman
    Builder

    Joined:
    Oct 11, 2014
    Messages:
    335
    Likes Received:
    104
    get an old computer power supply cord then you can use all three wires....safer....
    but to answer the question
    l and n.....

    if you have to ask the above question then use the fuse and diode... nothing to mess with if you don't understand what's going on...
     
  20. Julius

    Julius Well-Known
    Builder

    Joined:
    Nov 13, 2015
    Messages:
    193
    Likes Received:
    61
    Snokid, I was confused with the CNC Mk2 (9 axis) in the store. The xPro is still 190$ for me in Canada. Not worth the extra 140$!

    Rob, L and N are interchangable, just make sure the Ground actually goes to ground! On the dryer cord I used only ground had a rubber shield, and said FOR GROUND USE ONLY. In 2016 I would not use anything without a ground pin if possible.
     
  21. John Meikrantz

    John Meikrantz Well-Known
    Builder

    Joined:
    Nov 2, 2014
    Messages:
    169
    Likes Received:
    56
    Two differences - the xPro has built in Arduino, so you don't need an additional board to plug the shield into. Also, the xPro has four drivers - one for each axis motor so for the Ox design you don't have to double up on a single driver.

    If going the shield route I might take a look at the Arduino CNC Shield Arduino CNC Shield – 100% GRBL Compatable | Protoneer.co.nz which supports 4 drivers and you can replace them if you burn one out by accident. Lots of clones of these available cheap on eBay, even with Arduino.

    Another shield that supports four drivers is GAUPS GAUPS Arduino-compatible Stepper Shield kit - Amber Spyglass Ltd

    I am beta testing a new offering from Protoneer that is really cool - I'll be posting about it soon. ;)
     
  22. snokid

    snokid Journeyman
    Builder

    Joined:
    Oct 11, 2014
    Messages:
    335
    Likes Received:
    104
    any hints about the beta you can let slip? I do like protoneer stuff!!!
     
  23. John Meikrantz

    John Meikrantz Well-Known
    Builder

    Joined:
    Nov 2, 2014
    Messages:
    169
    Likes Received:
    56
    It's an enhanced version of the Raspberry Pi CNC board. Added support for a 4th driver, filters on the limit switch inputs, support for external drivers, etc. Initial testing has been very positive. Link to basics - Raspberry Pi CNC Challenge | Protoneer.co.nz
     
  24. John Meikrantz

    John Meikrantz Well-Known
    Builder

    Joined:
    Nov 2, 2014
    Messages:
    169
    Likes Received:
    56
    Sneak pic. Sitting in the old xPro enclosure. Combines RPi, Arduino, and Driver shield with wifi/ethernet in a very compact package.

    IMG_3878.JPG
     
  25. snokid

    snokid Journeyman
    Builder

    Joined:
    Oct 11, 2014
    Messages:
    335
    Likes Received:
    104
    oh very cool!!!!
    there goes more of my money!!!
    I'm new to raspberry pi just getting the hang of it I already have their RPi tophat board.
    I just got it going last night, just need a keyboard and mouse and I will be testing it out, but it looks very promising.
    I see you don't have any thing hooked to the RP are you using somekind of terminal program?
    thank you for the heads up!!!
     
  26. Rob Mitchell

    Rob Mitchell Well-Known
    Builder

    Joined:
    Nov 29, 2015
    Messages:
    105
    Likes Received:
    35
    Guys is the TVS diode necessary? I'm using a 24v power supply with online 15amp fuse. If I need a diode are there any alternatives since I am trying to source one locally.
     
  27. John Meikrantz

    John Meikrantz Well-Known
    Builder

    Joined:
    Nov 2, 2014
    Messages:
    169
    Likes Received:
    56
    I primarily use cnc.js, so I connect via web browser from my MacBook. Second option is bCNC, and if I'm running that I use vnc to remotely run the RPi desktop on my Mac. For a while I used chilipeppr also remotely connecting to RPi.

    Would be easy enough to plug in monitor and keyboard in the shop to run everything on the Pi locally, but I don't want the clutter!
     
  28. epiNoesis

    epiNoesis New
    Builder

    Joined:
    Jan 6, 2015
    Messages:
    4
    Likes Received:
    0
    Hello there!

    I have a question. If I supply the xPRO with the ATX, will it be able to power 3 nema 23 motors? Or am I supposed to use 24 volts for such motors?
     
  29. snokid

    snokid Journeyman
    Builder

    Joined:
    Oct 11, 2014
    Messages:
    335
    Likes Received:
    104
    I totally get not wanting clutter in the shop, That is one reason I wanted to try out the pi going to bolt the monitor to the wall then a shelf for the keyboard....
    if you are remotely controlling the PI from the Mac aren't you still bringing the laptop into the shop? or do you get the machine all set up and run it from another room?
     
  30. snokid

    snokid Journeyman
    Builder

    Joined:
    Oct 11, 2014
    Messages:
    335
    Likes Received:
    104
    First to answer your question yes it will work off a ATX power supply....
    Now for the advice...
    Get a 24V supply real cheap on ebay or amazon...
    to a point steppers don't care how much voltage is being supplied, they are more concerned about the current....
    The operator of the machine likes a higher voltage....
    The higher the voltage the higher the holding torque, and speed....
    it's a watts thing... V*A=watts
    so 12*2=24 watts
    or 24*2=48 watts
    insert tim the toolman taylor saying here!!!!
    just get a 24v supply and be happy
     

Share This Page

  1. This site uses cookies to help personalise content, tailor your experience and to keep you logged in if you register.
    By continuing to use this site, you are consenting to our use of cookies.
    Dismiss Notice