Welcome to Our Community

Some features disabled for guests. Register Today.

YAOP (Yet Another Openbuilds Printer)

Discussion in '3D printers' started by winand, Dec 12, 2014.
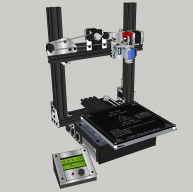
  1. winand

    winand Well-Known
    Builder

    Joined:
    Mar 14, 2014
    Messages:
    65
    Likes Received:
    36
  2. Mark Carew

    Mark Carew OpenBuilds Team
    Staff Member Moderator Builder Resident Builder

    Joined:
    Jun 28, 2013
    Messages:
    2,745
    Likes Received:
    2,410
    Wow! Impressive build @winand ! So many great ideas incorporated into this build.. Thank you for sharing
     
  3. DarkAlchemist

    DarkAlchemist Well-Known
    Builder

    Joined:
    Aug 2, 2014
    Messages:
    401
    Likes Received:
    22
    I like this build but a few things I would change.

    When are you going to put up a bom for us?
     
  4. winand

    winand Well-Known
    Builder

    Joined:
    Mar 14, 2014
    Messages:
    65
    Likes Received:
    36
    Thanks!
    I'm not going to supply a BOM of the build.
    You have to figure out for yourself what's needed ;-)
    The many pictures and sketchup file must be enough to get you going.
     
  5. DarkAlchemist

    DarkAlchemist Well-Known
    Builder

    Joined:
    Aug 2, 2014
    Messages:
    401
    Likes Received:
    22
    Well, that is pretty lazy of you :p

    Several of the parts I have no idea what they exactly are but thanks anyway.
     
  6. winand

    winand Well-Known
    Builder

    Joined:
    Mar 14, 2014
    Messages:
    65
    Likes Received:
    36
    Which parts do you mean?, i can help you out with that though
     
  7. DarkAlchemist

    DarkAlchemist Well-Known
    Builder

    Joined:
    Aug 2, 2014
    Messages:
    401
    Likes Received:
    22
    The plates used on X and the plates the GT2 is attached to (all of these are silver in color).
     
  8. winand

    winand Well-Known
    Builder

    Joined:
    Mar 14, 2014
    Messages:
    65
    Likes Received:
    36
    Those are "hand made" plates from a sheet of aluminium (3mm thick), cut on a table saw
     
  9. DarkAlchemist

    DarkAlchemist Well-Known
    Builder

    Joined:
    Aug 2, 2014
    Messages:
    401
    Likes Received:
    22
    Thought it was something like that.

    Thank you for your help. :)
     
  10. winand

    winand Well-Known
    Builder

    Joined:
    Mar 14, 2014
    Messages:
    65
    Likes Received:
    36
    Quick post of my first prints... ever :)
    A little cube of 1 x 1 x 1 cm
    Layers are very consistent, definitely need some extensive tweaking (temperature in the first place i guess) but i'm very happy with these 3 first prints. no problem with sticking to the build plate whatsoever (use glue stick on glass)
    PLA, Heated bed 70C, Nozzle 190C, layer height 0,2mm, fan from 3rd layer onwards.
    width/depth varies a bit from 9.99 to 10.03 mm :)
    height approx 8.80 mm (first layers little too hot / sagged / sqeezed to bed?)

    IMG_2092.JPG

    first 2 prints (background) only got halfway, due to overheating problems i think. (need to look into it)
    Third print was printed with a big fan blowing on to the ramps board.
    I'm have to rethink the cooling part i guess
    Next week i'm snowboarding in the alps, after that, i'll be tinkering again..
     
  11. winand

    winand Well-Known
    Builder

    Joined:
    Mar 14, 2014
    Messages:
    65
    Likes Received:
    36
    Quick update;
    After a number of cubes, i printed my first (useless :cool:)"figure".
    Printed in PLA with 0,2mm layer height, shell thickness 0,8mm, speed 50mm/s, bed 70C, nozzle 190C
    Print cooled only from one side (the right), so left side is not as tidy.
    No additional tweaking done yet.
    The print looks pretty decent, alltough a good photograph reveals lot of imperfections to attent to ;) :
    robot.jpg
     
    Mark Carew likes this.
  12. DarkAlchemist

    DarkAlchemist Well-Known
    Builder

    Joined:
    Aug 2, 2014
    Messages:
    401
    Likes Received:
    22
    You are getting there but seems to still need some tweaking and dialing in.
     
  13. winand

    winand Well-Known
    Builder

    Joined:
    Mar 14, 2014
    Messages:
    65
    Likes Received:
    36
    When printing, i noticed a 'weavy' pattern in straight walls.
    This was due to the extruder motor not turning smoothly, but with little 'ticks'.
    This issue was solved completle when changing the motor driver from an DRV8825 (1/32 microstepping) to an A4899 driver (16th stepping)
    Now some other minor issues are getting my attention. I also found out that ui prefer printing in ABS than PLA.

    I noticed some erratic movement of the Z-probe servo.
    I've put a resistor of 220 ohm between signal and ground which seems to eliminate that issue completely.

    DSC_0003 (2).JPG
    I've printed a fan duct in ABS for cooling the print when doing PLA.
    It is based on number 491316 found on thingiverse, but altered it to my needs. The fan can be taken of easily by unscrewing
    one M5 bolt from the back
    I had hooked the fan up to output D9 on the ramps board so the fan would automatically turn on at a given print height.
    This was troublesome; Even when the fan was not turned on, the nozzle temperature (often) went nuts and kept on rizing..
    The temp measurements of the nozzle were still ok, but the temp kept on rizing beyond the set temperature.. weird?
    Now i'm not using D9, but added a manual switch which i active when the first layer is printed. Works fine.

    DSC_0001 (2).JPG

    Maybe i should experiment with sticking ferrite clips onm some wires or twist some wires.
     
  14. DarkAlchemist

    DarkAlchemist Well-Known
    Builder

    Joined:
    Aug 2, 2014
    Messages:
    401
    Likes Received:
    22
    I love ABS and until recently had never touched PLA and the PLA I purchased was Chinese made low grade crap. I will purchase one of much higher quality shortly and make my final judgement on PLA then. I like PLA but my extruder doesn't because the kind person who made it didn't use enough infill and you can bend it by hand easily which means when the back pressure comes up, and with PLA being so hard, it skips. Not the hob it literally is bending the extruder body.
     
  15. winand

    winand Well-Known
    Builder

    Joined:
    Mar 14, 2014
    Messages:
    65
    Likes Received:
    36
    After switching to the A4899 driver for the extruder, and lowering the nozzle temp down to 185 C (was using 190 C upto now), my PLA prints start to look pretty OK.
    Picture taken from prints without any touching up:
    DSC_0001_800px.JPG
    I'm using dutch made PLA and ABS, so no chinese stuff for me ;-)
     
    Mark Carew likes this.
  16. Mark Carew

    Mark Carew OpenBuilds Team
    Staff Member Moderator Builder Resident Builder

    Joined:
    Jun 28, 2013
    Messages:
    2,745
    Likes Received:
    2,410
    Great improvement! Thank you for the driver tip, very helpful
    Mark
     
  17. DarkAlchemist

    DarkAlchemist Well-Known
    Builder

    Joined:
    Aug 2, 2014
    Messages:
    401
    Likes Received:
    22
    My Chinese garbage PLA demands 200c, or more, but at those temps it becomes sticky in the heat chamber.

    Your prints are a lot better, and between you and I, I would kill for 1/32 microstepping but the Arduino can't handle it and barely handles 1/16. A smoothie, or Azteeg has no issues up to 1/64 stepping though the Smoothie is 1/16 and the Azteeg is 1/32.
     
  18. winand

    winand Well-Known
    Builder

    Joined:
    Mar 14, 2014
    Messages:
    65
    Likes Received:
    36
    Okay, that's nice to know, i haven't read that anywhere? (any informative links?)
    The silence was the main reason to go for 1/32 stepping.
    Future thoughts; Maybe an upgrade to an Arduino Due and a RAMPS-FD board?
     
  19. DarkAlchemist

    DarkAlchemist Well-Known
    Builder

    Joined:
    Aug 2, 2014
    Messages:
    401
    Likes Received:
    22
    No links but it is a known fact due to timing and the Arduino can only handle so much. You will get jitters and skipping on an Arduino at 1/32 if you go full speed so most don't even try (you will have to go slower to handle the timing pulses). Any ARM board will easily handle 1/32 and 1/64 (if they offer those steppings).

    EDIT: I did find this link that was a **** good read for me :) http://www.ebay.com/gds/Microstepping-Versus-Gear-Reduction-/10000000002352664/g.html

    Now if all you were controlling and doing was just one motor and nothing else the 16mhz Arduino can easily handle that but slap a Ramps type controller for X, Y, Z, E on it and having to keep up with everything it simply is too much.
     
    #19 DarkAlchemist, Jan 20, 2015
    Last edited: Jan 20, 2015
  20. winand

    winand Well-Known
    Builder

    Joined:
    Mar 14, 2014
    Messages:
    65
    Likes Received:
    36
    Alright, thanks!
    When googling, i found some info about the Arduino not been able to cope with 1/32 microstepping on 0.9 degree stepper motors, but on 1.9 degree motors should not be a problem.
    Still, you've got me thinking; Occasionally i have a small X-axis shift in bigger prints.
    The construction of my printer is as rigid as can be so i was thinking about magnetic interference between signals.
    Missing steps due to 1/32 stepping like you say could also be a reason. Worth investigating i think
     
  21. DarkAlchemist

    DarkAlchemist Well-Known
    Builder

    Joined:
    Aug 2, 2014
    Messages:
    401
    Likes Received:
    22
    Yes, and this is why all leads on a ramps board is kept short because nothing seems to be shielded. This is why I never used my LCD panel because it just never had long enough cables and the length I need is too long for the job.

    So, I suspect that could be your problem for the motors as 1/32 is just pushing it and if you had X and Y simultaneously moving at 1/32 rapidly the Arduino may not be able to keep up.
     
    winand likes this.
  22. winand

    winand Well-Known
    Builder

    Joined:
    Mar 14, 2014
    Messages:
    65
    Likes Received:
    36
    Let me post an update after 6 years :)
    @DarkAlchemist; It indeed was the 1/32 microstepping that caused the rare layer shifting. Changed it to 1/16 and never had a problem since.
    This first printer was my only 3d printer and has been reliably printing for 6 years now! :D
    No problems with it what so ever. Never had any loose belts or screws. In these years i only had about 4 nozzle clogs. (original E3D V6)
    I've made almost no changes to the initial design, only added a brass brush at the side to be able to auto clean the nozzle before printing.
    (very handy to be able to move the nozzle some cm further than the left and right edge of the build plate :))
    Still, my favorite material to print with is ABS, but i'm shifting towards ASA now..
    I always print on capton tape on the glass bed, ABS stick very well to it (wipe it a bit with some 400 sandpaper and it's good for lots and lots of prints)

    Note;
    I'm close to completing my second build, a coreXY printer with direct drive extrusion which i can fully enclose. I wanted to use 10mm linear rods and linear bearings. That was a disaster. I tried multiple ways to get the build plate moving up and down reliably and smooth, and eventually i ditch these linear rods completely and used v-slot wheels again. These things are so easy to work with and so **** smooth and accurate!
     
    Peter Van Der Walt likes this.

Share This Page

  1. This site uses cookies to help personalise content, tailor your experience and to keep you logged in if you register.
    By continuing to use this site, you are consenting to our use of cookies.
    Dismiss Notice