Welcome to Our Community

Some features disabled for guests. Register Today.

INTERFACE CNC Touch Controller

Discussion in 'Other Builds' started by OpenBuilds, Dec 15, 2020.
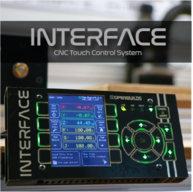
  1. Peter Van Der Walt

    Peter Van Der Walt OpenBuilds Team
    Staff Member Moderator Builder Resident Builder

    Joined:
    Mar 1, 2017
    Messages:
    13,998
    Likes Received:
    4,110
    David the swarfer likes this.
  2. Gofertpc

    Gofertpc Well-Known
    Builder

    Joined:
    Aug 12, 2019
    Messages:
    66
    Likes Received:
    49
    Got a notice they will ship next week. Merry Christmas everyone
     
  3. Mark Carew

    Mark Carew OpenBuilds Team
    Staff Member Moderator Builder Resident Builder

    Joined:
    Jun 28, 2013
    Messages:
    2,745
    Likes Received:
    2,410
    Happy New Year everyone!
    Looks like INTERFACES will begin shipping today! What an awesome way to start out the new year
    Thank you all for your support to the OpenBuilds mission.:thumbsup:
     
  4. grnch

    grnch New
    Builder

    Joined:
    Aug 1, 2020
    Messages:
    11
    Likes Received:
    4
    I received mine today! Question, is it metric only? Also the comment in the probez file is a bit confusing, can you explain how to set the probe thickness?
     
  5. Peter Van Der Walt

    Peter Van Der Walt OpenBuilds Team
    Staff Member Moderator Builder Resident Builder

    Joined:
    Mar 1, 2017
    Messages:
    13,998
    Likes Received:
    4,110
    If you have our XYZ Touch Probe Plus - Interface uses those variables to inject the offsets of our probe - ie plug and play, no need to "set" the thickness - see first paragraph of docs:interface:usage-probe [OpenBuilds Documentation]

    If you have a custom probe, you can edit the Macros and instead of the Probe Plus variables, use fixed numbers, but keep in mind that the Probe diameter menu also plays a role in calculating XY offsets, for your custom probe you cannot use the menu to set the diameter then, as we can't replace the variable anymore
    - We will in future add better support for custom probes, but for the best experience, consider getting a XYZ Touch Probe Plus instead - just so much easier for us to work with known offsets, positions, and instructions.

    Imperial DRO support has been added in firmware version 1.41, please update (See docs:interface:firmware-update [OpenBuilds Documentation])
    If you have v1.41 go to Tools and Util > Interface Config > Units to change between inch/mm mode
     
    #65 Peter Van Der Walt, Jan 6, 2021
    Last edited: Jan 6, 2021
    Giarc and sharmstr like this.
  6. JoshT

    JoshT New
    Builder

    Joined:
    Jul 26, 2017
    Messages:
    4
    Likes Received:
    8
    The Interface docs have instructions for BlackBox 2.4-2.6 and v2.7. What should I do if mine is at 2.3 on the brains board and 2.1 on the base board? Is it incompatible? Am I SOL? Or, do I just pop out the FDN340P transistor and carry on as though it is a 2.4 board?

    PXL_20210106_191203180.jpg PXL_20210106_191209814.jpg
     

    Attached Files:

  7. Peter Van Der Walt

    Peter Van Der Walt OpenBuilds Team
    Staff Member Moderator Builder Resident Builder

    Joined:
    Mar 1, 2017
    Messages:
    13,998
    Likes Received:
    4,110
    Same as V2.4 :)
    Cool! There are very few of those out there! :) Good memories man!
     
    JoshT likes this.
  8. JoshT

    JoshT New
    Builder

    Joined:
    Jul 26, 2017
    Messages:
    4
    Likes Received:
    8
    Got it - deface a collectible. ;-)

    Thanks for the quick response!
     
  9. romamaker

    romamaker Well-Known
    Builder

    Joined:
    Nov 14, 2017
    Messages:
    69
    Likes Received:
    54
    Received mine today! Can't wait to get home and give it a go.
     
    Peter Van Der Walt and sharmstr like this.
  10. grnch

    grnch New
    Builder

    Joined:
    Aug 1, 2020
    Messages:
    11
    Likes Received:
    4
    I can confirm I just did a firmware update and was notified on the controller of the new version! Thanks for the Inch's version!
     
    Peter Van Der Walt likes this.
  11. K. Orr

    K. Orr New
    Builder

    Joined:
    Nov 9, 2018
    Messages:
    3
    Likes Received:
    5
    Works well for me. Only have ran two files at this point. Would like to see the source code made available so I can change screen colors for certain items. Can not read certain portions of the display when wearing laser safety glasses. It's a safety issue.
     
  12. David the swarfer

    David the swarfer OpenBuilds Team
    Staff Member Moderator Builder Resident Builder

    Joined:
    Aug 6, 2013
    Messages:
    3,277
    Likes Received:
    1,834
    maybe a high contrast 'black and white' mode for laser users?
     
    sharmstr and Peter Van Der Walt like this.
  13. K. Orr

    K. Orr New
    Builder

    Joined:
    Nov 9, 2018
    Messages:
    3
    Likes Received:
    5
    High contrast would work I think!
     
    Peter Van Der Walt likes this.
  14. Mark Carew

    Mark Carew OpenBuilds Team
    Staff Member Moderator Builder Resident Builder

    Joined:
    Jun 28, 2013
    Messages:
    2,745
    Likes Received:
    2,410
  15. Peter Van Der Walt

    Peter Van Der Walt OpenBuilds Team
    Staff Member Moderator Builder Resident Builder

    Joined:
    Mar 1, 2017
    Messages:
    13,998
    Likes Received:
    4,110
    There is no usb-host to aurt adapters that I know off (opposite of an FTDI adapter, as the USB on the XC is a Client, not a Host)

    It runs an atnega, all atmegas has a uart. If it boils down to it, solder wires to the MCU pins if they have no other testing points or pins inside. Or replace it with a BlackBox
     
  16. Elmo Clarity

    Elmo Clarity Journeyman
    Builder

    Joined:
    Jan 17, 2015
    Messages:
    505
    Likes Received:
    149
    Just opened up the X-Controller and I don't think soldering is an option. There is an ICSP header, but I don't think that can be used.
    EDIT: The X-Controller uses the ATMega328 which only has 1 hardware uart which drives the USB port. Might be able to do something but will require cutting traces.
     
    #76 Elmo Clarity, Jan 9, 2021
    Last edited by a moderator: Jan 19, 2021
  17. ADW_01

    ADW_01 New
    Builder

    Joined:
    Nov 29, 2018
    Messages:
    16
    Likes Received:
    11
    I finally received my Interface but now I’m feeling a bit disappointed. I emailed support 3 weeks ago to double check that it would work with my Sparks XPRO 3 v1.1 and they said it would. I’m trying to find the RX and TX on the controller and I can’t find it. Any ideas? Is my only option buying a black box?

    Thanks
     
  18. JoshT

    JoshT New
    Builder

    Joined:
    Jul 26, 2017
    Messages:
    4
    Likes Received:
    8
    Interface mounted on my 1010 and ready to rock.
     

    Attached Files:

  19. sharmstr

    sharmstr OpenBuilds Team
    Staff Member Moderator Builder Resident Builder

    Joined:
    Mar 23, 2018
    Messages:
    2,035
    Likes Received:
    1,431
    Nice use of those tee brackets. I think I have a few laying around as well.
     
  20. Giarc

    Giarc OpenBuilds Team
    Staff Member Moderator Builder Resident Builder

    Joined:
    Jan 24, 2015
    Messages:
    2,915
    Likes Received:
    1,619
    Look at this https://raw.githubusercontent.com/Spark-Concepts/xPRO/master/wiki/xPRO pinout.jpg. The Tx and Rx pins are available. Just find a convenient 5 volt ad ground. Ground across from Tx.
    upload_2021-1-9_18-48-50.png
    Then read this docs:interface:connect-generic [OpenBuilds Documentation]
     
  21. jda70az

    jda70az Well-Known
    Builder

    Joined:
    Nov 11, 2020
    Messages:
    110
    Likes Received:
    16
    That's pretty cool.
     
  22. Peter Van Der Walt

    Peter Van Der Walt OpenBuilds Team
    Staff Member Moderator Builder Resident Builder

    Joined:
    Mar 1, 2017
    Messages:
    13,998
    Likes Received:
    4,110
    #82 Peter Van Der Walt, Jan 9, 2021
    Last edited: Jan 9, 2021
  23. Peter Van Der Walt

    Peter Van Der Walt OpenBuilds Team
    Staff Member Moderator Builder Resident Builder

    Joined:
    Mar 1, 2017
    Messages:
    13,998
    Likes Received:
    4,110
    That looks awesome!
     
  24. ADW_01

    ADW_01 New
    Builder

    Joined:
    Nov 29, 2018
    Messages:
    16
    Likes Received:
    11
  25. ADW_01

    ADW_01 New
    Builder

    Joined:
    Nov 29, 2018
    Messages:
    16
    Likes Received:
    11
    Too late. I ordered the black box an hour ago. You guys are taking all my money
    Lol Thanks for the help anyway Peter
    I live in California so I have to wait a long week to get it.
     
  26. Peter Van Der Walt

    Peter Van Der Walt OpenBuilds Team
    Staff Member Moderator Builder Resident Builder

    Joined:
    Mar 1, 2017
    Messages:
    13,998
    Likes Received:
    4,110
    :) you won't regret all the newfound power, awesome documentation start [OpenBuilds Documentation], and ease of use
     
    Mark Carew likes this.
  27. JSuster

    JSuster New
    Builder

    Joined:
    Jun 11, 2020
    Messages:
    31
    Likes Received:
    9
    Through the Interface, is there a way to manually zero the x and Y axis then just use a probe to set Z? I only use a Z probe as most of the time I set X/Y in the middle of the workpiece. This will also come into play when changing bits for a job where only the Z axis will need to be re-set.
     
  28. Peter Van Der Walt

    Peter Van Der Walt OpenBuilds Team
    Staff Member Moderator Builder Resident Builder

    Joined:
    Mar 1, 2017
    Messages:
    13,998
    Likes Received:
    4,110
    Yes, you can both zero (using setzero menu) and probe (tools and util > probe menu) individual axes as of firmware version 1.37 and up, currently on v1.41
     
  29. JSuster

    JSuster New
    Builder

    Joined:
    Jun 11, 2020
    Messages:
    31
    Likes Received:
    9
    Thanks Peter, just verifying it will work for what I need. Though i already placed my order, so I was putting the cart before the horse.
     
    Peter Van Der Walt likes this.
  30. Hoseff

    Hoseff New
    Builder

    Joined:
    Jan 11, 2021
    Messages:
    3
    Likes Received:
    1
    I’m interested in getting one of these interfaces but I’m curious as to what would be involved with connecting it to the Arduino Uno that is currently controlling my machine. I know I’d have to make a cable but can someone help me with what’s involved? What connector do I need to plug into the interface and how does the other end connect to the Arduino?

    Thanks!
     

Share This Page

  1. This site uses cookies to help personalise content, tailor your experience and to keep you logged in if you register.
    By continuing to use this site, you are consenting to our use of cookies.
    Dismiss Notice