Welcome to Our Community

Some features disabled for guests. Register Today.

C-Beam Prefab Untitled

Discussion in 'CNC Mills/Routers' started by ahayden, Sep 24, 2016.
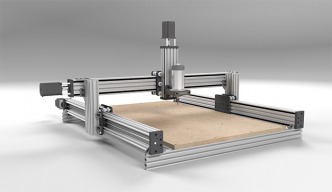
  1. ahayden

    ahayden New
    Builder

    Joined:
    Aug 8, 2016
    Messages:
    4
    Likes Received:
    42
    ahayden published a new build:

    Read more about this build...
     
    TerryOx, snokid and Joe Santarsiero like this.
  2. MaryD

    MaryD OpenBuilds Team

    Joined:
    Apr 13, 2016
    Messages:
    649
    Likes Received:
    639
    Nice design
     
  3. TerryOx

    TerryOx Well-Known
    Builder

    Joined:
    Apr 1, 2016
    Messages:
    90
    Likes Received:
    30
    Bigger is sometimes better. There might also be interest in a larger format CNC machine that can easily be converted to an intermediate size, using the same rails but with adjustable plates that can effectively "choke up" on the rails to produce a machine with greater accuracy and repeatability. Rather than using plates screwed to the ends of the rails, it would use sliding plates on the sides of the rails, that could set the effective machine size to slightly greater than the planned project size. Maybe it already exists.
     
    #3 TerryOx, Sep 25, 2016
    Last edited: Sep 25, 2016
  4. ahayden

    ahayden New
    Builder

    Joined:
    Aug 8, 2016
    Messages:
    4
    Likes Received:
    42
    @TerryOx Having some scalability to improve accuracy for smaller high tolerance parts definitely drove a lot of design decisions. I'm hoping this setup will provide enough rigidity, though admittedly modular joints have a tendency to introduce more error than their fixed counterparts. I haven't seen any designs yet that would be able to easily scale x,y and z travel. Please let me know if I'm overlooking any.
     
  5. TerryOx

    TerryOx Well-Known
    Builder

    Joined:
    Apr 1, 2016
    Messages:
    90
    Likes Received:
    30
    I do appreciate some of the advantages of your design. My build of the C-Beam XL is in the early stages, and I tend to do things very slowly and deliberately.
     
  6. JordanMoss

    Builder

    Joined:
    Jun 20, 2016
    Messages:
    17
    Likes Received:
    5
    Nice design. I am currently building something almost exactly the same.

    Have you thought about supporting the X axis gantry with a custom shaped plate (like the OX) rather than the vertical rail sections?
     
  7. ahayden

    ahayden New
    Builder

    Joined:
    Aug 8, 2016
    Messages:
    4
    Likes Received:
    42
    @JordanMoss I looked into that and I have a few vector files drawn up for plates that accommodate 4 wheel sets along the top and bottom in addition to 4 more mini wheels running in the C-Beam track. Currently I don't have direct access to a CNC Router that can easily cut aluminum.

    For this build I'm more interested in a design that offers flexibility, in this current iteration I can lower the X axis gantry which will provide more rigidity to the Z axis. I can also shorten the X axis without cutting my lead screw or C-Beam.
     
  8. Bad Sequel

    Bad Sequel Well-Known
    Builder

    Joined:
    Aug 19, 2015
    Messages:
    83
    Likes Received:
    32
    Liking the looks of this!
     
  9. Mark Carew

    Mark Carew OpenBuilds Team
    Staff Member Moderator Builder Resident Builder

    Joined:
    Jun 28, 2013
    Messages:
    2,741
    Likes Received:
    2,407
  10. Darrell Corpening

    Builder

    Joined:
    Mar 12, 2015
    Messages:
    12
    Likes Received:
    0
    Can you explain further what you mean by "admittedly modular joints have a tendency to introduce more error than their fixed counterparts"?
    And another question - which of the Openbuilds plates did you use for the two Y-movement beams with?
     
  11. ahayden

    ahayden New
    Builder

    Joined:
    Aug 8, 2016
    Messages:
    4
    Likes Received:
    42
    @Darrell Corpening gantry routers have a gantry that runs along the y axis which is then connects to a carriage that runs along the x axis and z axis. This allows the cutting volume of the router to be maximized however with each axis connected in series the error/deflections compounds. This is added to the fact that in the carriages and gantry need to be kept to a reasonable size. A heavier gantry means actuator rails need to be stiffened to support more weight and stepper motors need more power to drive the axises. Travel speeds then are reduced to make up for increased inertia. Because of this XY tables are designed to have a smaller cutting envelope and to move at slower speeds. The x and y move independently of the z axis dividing the mass of moving parts and allowing for greater accuracy and larger more powerful spindles to be used. This is essentially the difference between the design of a 3 axis CNC router and a 3 axis CNC mill.

    The C-beam XL is somewhat of a hybrid xy table where the table only moves the y axis and the fixed gantry runs a carriage that navigates the x and z axis'. The dual y actuators are are linked by the table which provides a much more rigid connection than a moving gantry counterpart.

    If anyone else has any input on this feel free to jump in. I'm sure there's probably another thread out there that dives a little deeper into the pros and cons.
     
    jamesdjadams and AnassL like this.
  12. Jestah

    Jestah Well-Known
    Builder

    Joined:
    Dec 4, 2013
    Messages:
    148
    Likes Received:
    84
    Really nice design that looks like it is going to perform very well! thanks for sharing!
     
  13. Dale Y

    Dale Y New
    Builder

    Joined:
    Jun 20, 2016
    Messages:
    46
    Likes Received:
    6
    Nice and simple. I am new to this and have just started planning one of my own, which oddly enough is similar. Now I see this and it gives me some ideas on how to finish my design
     
  14. Darrell Corpening

    Builder

    Joined:
    Mar 12, 2015
    Messages:
    12
    Likes Received:
    0
    I love the simplicity of this design. And it could easily be scaled to any reasonable size.

    Looks like you are using standard Openbuilds plates rather than custom plates. Which Openbuilds plates are you using on the Y and X axis?
     
  15. Darrell Corpening

    Builder

    Joined:
    Mar 12, 2015
    Messages:
    12
    Likes Received:
    0
    Looks to me that you have used a total of 6 XL Gantry Plates. Is that right?
     
  16. Rick 2.0

    Rick 2.0 OpenBuilds Team
    Staff Member Moderator Builder Resident Builder

    Joined:
    Dec 20, 2013
    Messages:
    2,852
    Likes Received:
    1,524
    7 XL plates. There are 2 plates back to back between the X and Z axes.
     
  17. Jesus Obezo

    Builder

    Joined:
    Jan 15, 2017
    Messages:
    1
    Likes Received:
    0
    Perhaps you could offer options of the 500 mm rails in either direction for those of us that need the space saving.
     
  18. MWB

    MWB New
    Builder

    Joined:
    Mar 9, 2017
    Messages:
    1
    Likes Received:
    0
    This is the design I am going with. Makes sense and is a efficient use of existing parts for those of us that cannot currently fabricate aluminum parts for plates. I would like to go with a 1500 mm by 750 mm size (approx.) Do you see any issues with this length of C Beam as well as lead screw?
     
  19. eglin

    eglin New
    Builder

    Joined:
    Feb 19, 2017
    Messages:
    10
    Likes Received:
    0
    Is the OP still active here ? How did you mount 3 wheels on a single screw on the z axis? I can't figure out and the longest screw is 65mm which doesn't seem to be long enough to have it work like the picture, what am I missing here?
     
  20. Rick 2.0

    Rick 2.0 OpenBuilds Team
    Staff Member Moderator Builder Resident Builder

    Joined:
    Dec 20, 2013
    Messages:
    2,852
    Likes Received:
    1,524
    He didn't. You'll note there are two plates on the front side of the X-axis. There is a 25mm bolt sticking forward from the front plate with one wheel and a 60mm bolt sticking back toward the rear holding the other two. (Besides, you have eccentrics rotated in two different directions in the top screws snugging up the different axes so a single bolt would not be possible.)
     
    eglin likes this.
  21. eglin

    eglin New
    Builder

    Joined:
    Feb 19, 2017
    Messages:
    10
    Likes Received:
    0
    Thank you that makes much more sense :) I am new just got my parts in. How can you tell where the eccentrics are, still couldn't figure out where they should go, and if all wheels need one, why they are needed etc. ?
     
  22. Rick 2.0

    Rick 2.0 OpenBuilds Team
    Staff Member Moderator Builder Resident Builder

    Joined:
    Dec 20, 2013
    Messages:
    2,852
    Likes Received:
    1,524
    The eccentric nuts help you tighten the wheels to the rail. They are placed in the larger holes in the plate and will be oriented to all fall along one side of the extrusion. The eccentric nuts are then rotated to get the wheels snugged up to the track. Better explanations can be found in the following projects with the first actually giving examples of assemblies very similar to the ones used in this project.
    C-Beam Machine XLarge
    OpenBuilds OX CNC Machine
     
    eglin likes this.
  23. eglin

    eglin New
    Builder

    Joined:
    Feb 19, 2017
    Messages:
    10
    Likes Received:
    0
    Those links did clear up a lot of questions thank you. I have a couple more if you don't mind, I see that only one side needs the eccentric, does it matter which ? Also, how did the OP mount the two plates to each other on the z axis ?
     
  24. Rick 2.0

    Rick 2.0 OpenBuilds Team
    Staff Member Moderator Builder Resident Builder

    Joined:
    Dec 20, 2013
    Messages:
    2,852
    Likes Received:
    1,524
    Side doesn't really matter so most people generally go with whichever side is most accessible in order to make the adjustments easier.

    Connection of the Z-axis plate to the X-axis is shown near the bottom of the C-Beam Machine XLarge build. There are threaded screw holes that match up with smooth screw openings when the two plates are set 90 degrees to each other.
     
    eglin likes this.
  25. eglin

    eglin New
    Builder

    Joined:
    Feb 19, 2017
    Messages:
    10
    Likes Received:
    0
    Thank you again, I am confused about one more thing, what is the difference between nut block and anti backlash? I ordered all anti backlash. Also I see some builds using double nut blocks. Is it ok to use a single anti backlash on all axis'?
     
  26. Rick 2.0

    Rick 2.0 OpenBuilds Team
    Staff Member Moderator Builder Resident Builder

    Joined:
    Dec 20, 2013
    Messages:
    2,852
    Likes Received:
    1,524
    Yes, a single anti-backlash works fine.
     
  27. eglin

    eglin New
    Builder

    Joined:
    Feb 19, 2017
    Messages:
    10
    Likes Received:
    0
    I am still not too clear on how two plates are joined at the Z. I packed up everything for now due to not having time but I look at that thread you have shared almost everyday. I see the images where screws are inserted on both plates but its not clear on how exactly they are joined? Do plates have threads for the screws?
     
  28. Rick 2.0

    Rick 2.0 OpenBuilds Team
    Staff Member Moderator Builder Resident Builder

    Joined:
    Dec 20, 2013
    Messages:
    2,852
    Likes Received:
    1,524
    Yes, some of the holes are threaded. So when the plates are turned 90 degrees to each other the screws pass through the smooth holes into the threaded ones.

    When you have a set of plates in front of you, rotate one set 90 degrees off the other and you'll see the way the holes line up with each other.
     
  29. eglin

    eglin New
    Builder

    Joined:
    Feb 19, 2017
    Messages:
    10
    Likes Received:
    0
    Just use a nylon nut on the other ends then?
     
  30. eglin

    eglin New
    Builder

    Joined:
    Feb 19, 2017
    Messages:
    10
    Likes Received:
    0
    I am guessing it is just a nylon nut, I want to be mentally prepared for all the questions in my head so when I start building I actually finish it
     

Share This Page

  1. This site uses cookies to help personalise content, tailor your experience and to keep you logged in if you register.
    By continuing to use this site, you are consenting to our use of cookies.
    Dismiss Notice