Welcome to Our Community

Some features disabled for guests. Register Today.

Strong OX

Discussion in 'CNC Mills/Routers' started by Hytech2k, Nov 28, 2014.
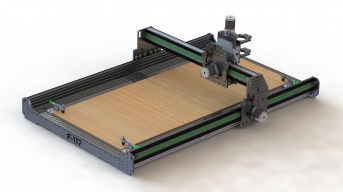
  1. George M

    George M New
    Builder

    Joined:
    Feb 22, 2015
    Messages:
    32
    Likes Received:
    4
    I emailed the guy at vgrooverail.com. Here's wheat I got back.

    "I just have 35.5" pieces with holes pre drilled. $31 each plus $15 shipping."

    Pretty steep on the shipping. Grainger has 48" pieces @33.45 plus local tax. Cold rolled 52100 steel Much better deal which is surprising since Grainger is usually 3 times more expensive than anyone else.

    http://www.grainger.com/product/PBC-Linear-Linear-Rail-2CRV9?nls=1&searchQuery=2crv9


    All this assuming that we are talking like product. That being VRD1 rail. Mark, is that what the rail here at OpenBuilds is?

    My thought is to use steel rail and steel wheels on the top and existing aluminum rail and Delrin wheels on the bottom. Does that sound workable?
     
  2. Hytech2k

    Hytech2k Veteran
    Builder

    Joined:
    May 6, 2014
    Messages:
    429
    Likes Received:
    331
    That's a good price from Grainger. I was thinking of trying the same thing with the steel on top and the delrin or what I have left of the Xtreme wheels on the bottom....
     
  3. Karl Miller

    Builder

    Joined:
    Apr 14, 2014
    Messages:
    25
    Likes Received:
    4
  4. George M

    George M New
    Builder

    Joined:
    Feb 22, 2015
    Messages:
    32
    Likes Received:
    4
    If you are talking about rack, they also have the 1/2 x 3/4 that is pre drilled. That is what I used on mine.
     
  5. SatMike

    SatMike New
    Builder

    Joined:
    Feb 12, 2015
    Messages:
    27
    Likes Received:
    5
  6. Hytech2k

    Hytech2k Veteran
    Builder

    Joined:
    May 6, 2014
    Messages:
    429
    Likes Received:
    331
    Sorry about that Karl, I got sidetracked, the files have been posted in the files section. These plates are for 2080 Y extrusions, 5010 X beam extrusion, and 20/20 rack all around...
     
  7. Karl Miller

    Builder

    Joined:
    Apr 14, 2014
    Messages:
    25
    Likes Received:
    4
    Groovy! Thanks @Hytech2k . Very grateful.
     
  8. Mpol0717

    Mpol0717 New
    Builder

    Joined:
    Jul 23, 2014
    Messages:
    12
    Likes Received:
    0
    I have upgraded to Geralds F117 and I as well have had a couple of wheels split in half too. Have less than 5 hrs of run time on them. Kind of dissapointing.
     
  9. Joe Santarsiero

    Joe Santarsiero OB addict
    Staff Member Moderator Builder

    Joined:
    Oct 30, 2014
    Messages:
    902
    Likes Received:
    196
    Hi Mpol. Which ones split?
     
  10. Mpol0717

    Mpol0717 New
    Builder

    Joined:
    Jul 23, 2014
    Messages:
    12
    Likes Received:
    0
    The xtreme polycarbonate ones.

    Matt
     
  11. Lee Whiteley

    Builder

    Joined:
    Sep 14, 2014
    Messages:
    23
    Likes Received:
    3
    Hello,

    I've really enjoyed reading about your build. I just completed a 4'x4' build and am in the process of getting all aligned, cables routed, and finishing touches. However I have always wanted to a smaller footprint CNC router that would be very rigid and made purposely to work with non ferrous metals and plastics for small projects. Portability would be a nice feature as well.

    Your design is just a super example of a well thought out machine. It will be very interesting to see you come up with a solution for the failing wheels.

    The move to steel rails would be quite expensive if you were to use the wheels as depicted in the Grainger catalog. If I understand this would be only for the top rail?

    My upcoming plan is to build my machine just like you've done just a bit smaller but using the exact same materials. I'm betting that this machine will have the stiffness that I'm going to need to machine metals other that steel of course.

    Thanks for all the information you've given to this community of builders and experimenters.

    I look forward to reading more of your posts.

    Regards,

    Lee
     
    GrayUK likes this.
  12. Hytech2k

    Hytech2k Veteran
    Builder

    Joined:
    May 6, 2014
    Messages:
    429
    Likes Received:
    331
    You are correct, running the wheels in the V slot would be the easier solution. But then you have to make thick wheel spacers (over 3/4") which would most likely introduce unwanted flex and still gain the necessary clearance to use R&P and you still have the problem with the slot being fouled with debris effecting the cut quality.
     
    #282 Hytech2k, Jun 30, 2015
    Last edited: Jun 30, 2015
  13. GrayUK

    GrayUK Openbuilds Team Elder
    Staff Member Moderator Builder

    Joined:
    May 5, 2014
    Messages:
    1,668
    Likes Received:
    627
    How about using v slot, with an airline attached to the end of each "Y", blowing down the length of it, thereby keeping the slot clear. :rolleyes:
    Gray
     
  14. Hytech2k

    Hytech2k Veteran
    Builder

    Joined:
    May 6, 2014
    Messages:
    429
    Likes Received:
    331
    I thought about that, or teeing off my vacuum collector line and making a nozzle to keep the slot clear... After making a prototype with 3/4"+ spacers though I wasn't impressed the distance from the plate to the wheels. Keeping the wheels closer to the plate would make the assembly more rigid. The only issue here is the wheels themselves, even going with just 1 steel top v rail on each extrusion with 2 steel V wheels would not only fix the split wheel problem but also make the machine deflect less.
     
    GrayUK likes this.
  15. Serge E.

    Serge E. Journeyman
    Builder

    Joined:
    May 6, 2014
    Messages:
    730
    Likes Received:
    251
  16. GrayUK

    GrayUK Openbuilds Team Elder
    Staff Member Moderator Builder

    Joined:
    May 5, 2014
    Messages:
    1,668
    Likes Received:
    627
    I wish we had a "Metal Depots", or similar, in the UK
     
  17. Hytech2k

    Hytech2k Veteran
    Builder

    Joined:
    May 6, 2014
    Messages:
    429
    Likes Received:
    331
    Thanks for the links and options.... I think though $99.00 for a drilled, hardened, 36" long piece of v rail is a bit steep, and 51.00 for a sealed v wheel might be out of reach for most people... It's good to have options though..

    I'll be checking with Superior Bearing and a few others getting price quotes for hardened V rail and steel v wheels...
     
  18. Kevin p

    Kevin p New
    Builder

    Joined:
    May 7, 2015
    Messages:
    10
    Likes Received:
    0
    Those of you trying steel wheels on the aluminum how is the wear?
    Those trying delrin how's the accuracy with running those?

    I have most of my parts at this point but I'm waiting on ordering the wheels until these options are tested since multiple sets of wheels add up quickly and I'm trying to stay within budget on this build.
     
  19. Lee Whiteley

    Builder

    Joined:
    Sep 14, 2014
    Messages:
    23
    Likes Received:
    3
    Just wondering what kind of solution you came up for the Wheel dilema. I also am very curious about this very problem for my own build. A cost effective solution would be great.

    Lee
     
  20. Hytech2k

    Hytech2k Veteran
    Builder

    Joined:
    May 6, 2014
    Messages:
    429
    Likes Received:
    331
    I've changed all the Y axis top wheels to delrin to see if they will "give" a little rather than crack and split.... So far so good, i've cut probably 20 signs so far without issue and the wheels all look good. I'm keeping an eye out for other sturdier options but for the moment i'm working on finishing my laser/3D printer project... If I come across other options I will post them here...

    Gerald
     
    GrayUK likes this.
  21. Hytech2k

    Hytech2k Veteran
    Builder

    Joined:
    May 6, 2014
    Messages:
    429
    Likes Received:
    331
    I think i'm going to pass on the steel/aluminum option, if I go with steel wheels i'll try to find hardened v rail to match. I haven't noticed any difference so far in cutting with the delrin wheels, but I haven't tried any 6061 yet, just pine and oak...

    Maybe Mark can chime in if he's knows of a supplier for steel v rail that's compatible with the steel wheels the OB store sells...
     
  22. George M

    George M New
    Builder

    Joined:
    Feb 22, 2015
    Messages:
    32
    Likes Received:
    4
    From my experience the open rail wears out FAST. My steel rails haven't arrived yet so been running steel wheels on the open rail for the gantry. Can definitely see wear - black coming off and where the transition from angle to straight should be smooth, it is now sharp and ragged where the gantry is running the most. And that is with not a lot of use. Only three or four signs.
     
  23. Mark Carew

    Mark Carew OpenBuilds Team
    Staff Member Moderator Builder Resident Builder

    Joined:
    Jun 28, 2013
    Messages:
    2,742
    Likes Received:
    2,407
    Yes steel wheels on aluminum will wear down the rail in time.
    At this point I do not have a recommendation as I have not tried these out yet. We are collecting rails for testing.
    Good to hear the Delrin wheels are working out allowing you to keep cutting for now. In the case of the center v wheel application being used with the forces here, we know these are not a long term solution and we are working to come up with one that will work and hope to have something to share soon.
    Thanks guys
    Mark
     
    GrayUK and Hytech2k like this.
  24. Joe Santarsiero

    Joe Santarsiero OB addict
    Staff Member Moderator Builder

    Joined:
    Oct 30, 2014
    Messages:
    902
    Likes Received:
    196
    Hi George,

    To get a little more life from your set-up may I recommend you to give the wheels and railway a thorough wipe down, apply a Teflon/wax type spray, and give another not so through wipe down. Edit; a dry Boron Nitride spray is ideal for this situation. Google boron nitride mold release spray. Stay away from Graphite. It'll compound the problem.

    Adding plexi guide fences is another nice addition to keep debris down...that is if your set-up allows them.
    Keep us updated on your vrail install!

    Joe
     
    #294 Joe Santarsiero, Jul 15, 2015
    Last edited: Jul 15, 2015
    GrayUK, Hytech2k and Mark Carew like this.
  25. Kevin p

    Kevin p New
    Builder

    Joined:
    May 7, 2015
    Messages:
    10
    Likes Received:
    0
    Surface work only or deeper cuts? Would you suggest going all delrin or the 6/2 combo you're currently running? Most of my work is going to be 3/4" plywood and I know plunge cuts are going to take more force than surface work which is where most of my concern is from.
     
  26. Hytech2k

    Hytech2k Veteran
    Builder

    Joined:
    May 6, 2014
    Messages:
    429
    Likes Received:
    331
    Kevin, IMHO it's too early for me to say. Alot of my work is a combination of pocket cuts, 3D work, and profile cuts... I use alot of 1/8 bits and profile with a 1/4 compression bit at 60IPM and .23 DOC without issue... I found some steel v rails I may try or go with 1/2 angle iron rail (but that would require the Y plates to be redesigned for them) and 4 steel V wheels with 3/8 bores.
     
  27. George M

    George M New
    Builder

    Joined:
    Feb 22, 2015
    Messages:
    32
    Likes Received:
    4
    Well I received my steel rails from Zoro. Should have paid more attention to the detail specs. I don't know that I can get them to work with my setup - i.e. installing on a 25-5010 vslot. If you look at the picture comparison, I would need to drill and tap each hole in the v-slot rail that would be very near the top and doing so may affect the structural integrity. Another option would be to epoxy them onto the rail. That seems to be the most doable but would have to research on what epoxy to use.
    Hopefully Gerald or Mark will find a better bolt on solution.

    OpenRail.jpg
     
  28. SatMike

    SatMike New
    Builder

    Joined:
    Feb 12, 2015
    Messages:
    27
    Likes Received:
    5
    Greg,

    I had the same concern with those rails when looking at the spec sheet. I think epoxy would work, although at the cost of being rather permanent. The other option would be to mount the v-rail to a plate, and secure the plate to the extrusion. However, I think you could get away with taping the rail, although I doubt I would use every hole.
     
  29. George M

    George M New
    Builder

    Joined:
    Feb 22, 2015
    Messages:
    32
    Likes Received:
    4
    I'll be working on it this weekend. First attempt will be to drill hole and use sheet metal screws. Tested it on the v-slot scrap I had, but the 5010 I use for the X rail is a bit thicker so don't know for sure it will work in it. If not will try the tap method and lastly epoxy.

    You also got me thinking about using a plate. Might be possible to do that - or maybe rip off the V section of the existing open rail, epoxy the new rail to the now flush open rail and reattach. Problem with that is I dont want to need new plates, so the spacing for wheels would have to work by adjusting spacers.
     
  30. George M

    George M New
    Builder

    Joined:
    Feb 22, 2015
    Messages:
    32
    Likes Received:
    4
    I'm running on steel - well the gantry is anyway. That is where I had the big problem with the extreme wheels. Then switched to steel wheels and saw the aluminum open rail deteriate rapidly. I don't have as much problem with the Y wheels and rails I think because I have been doing maily 3d profiles using X rastor. So a lot of carriage movement and minimal Y motion.

    Anyway I used steel rail from Zoro.com. At first I tried to tape the rail to the 5010 extrusion (my X rail) and drill a pilot hole and drive in the sheet metal screws. However it was too difficult to get the rail positioned correctly, especially with the rounded edges of the extrusion. I found when I set the screws it would move the rail slightly.

    So I went to plan B. I epoxied the rail about every 6". Taped and clamped it down for an hour. Then went back to drill the pilot holes and drive the screws. This went well. Here are some pictures .
    1 is the worn open rail
    2 is a comparison of open rail and new steel rail
    3 is the process of epoxy
    4 is the X rail back on the machine
    5 is a closeup of the working rails

    Worn Open Rail.jpg OpenRail.jpg Epoxy.jpg Back On Machine.jpg Completed.jpg
     
    GrayUK, Joe Santarsiero and Hytech2k like this.

Share This Page

  1. This site uses cookies to help personalise content, tailor your experience and to keep you logged in if you register.
    By continuing to use this site, you are consenting to our use of cookies.
    Dismiss Notice