Welcome to Our Community

Some features disabled for guests. Register Today.

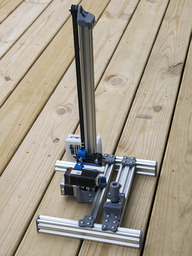
Dedicated Compact Rotary Axis Laser Engraver

Discussion in 'Laser Cutters' started by David Bunch, Jan 31, 2022.

  1. David Bunch

    David Bunch Veteran
    Builder

    Joined:
    Oct 27, 2014
    Messages:
    622
    Likes Received:
    428
  2. Giarc

    Giarc OpenBuilds Team
    Staff Member Moderator Builder Resident Builder

    Joined:
    Jan 24, 2015
    Messages:
    2,912
    Likes Received:
    1,619
    Thank you! I plan to build this soon. I have an old 0.9 degree stepper from a inkjet printer I may try to incorporate into this for the rotary, but it may be too small. I just got a shipment in that includes the 2040 v-slot for my K40 upgrade. I know you said 250mm for the pieces, but the off-cuts will be slightly shorter. Waste not, want not. My goal is to use up the parts and pieces left over from other builds. This is the perfect project for that.
     
  3. David Bunch

    David Bunch Veteran
    Builder

    Joined:
    Oct 27, 2014
    Messages:
    622
    Likes Received:
    428
    That motor might work. The pancake motor I use works fine for the rotary axis. I will have to put my hand on it again after the next run as I don't remember how warm it was to the touch. There is nothing magic about the 250mm lengths or the 500mm length. They could be longer or shorter. It was just that 250mm & 500mm lengths were easy to source without having to cut anything.

    One thing I was realizing with this design is you can only do small parts. I have one bamboo kitchen container that is 140mm in diameter that I want to engrave at some point. The solution to that problem is to use a separate 250mm length for mounting the turntable. This might be pushing the engraving length for the smaller parts like pens as you need about 40mm offset using the blind corner. With the Z-axis adjustment, I might have enough space for it to work for me as I use about 30mm offset to the laser. You could also use something like this plate T Joining Plate - OpenBuilds Part Store in place of a couple of the blind corners that are between the 2 - 250mm lengths. I also added optional 4 Black Angle Corner Connector - OpenBuilds Part Store or L brackets to mount this to a MDF or plywood. I kind of like the idea of cutting a piece of MDF to fit footprint as this makes it flat & solid. You could also then build an enclosure around it.

    RotaryAxisLE_2040_4.jpg
     
  4. Mark Carew

    Mark Carew OpenBuilds Team
    Staff Member Moderator Builder Resident Builder

    Joined:
    Jun 28, 2013
    Messages:
    2,744
    Likes Received:
    2,409
    Very nice David! :thumbsup: Thank you for sharing
     
  5. David Bunch

    David Bunch Veteran
    Builder

    Joined:
    Oct 27, 2014
    Messages:
    622
    Likes Received:
    428
    Think I solved the blind corner space problem. I came up with a custom 3d printed bracket for connecting all the 2040x250mm base extrusions together. I don't have an extra 2040x250mm but do have a 2 - 2020x250mm which this bracket will also connect those together nicely. I printed one & seems as solid as the blind corners, so will print 3 more of them. It does take 5 M5x12mm screws & T-Nuts for each bracket. This is probably a little less expensive also. Should also be easier to adjust the offset of the turntable mounted 2040. Here is what the new model looks like.
    RotaryAxisLE_2040_7.jpg
     
    Giarc likes this.
  6. Giarc

    Giarc OpenBuilds Team
    Staff Member Moderator Builder Resident Builder

    Joined:
    Jan 24, 2015
    Messages:
    2,912
    Likes Received:
    1,619
    I was thinking of mounting mine to mdf and building an enclosure where the back panel could slide up and out. If I want to engrave a surface of a large object. I will have to think on it more.

    I may need to place another order with the OB parts store. I wonder if my financial person (wife) will notice a third order in the span of a month.
     
  7. David Bunch

    David Bunch Veteran
    Builder

    Joined:
    Oct 27, 2014
    Messages:
    622
    Likes Received:
    428
    I put it all together today after scavenging the necessary T-Nuts from previous build. I seem to never have enough of those T-Nuts. I used blind corners on the main 2040 beam since I didn't have enough T-nuts, but I do like these custom 3d printed brackets better. I created a 3d printed corner for mounting to the Base board. Having all these V-Slot connections 3d printed keeps the M5 simpler since I design them all to use M5x12mm screws. I also relocated the 3d printed brackets to opposite side of the other 2040 since they interfered with getting the turntable lined up with laser, but later realized that the cantilever arm was not centered on that main beam, so I shifted it to center & rotated those special brackets around. Think I have the BOM together & will work on getting all the STL & assembly file together to upload. This design has come together nicely in a short time.

    Here is the 1st assembly of parts.
    IMG_2180_800x600.jpg
     
  8. Giarc

    Giarc OpenBuilds Team
    Staff Member Moderator Builder Resident Builder

    Joined:
    Jan 24, 2015
    Messages:
    2,912
    Likes Received:
    1,619
    One part down. Fits perfectly.
    IMG_20220201_165637__01.jpg
     
    Mark Carew likes this.
  9. David Bunch

    David Bunch Veteran
    Builder

    Joined:
    Oct 27, 2014
    Messages:
    622
    Likes Received:
    428
    Cool. I found that I didn't need to use the top clamping screw for the pen as it was a good enough press fit. The only problem I had was making sure it perfectly straight. Further you can push it in without hurting pen, the less problem with keeping it straight. Rotating it around a few times & lining up the edge of pen by sight with the cantilever would tell me whether it was off or not. This morning I realized a simpler mounting for the turntable motor to allow for other size motors. I am going to rotate that front 2040 90 degrees & mount it to the top of the 2040 instead of sides. This will solve a couple of problems. Easier to adjust screws from the top & no cantilever, so it can support heavier objects.

    Here is what I had in mind for the motor mount for the turntable. This will make it easier to adjust for larger depth motors, less parts to print & no long M3 screws.
    RotaryAxisLE_MotorMount2040_2.jpg
     
    #9 David Bunch, Feb 2, 2022
    Last edited: Feb 2, 2022
    Giarc and Mark Carew like this.
  10. David Bunch

    David Bunch Veteran
    Builder

    Joined:
    Oct 27, 2014
    Messages:
    622
    Likes Received:
    428
    Think I have worked out all my current problems. I just have to the print 3 new parts. The BOM cost for mechanical part of this build comes in around $110 and adding the electronics puts it a little over $200. Here is what it looks like all together now.
    RotaryAxisLE_2040_8.jpg
     
  11. David Bunch

    David Bunch Veteran
    Builder

    Joined:
    Oct 27, 2014
    Messages:
    622
    Likes Received:
    428
    I uploaded a zip file to the files area with all the STL files, BOM & assembly drawing in STL, STEP & SKP format. Importing the STEP file into fusion 360 & using that as a build guide is probably easier than the STL or SKP format. The SKP format did not come out well as fusion 360 failed to save in that format, so I used a .3mf format & converted it to SKP using TurboCAD 2021. I trimmed the pen holder a little more & made the M5 motor shaft hole slightly larger as it was too tight a fit for me. There are several motor mounts for the turntable depending on how big your nema17 is. I have sizes in 5mm increments from 25mm - 50mm. I am using MotMnt_25mmHt_Top2040.stl for my pancake motor.

    I was finally able to get fusion 360 to export to a SKP after I reworked the assembly and uploaded it as Compact_Rotary_Axis_LE v9 v1.skp
     
    #11 David Bunch, Feb 3, 2022
    Last edited: Feb 3, 2022
  12. Giarc

    Giarc OpenBuilds Team
    Staff Member Moderator Builder Resident Builder

    Joined:
    Jan 24, 2015
    Messages:
    2,912
    Likes Received:
    1,619
    This is awesome! Thanks. I prefer STEP so this works out great.
     
  13. David Bunch

    David Bunch Veteran
    Builder

    Joined:
    Oct 27, 2014
    Messages:
    622
    Likes Received:
    428
    I added one more STL file that I find useful for limiting how far down the X-Carriage moves. It is called X-Axis_StopLimit.stl
    It is the yellow part looks like in the assembly attached with M5x12mm screw & T-Nut
    X-Axis_StopLimit.jpg
     
    Mark Carew and Giarc like this.
  14. JustinTime

    JustinTime Veteran
    Builder

    Joined:
    Dec 18, 2013
    Messages:
    758
    Likes Received:
    253
    So what happens when the X axis wants to go beyond the stop? Is there a limit switch?
     
  15. David Bunch

    David Bunch Veteran
    Builder

    Joined:
    Oct 27, 2014
    Messages:
    622
    Likes Received:
    428
    Guess you could use a limit switch for the X-Axis, but not sure if you could just home X-axis since I don't know if there is a way to use a limit switch on the rotary axis. I just find that stop useful as a manual X-axis switch & usually set it with 12v turned off. In case that carriage gets knocked downward & I miss it, I know it will not go lower than that stop.

    I was looking further at this build before actually testing which might be this afternoon since weather is warmer today. I added one more part to stiffen the cantilever. For small parts like pens probably not really necessary but does help to stiffen it quite a bit. Using 2040 for the cantilever instead of 2020 makes adding this part easier. You might could use a corner connector there, but I have a 5mm offset between the cantilever beam & main beam. I did that to give better clearance for attaching that motor mount to the 2 V-Slots. I might look at that part again & see if I can make those 2 beam connections flush.

    [Edit] Looks like that will work by making the plastic connecting part to the main beam 5mm thick instead of the 6.5mm & using M5x10mm screws instead of the M5x12mm. I will print it & try it after I do my 1st test burn with current configuration.

    I also spotted another 3d printed part I forgot from the carriage assembly. I uploaded Shim_Plate_6_4mm_V821.stl & VerticalStiffener.stl & will update the zip file when I get a chance. There are several more hardware items I missed from the carriage assembly & will update the BOM when I update the zip file.

    Here is what that Vertical stiffener looks like in the assembly.
    Vertical_Stiffener.jpg
     
    #15 David Bunch, Feb 4, 2022
    Last edited: Feb 4, 2022
  16. Giarc

    Giarc OpenBuilds Team
    Staff Member Moderator Builder Resident Builder

    Joined:
    Jan 24, 2015
    Messages:
    2,912
    Likes Received:
    1,619
    Ha! I was wondering what kept the proper space when I was looking at the Fusion 360 document last night. I thought I was going crazy. I was going to ask today. Thanks!
     
  17. David Bunch

    David Bunch Veteran
    Builder

    Joined:
    Oct 27, 2014
    Messages:
    622
    Likes Received:
    428
    It just occurred to me this evening that if you wanted to use a limit switch, you could probably wire the one limit switch for the X-axis to both the X & Y on the controller board. I am currently using a controller board that has X, Y & Z and have the rotary axis set to the Z-axis mostly so I do not have to change the GRBL settings when I use it for a normal X, Y laser engraver. Lightburn handles using a Z-axis as rotary just fine. I have a macro for moving Z back to zero if it somehow gets changed. I found a 2-axis controller board on the aliexpress site that has both a 2 & 3 pin connection for a laser with soldered on DRV8825, but no limit switch connections for around $19. I haven't decided on whether to order it yet or not.

    I did my 1st test burn on a bamboo pen with the new setup today & worked well. My biggest problem is still getting the pen absolutely straight. Probably need to get a drill chuck, but still on the fence as to which one to buy. I shot a video of it and should be able to upload it YouTube tomorrow. One thing I have noticed with these bamboo pens is some parts of the bamboo burn easier than others (not the case on all pens though). I had to run it a couple more times at higher power to get part of it to burn well. My initial settings with the 6W NEJE laser were 1200mm/min & 50% power. I ran it twice more at 60%, then 70% and came out reasonable after that. One post processing technique I use to get extra soot off is to wipe it down with a paper towel doused with 91% isopropyl alcohol.

    [Edit] Here is the motor mount that makes the 2-2040 mesh flat together. I did a test print of 2 holes to make sure the M5x12mm screws would fit. Rather than making it a 5mm thick & having another screw size, I made a 1.5mm high bump to still use the M5x12mm screws. This have about 12.5% less volume than previous design. I will print it this morning.
    PenMotMnt_Above.jpg
     
    #17 David Bunch, Feb 4, 2022
    Last edited: Feb 5, 2022
  18. David Bunch

    David Bunch Veteran
    Builder

    Joined:
    Oct 27, 2014
    Messages:
    622
    Likes Received:
    428
    I updated the build page with some more information & new photos.

    The 1st burn test video can be found here:
     
  19. Giarc

    Giarc OpenBuilds Team
    Staff Member Moderator Builder Resident Builder

    Joined:
    Jan 24, 2015
    Messages:
    2,912
    Likes Received:
    1,619
    Brilliant! Why did I not think about this on my lathe. I just put a push button on the side of the enclosure and manually press it for Y.
     
    Mark Carew likes this.
  20. David Bunch

    David Bunch Veteran
    Builder

    Joined:
    Oct 27, 2014
    Messages:
    622
    Likes Received:
    428
    It was kind of interesting how that idea just popped in my head.

    I printed the FlushPenMotMnt_Above_V2040.stl & FlushVerticalStiffener.stl that I uploaded to the files area. They replace the other 2 similar files. Seems like a better idea to have the 2-2040s mesh together rather than have a 5mm offset between them. It also allows you to use standard hardware like corners instead of the stiffener part I included. I still have not updated the .zip file.

    This morning I swapped the 2040x250mm legs with the 2060x250mm legs to see if that was any better of an option. The only thing that really buys me is being able to put a cap on the end of 2040 cantilever beam & have a gap under 2040x250mm main beam to run the turntable motor wire. It also increases the height of the machine by 20mm (or loose 20mm burn height if I move the 2040 cantilever down to base of 2060s) & I don't really need a cap on that 2040 since it is not seen, so will put it back to 2040 legs.
     
  21. David Bunch

    David Bunch Veteran
    Builder

    Joined:
    Oct 27, 2014
    Messages:
    622
    Likes Received:
    428
    I updated the zip file of all the files & deleted the extra STL files I had uploaded since last zip since the most current ones are in the zip. I added LaserAdjustGauge_30mmHt.stl that I use to set the Z height, so I do not have to set focus. I just adjust the z height until it is 30mm from object. I added step file & fusion 360 of that file in case someone wants a different offset.
    LaserAdjustGauge_30mmHt.jpg
    I had made a toothpick spindle awhile back & updated that to tweak the design. I designed it around these Tea Tree Therapy toothpicks which seem a better choice for engraving since they have a mostly cylindrical base to hold it. Amazon.com: Tea Tree Therapy Cinnamon Toothpicks (1x100 CT) : Health & Household You should also be able to find these in some local stores. I did not include this file yet since I haven't tested it yet, but here is what that design looks like. There is a little over 6.2mm circumference which looks like enough to burn the openbuilds logo. I will test that when it warms up some more.
    ToothPickSpindle.jpg
    I was also thinking of adding 2040x250mm vertical along one side to put a raspberry pi camera attachment to maybe get closer videos.
     
    Giarc likes this.
  22. David Bunch

    David Bunch Veteran
    Builder

    Joined:
    Oct 27, 2014
    Messages:
    622
    Likes Received:
    428
    I did some burn tests with the toothpicks yesterday, mostly with the openbuilds logo. That design doesn't seem to lend itself well to this small of an item, but other designs should as I did them before. Will have to do some more testing later.

    I finally found a GRBL controller board that had all the features I needed & then some and was only $16.55 for just the board. It is a grbl 32 bit CNC shield controller ESP32 WIFI MKS DLC32 V2.1 It has X, Y & Z drivers & endstop connections as well as 3 pin laser connection. Might have a little learning curve with this one since it is grbl on a 32bit board.

    I started playing around with reworking the design of my self-centering turntable to be able to mount to the top of the 2040. Looks like it should work. Here is what it looks like so far. There are 3 standoff connections between bearing base & 2040 base using M3x35mm screws. I designed those connections so I could get to them without taking the 2040 base off.
    SelfCenteringTurntable_2040Mount.jpg
     
  23. David Bunch

    David Bunch Veteran
    Builder

    Joined:
    Oct 27, 2014
    Messages:
    622
    Likes Received:
    428
    I adjusted this design some more. I added a slot to motor bearing mount & a slot on the 2040 base mount. I have found the slots make it easier to change the spindle that is attached to the motor. Since some folks will use a larger depth motor than I am using, I decided to change those 3 M3x35mm screw connections with the standoffs to M5 screws. M3 screws are probably sufficient for this since the plastic standoffs carry most of the weight, but M5 screws seemed like a better choice. I have some M5x35mm screws & M5x40mm screws & will test the longer ones to see how well it stands up without the motor resting on the base. I also made nut traps coming in from the bottom plate. M5 nut traps to me are more forgiving than M3s since there is more surface area for the nut. With this setup, I should be able to keep the motor mount & 2040 base mount in place and be able to swap between the self-centering turntable & any other spindle.
    SelfCenteringTurntable_2040Mount_V2.jpg
    I also ordered a .3mm-8mm drill chuck from China for less than $4. Will see how well that works with smaller objects than pens. Toothpicks are around 2mm in diameter. I was looking at getting one that went from 2mm-13mm which would handle the bamboo pens but seems like I might damage the pen with that. I may adjust my bamboo pen spindle to be .1mm or so bigger diameter so the fit is not as tight a fit, but still hold it well.
     
    Giarc and Peter Van Der Walt like this.
  24. David Bunch

    David Bunch Veteran
    Builder

    Joined:
    Oct 27, 2014
    Messages:
    622
    Likes Received:
    428
    I have the turntable design worked out & printed. I will update assembly guide for this before uploading the parts. I used fatter standoff spacers than the original smaller hex shaped spacers but will include them if someone has clearance issues. You will probably need a ball end hex key set or the set from openbuilds. I think most folks building something like this have those. You do have to make sure that no part of your laser carriage hits this when the turntable revolves around. With this new main motor mount in place, you can easily swap the turntable with the pen mount, toothpick mount or probably any other custom mount you care to put on there. Here are some photos of the assembly. I respaced the front 2040 with a 40mm gap between its & main beam.
    IMG_2196_800x600.jpg IMG_2207_800x600.jpg IMG_2213_800x600.jpg IMG_2208_800x600.jpg
     
    JustinTime likes this.
  25. David Bunch

    David Bunch Veteran
    Builder

    Joined:
    Oct 27, 2014
    Messages:
    622
    Likes Received:
    428
    I did some more testing the last couple of days. I bought a 1.25"x4' birch dowel this week & cut off a 4" and 6" piece to test with the rotary engraver. I wanted a larger diameter object to fine tune my rotary settings & this dowel seemed like a good choice. Playing around with $101= ? in GRBL & the rotary mm per revolution, I realized I had those numbers backwards, but speed difference between x-axis & rotary axis for same length of travel was still off. I had mostly figured this out before but had forgotten it. After going back thru the build log of other laser engraver, I found the numbers I used there. To better finetune these settings, I created a Lightburn file with a layer for a horizontal 100mm line & a vertical 100mm line and set the speed the same for both (used a large number 1000mm/min to start with so times are not so long). Run them separately with laser turned off & look at the time in the console window of how long it took for each one. Before running this test, you have to make sure you get exactly 1 revolution (or as close as you can) when hitting the test button in the rotary setup dialog. To fine tune the 1 revolution correctly, I made a simple Lightburn file that looked like this.
    LaserRevolutionCalibrate.JPG
    The vertical distance is the circumference of the object I was burning which in this case was a 1.25" diameter birch dowel (31.75mm circumference). After running this file, those 2 horizontal lines should line up if it is correct. The final numbers that worked for me with a 1.8-degree Nema 17 & 1/32 DRV8825 stepper drivers are $102=64 in GRBL firmware & 100.0 mm per rotation in Lightburn Rotary Setup. If you multiple those numbers together you get 6400. If you have to adjust those numbers, I believe they should come out to that 6400. Different steppers and 0.9-degree motors will of course have to be adjusted.

    Here is a test run I did today before I had those numbers correct but came out pretty good and also had no discernible overlap. I made a spindle mount for this size dowel & changed the motor bracket style to use a M3x12mm screw with captive locknut & tighten against the flat part of motor shaft. That works a lot simpler than the side mounting bracket. I made 2 mounting holes, but only used one. Putting the captive nut in from the top was a little too difficult (probably should have made that captive nut hole go all the way thru). I ran this file twice as it didn't burn evenly the first time, partly because my rotary settings were a little off and moved a little faster along the X-axis. The dowel was a nice press fit in the spindle, so didn't have to use bracket screw.
    IMG_2214_800x600.jpg IMG_2215_800x600.jpg
    I was also starting to play with making a safety shield holder for the back of this machine. I have a couple of 12" square pieces of laser shielding from J Tech Photonics & came up with this mounting method for it. I might try it tomorrow if I have enough spare T-Nuts.
    LE_SafetyShield_Holders.jpg
     
    Mark Carew and Giarc like this.
  26. Mark Carew

    Mark Carew OpenBuilds Team
    Staff Member Moderator Builder Resident Builder

    Joined:
    Jun 28, 2013
    Messages:
    2,744
    Likes Received:
    2,409
    It's dialing in well now, nice one! Love the shield idea David I have some of the laser shielding but not 12" worth, so I was trying to think of a way to mount a smaller piece to the z so it follows the laser beam and we would not need that large of a shield.
     
    Peter Van Der Walt likes this.
  27. David Bunch

    David Bunch Veteran
    Builder

    Joined:
    Oct 27, 2014
    Messages:
    622
    Likes Received:
    428
    I designed this a while back & thought I had posted it somewhere here, but don't see it. You could do something similar to this.
    LaserShieldShroud.jpg
     
    Mark Carew likes this.
  28. Mark Carew

    Mark Carew OpenBuilds Team
    Staff Member Moderator Builder Resident Builder

    Joined:
    Jun 28, 2013
    Messages:
    2,744
    Likes Received:
    2,409
    That will do it! Thanks
     
  29. David Bunch

    David Bunch Veteran
    Builder

    Joined:
    Oct 27, 2014
    Messages:
    622
    Likes Received:
    428
    I added ShieldShroud.zip to the Files tab that has the STL, STEP & a Sketchup file in it to help you get started for working to your needs. The STL files can also be found with this thingiverse design: Cantilever Laser Engraver by GeoDave

    I also added LightBurnTestFiles.zip to the files tab that has my Lightburn test files in I was using to help others calibrate their machine.
     
  30. David Bunch

    David Bunch Veteran
    Builder

    Joined:
    Oct 27, 2014
    Messages:
    622
    Likes Received:
    428
    I did some further testing swapping the 1.8-degree Nema 17 with a spare 0.9-degree Nema 17 I had. Then I swapped the DRV8825 for a A4988 driver and used the 1.8-degree motor again.
    The only number I needed to change was the firmware number $101. The 100.0 mm per rotation in Lightburn Rotary Setup stayed the same.
    Here are the GRBL numbers that should cover most people's situation ($101 is Y-axis or use $102 if you are using Z-axis for rotary setup)
    $101 = 64 ;DRV8825 & 1.8-degree Nema 17 1/32 step
    $101 = 128 ;DRV8825 & 0.9-degree Nema 17 1/32 step
    $101 = 32 ;A4988& 1.8-degree Nema 17 1/16 step

    For other less common situations, use the Prusa Calculator here:
    RepRap Calculator - Prusa Printers
    Under Steps per millimeter - leadscrew driven systems section
    Under Pitch Resets, Set M6 - metric (1mm per rotation). This is so you have a 1: 1 gear ratio
    Then change Motor step angle and Driver microstepping to what you are using. Take the Result number in green highlight & divide that by 100. That will give you the number to put in the GRBL firmware.
    RotarySettings_PrusaCalculate.jpg

    Using the Line100mm.lbrn2 I included with the zip file LightBurnTestFiles.zip, here are my test run times using a DRV8825 & 1.8-degree Nema 17 for both X-axis & Rotary Axis.
    Even at a real slow speed of 100 mm/min, the run times are exactly the same.
    -------------------------------------------------------------------
    $101=64.000
    100.00 mm per rotation in Lightburn Rotary Setup


    2000 mm/min
    Starting stream
    Layer C00
    Stream completed in 0:05
    Starting stream
    Layer C02
    Stream completed in 0:05

    1000mm/min
    Starting stream
    Layer C02
    Stream completed in 0:08
    Starting stream
    Layer C00
    Stream completed in 0:08

    500 mm/min
    Starting stream
    Layer C02
    Stream completed in 0:14
    Starting stream
    Layer C00
    Stream completed in 0:14

    100 mm/min
    Starting stream
    Layer C00
    Stream completed in 1:02
    Starting stream
    Layer C02
    Stream completed in 1:02
    ----------------------------------------

    I updated my build tab to reflect these correct numbers.
     
    #30 David Bunch, Feb 18, 2022
    Last edited: Feb 18, 2022
    Giarc likes this.

Share This Page

  1. This site uses cookies to help personalise content, tailor your experience and to keep you logged in if you register.
    By continuing to use this site, you are consenting to our use of cookies.
    Dismiss Notice