This build log will chronicle the construction of my oversize (1000mm X 1500mm) OX router.
Current Status
Mechanical assembly is complete. (some modifications needed)
Electrical is complete but cabling needs to be redone to improve how it looks
Here is a video of the first full speed and full table movement.
Build Log
Here is my dual 24V power supply. Each supply is rated at 24V 15A. This was purchased 12 years ago when I first started collecting parts for a CNC router.

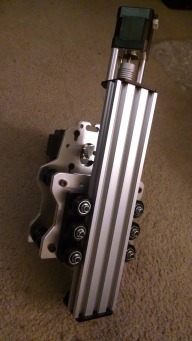
Some awesome steppers I picked up surplus. NEMA 23 with built-in controllers. I will be sending step and direction to them with a GRBL controller.

10/4/14: All of the parts arrived.

The grand unboxing.

After laying the V slot out on the floor I think I may have misjudged just how large 1000mm X 1500mm really is!

10/9/14: I still haven't ordered the plates from Chris and the need to put some parts together is killing me. So I attached the lead screw to the Z axis motor. Now I feel better.

10/14/14: LET THE BUILD BEGIN!!
Received my plates from Chris and a coworker who is regularly works with 8020 extrusion was kind enough to cut my rails to length.

I only had about an hour so I only got the wheels attached to the Y axis plates.

10/15/14: Today I was able to finish most of the mechanical portion of the build.
X, Y and Z axis is assembled and I'm very happy with how smooth the motion is.


10/16/14: Cleaning out a spot in the basement workshop. I had to reorganize an existing wood working setup where I make wood writing pens. Once again I realize I have TOO MUCH stuff.
10/18/14: Moved the mechanical bits to the basement and bolted the OX to my workbench.
The workbench is built like a tank and is very stable. It should provide a good foundation for my OX. There is a bit (about 6") of overhang on the right side. I'm hoping it won't cause any issues.

10/19 & 10/20/14
Worked on wiring up this beast. So far this is the most difficult (tedious) part of the build.
This is a picture of the Z axis stepper driver I got from Amazon for $10.

10/21 to 10/25/14: I completed wiring up all of the motors and I have first movement of all the axises. I also ordered and received my router (Bosch 1617EVS) and added an MDF bottom/waste board.
10/24/14
Since my steppers have integrated controllers I can't use one of the standard GRBL breakout/driver boards. To remedy this, I designed my own board which breaks out the various GRBL signals into RJ45s and screw terminals. I also included an inverter for one of the Y axis motors so I could invert the DIR signal. I ordered these through OshPark and should have them in a couple of weeks.


10/26/14
Here you can see the router and the mdf mount I made. This mount was intended to be temporary until I could cut one from aluminum. Unfortunately, it split within minutes of it being attached.


This is my temporary breakout of the signals from the GRBL while I'm waiting on my boards from OshPark.

10/27/14
I modified Mark's (Kram242) idea for mounting the router. I used a short piece of DIN rail as a seat for the router and two 4.5" band clamps. This appears to be quite stable, but it hasn't been tested under load with the router running.


10/28/14
I was doing of bit of testing with the Z axis and noticed some twisting of the X axis beams.
I'm planning to remove the 20x60 beams and drill a couple of holes so I can bolt them together.
Them I am going to fill the voids in the beam (highlighted in green in the picture below) with some urethane casting resin that I use in my pen business.
Specifically I will be using Alumilite Clear resin. It has very low shrinkage, is very hard and should do a nice job of locking the two 20x60 beams together to form one solid single beam.
I probably won't make this modification until mid-November when I get some guaranteed free time.

10/30/14
Lots of parts arrived today unfortuantly there was no time to do any work on the machine. NEMA23 plates from Chris, two pieces of cable drag chain, and a NEMA23 flex coupler for the Z axis lead screw.
11/10/14
Ordered the last two pieces of 20x40 that I needed. These will be used as supports for the MDF waste board.
11/25/14
-So the OX is alive and running.
-I replaced the Z axis NEMA 17 with a NEMA 23. The difference is just short of amazing.
-Added cable drag chain and rerouted/rewired everything to make it look better and to clean up the rats nests.
-GRBL breakout board is working well. Some minor issues with component spacing, but it works.
I'll update the design if I ever need to make more boards.
I'm having issues with repeatability of movements and the OX is experiencing some sporadic skipping. I think both are being caused by the belts stretching. I'm getting quite annoyed with this problem as it is preventing me from cutting anything that requires close tolerances.
If I can't solve this belt drive problem soon, I will probably convert the X and Y axis to lead screws.
01/30/2015
I finally got around to installing the limit/home switches. So I guess you could say that this build is complete. I still do not have a great love of the belt drives so I will be converting the X and Y axis to lead screw sometime in the next month or two.
Yet Another Ox Build
Build in 'CNC ROUTER BUILDS' published by RogueGeek, Feb 2, 2015.
This build log will chronicle the construction of my oversize (1000mm X 1500mm) OX router.
-
-
Build Author RogueGeek, Find all builds by RogueGeek
-
- Loading...
-
Build Details
- Build License:
-
- CC - Attribution - CC BY