I followed the excellent online build instructions for the most part. I made some tweaks as I went along.
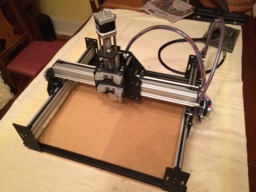
Here's the build before adding the router spindle. Note the use of flexible tubing to "float" the control cables between rails. Those have worked very well for this smaller build volume.

Just for fun, a stereo image. Cross your eyes.

I spent extra time terminating and dressing cables to assure a reliable build. Nylon ties anchor everything in place to allow the cables to flex with the machine but not weaken the connections.


I went with an upgrade of the Bosch Colt trim router with Precise Bits E11 collar.

While squaring the machine, I found shims broken out of a thickness gauge set were perfect for the tiny adjustments needed.

I realized the two belts of the Y-axis rails presented an interesting challenge. How to tension them so they don't introduce any skew as the gantry traveled fore and aft? Being a musician, I realized I could simply stretch and pluck each belt so they played the same musical pitch.

Of course, my first project after a "hello world" test, was a container for the control electronics. I built 3D models of each of the components in my control system - power supply, arduino+servo shield, buttons, etc.

Then, I positioned them in 3D space and designed a finger-joint enclosure around them. Once I was satisfied with my design, I flattened the six sides in order to send them to DeskProto for NC file creation.

Here they are cut and being finished with a sealer.

And, adding the electronics.


A view of the controller with the Shapeoko, beyond. Note the addition of a custom spoiler board with brass threaded inserts.

All in all, this first CNC project has been educational and useful. One of my latest projects is a wooden clock from published plans. It does a really nice job with those thin clock hands.

Shapeoko 2 - my first CNC
Build in 'Cartesian Style CNC' published by Michael Morlan, Jan 4, 2019.
This was my first foray into CNC. I chose to go with a reliable kit build since my knowledge of GCode, controllers, and steppers was pretty rudimentary.
-
-
Build Author Michael Morlan, Find all builds by Michael Morlan
-
- Loading...
-
Build Details
- Build License:
-
- CC - Creative Commons Public Domain (CCO 1+)