
I made a PDF document that lays out all the steps to this project. It's probably easiest to just download it and print it out. It's not a hard project, I just went a little overboard on the details in the instructions. I wanted it to be doable even for people with little to no prior technical experience.
There is also a YouTube Video that goes through all the steps of the build.
Other included attached files are these:
Parts list
Arduino Software for the autoclave
Notes, including schematics, drawings and photos
This is the table of contents for the included book of instructions, 181111_OpenAutoclaveBookDownload.pdf:
Chapter 1 - Setup
1.1 Set up your workspace 5
1.2 Tools 5
1.3 Parts and supplies 6
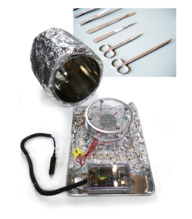
Chapter 2 - Build the autoclave oven
2.1 Insulated pot 16
2.2 Base tray 19
2.3 Heater rack 21
Chapter 3 - Build the electronic controller
3.1 Drill holes in the electronics box 25
3.2 Install the components 30
3.3 Finish the wiring 39
Chapter 4 - Set up the controller computer
4.1 Install the Arduino software 47
4.2 Download the Open Autoclave software 49
4.3 Upload the software to the microcontroller 51
Chapter 5 - Test the autoclave system
5.1 Run a full cycle 55
5.2 Download and graph the data 59
5.3 Using biological indicator strips 62
5.4 Troubleshooting 63
5.5 Using the autoclave, no computer 65
Chapter 6 - Resources
6.1 Change the temp and time settings 68
6.2 Volt-ohm meter 69
6.3 Anti-static mat 70
6.4 Pin connector crimper 71
6.5 Full electrical schematic 72
6.6 Diagram of autoclave system 73
6.7 Template for drilling electrical box lid 74
6.8 Template for drilling electrical box 75
6.9 Placement of components in electrical box 76
6.10 Ideas for improvements 77
6.11 Powering Open Autoclave with Solar 78
Humanitarian Medical Instrument Sterilizer Made from RepRap Parts
Build in 'Everything Else' published by David Hartkop, Dec 27, 2018.
Instructions to build an open-source off-grid medical instrument sterilizer that can be used by aid workers in places without reliable electrical power
-
-
Build Author David Hartkop, Find all builds by David Hartkop
-
- Loading...
-
Build Details
- Build License:
-
- CC - Attribution - CC BY
Reason for this Build
I read a World Health Organization report that said 3 billion people in the world live in rural areas without reliable electricity and that, because of this, they often cannot get access to surgical care. The reason is that medical instrument sterilizers are usually too expensive and use too much electricity to work in these areas. I realized that I could use my RepRap building skills to design and build an autoclave that operates on 12VDC and is controlled by an Arduino. This means that it is inexpensive and can also run off grid from a vehicle or a solar panel. I wanted to promote this project to people who can build/test/deploy it in the field. Most of all, I want to promote the idea that we makers have skills that apply to solving real world problems, and can actually save lives.Inspired by
My dad, who was a family practice doctor for most of his life and worked to make life better for people. -
Attached Files: