
Introduction: CNC Cyclone PCB Factory, My Way, Step by Step.
![[IMG]](proxy.php?image=https%3A%2F%2Fcdn.instructables.com%2FFB1%2FGKYQ%2FJK4UNA4K%2FFB1GKYQJK4UNA4K.LARGE.jpg%3Fauto%3Dwebp%26width%3D259&hash=5f2a49481567f50457bbd07075642e05)
By reef
Code repo
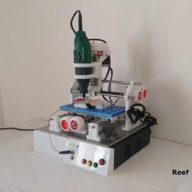
I'd like to renew my cnc for PCB so I decide to create new one from an existing project named Cyclone PCB Factory. You can find the original project here.
(I know I need to buy a good webcam)
Step 1: History
I write an Instructable about Millin PCB with my homemade CNC, and I continue to develop and use board for personal use, but I'd like to get a more little CNC with some features like TTrack or probe to simplify the use.
I also refer to my other Instructables to explain the use of bluetooth pass-through serial interface to control CNC wireless.
I write a simple code for CNC shiled to calculate step/mm, you can find It here.
I explain my way to get It efficiently and more comfortable, but this is the first step, next I'd like to do a board to resolve all the problem I find and I resolved now with various simple "service boards".
I change some part like Z Axis with new one to fix a lot of problem, new Herringbone gearsto prevent noise and precision problem, and electronic with new one less expensive.
Some part like stepper and smoth rod taken from old printers.
If you have some additional experience or have a better solution write a comment or directly to me, so I can integrate you solution to the board.
Next step is to add a simple display and some digital control and minimal wifi remote.
But do all step by step.
Step 25: Test: Autolevelling ChiliPeppr
Autolevelling feature not working on UGS so to test this features I use ChiliPeppr.
Step 27: Test: First Milling PCB With Noise Problem.. and Panic!!
I try to mill a PCB without a service board to reduce noise and in the video you can see what's happend.
Go to the first minute of video (1:06).
Step 28: Test: Milling PCB (Puff!!)
First I need a vacuum cleaner
Here you can see Cyclone PCB at work.
Now work very good, and It's very precise.
Step 29: Thanks
As already said (with your contribution) I would like to create a board that includes all the fixes, if you have any experiences to share, write me or comment, so I can integrate your improvements.
Recap of all link
www.mischianti.org
CNC Cyclone PCB Factory, my way, step by step.
Build in 'Cartesian Style CNC' published by reef, Sep 23, 2019.
I'd like to renew my cnc for PCB so I decide to create new one from an existing project named Cyclone PCB Factory.
-
-
Build Author reef, Find all builds by reef
-
- Loading...
-
Build Details
- Build License:
-
- CC - Attribution NonCommercial - Share Alike - CC BY NC SA
![[IMG]](https://cdn.instructables.com/FCP/H3J4/JK8KCB37/FCPH3J4JK8KCB37.LARGE.jpg)
![[IMG]](https://cdn.instructables.com/FB1/GKYQ/JK4UNA4K/FB1GKYQJK4UNA4K.LARGE.jpg)
![[IMG]](https://cdn.instructables.com/F49/RPJ6/JIKJX5N8/F49RPJ6JIKJX5N8.LARGE.jpg)
![[IMG]](proxy.php?image=https%3A%2F%2Fcdn.instructables.com%2FFF9%2FGEYU%2FJB2S4KIR%2FFF9GEYUJB2S4KIR.SQUARE2.jpg%3Fauto%3Dwebp&hash=8498c02a6becdb533037b07dbf259689)
![[IMG]](https://cdn.instructables.com/F4W/RDNE/JJ8U8ORC/F4WRDNEJJ8U8ORC.LARGE.jpg)
![[IMG]](https://cdn.instructables.com/FB9/JBPA/JK4UNC9Y/FB9JBPAJK4UNC9Y.LARGE.jpg)
![[IMG]](https://cdn.instructables.com/F8G/QE8H/JK4UNBRC/F8GQE8HJK4UNBRC.LARGE.jpg)
![[IMG]](https://cdn.instructables.com/FCH/ZQHS/JK4UNCJF/FCHZQHSJK4UNCJF.LARGE.jpg)
![[IMG]](https://cdn.instructables.com/F66/WQDE/JK4UL34Q/F66WQDEJK4UL34Q.LARGE.jpg)
![[IMG]](https://cdn.instructables.com/FOL/H5G7/JK4UNCZW/FOLH5G7JK4UNCZW.LARGE.jpg)
![[IMG]](https://cdn.instructables.com/F35/IEXP/JK4UN8FT/F35IEXPJK4UN8FT.LARGE.jpg)
![[IMG]](https://cdn.instructables.com/F7X/1U4U/JK4UN9AV/F7X1U4UJK4UN9AV.LARGE.jpg)