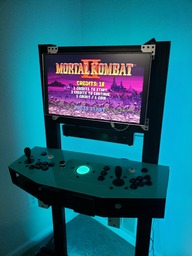
Here's a more complete photo of the build. I plan on doing some better cable management at the bottom of the machine soon, but this displays the completed physical build. I don't particularly have a build guide as I improvised and made most of the design up as I went along.
The frame is primarily made from C-Beam aluminum extrusions, with 20x20 V-Slot extrusions as seen in the back for support and to reduce and wobbling.
The two upright 1500mm C-Beams have 3 500mm C-Beams mounted horizontally, to which I have mounted a small computer, an adjustable arm mount for the monitor allowing me to quickly switch between horizontal and vertical games easily. The shape of the C-Beams allowed me to easily hide the majority of the cables that for the monitor, speaker bar, and control panel. The speaker bar is held in place by 3D printed brackets, and I put two small holes in the computer case to allow that to simply hang from 2 M5 bolts with T-nuts in the extrusion's channels.

The control panel itself is made from layers of laser cut acrylic, held apart by more C-Beam extrusion and some 20x20 V-slot extrusion to support the corners There are also two, flip-down, plastic cup holders that were incredibly easy to mount to the extrusion across the front of the panel.

The panel itself is mounted on 2 more 250mm C-Beam arms. It's held at an angle by 4 3D printed mounts, and only uses 1 USB port. It can be lifted off to be used as a game-pad on any computer.

This was a "quarantine" and was extremely fun to build. I chose aluminum extrusions for a number of reasons. I'm also working on a yet-to-be complete CNC mill and found the extrusions to be a light-weight but strong and versatile building material. I wanted to build this with as little need for power tools as possible, and beyond cutting the two 20x20 V-slot bars for the panel, built this from completely stock lengths readily available. Due to it being so lightweight, I can still move the entire thing myself without assistance, which is not something you can say for a classic full sized arcade cabinet, and I personally love the modern look I ended up with.
A custom arcade
Build in 'Furniture Builds' published by ajdubs, Jun 19, 2020.
This is an arcade "cabinet" of sorts built almost entirely from OpenBuilds extrusions. Save for a few 3d printed parts, the electrical components, the acrylic panels, and the monitor mount, every component was purchased from the OpenBuilds part store.
-
-
-
- Build Progress:
-
- Build Complete!
Redrrrr, erga jerawood, Paul Stoller and 6 others like this. -
-
Build Author ajdubs, Find all builds by ajdubs
-
- Loading...
-
Build Details
- Build License:
-
- CC - Attribution - CC BY
Reason for this Build
I had been planning to build out an arcade for years, and quarantine boredom along with the extra free time made me pull the trigger. -
Parts list
Qty Part Name Part Link Comments 3 C-Beam extrusion - 1000mm - Black https://openbuildspartstore.com/c-beam-linear-rail/ Link 2 C-Beam extrusion - 1500mm - Black https://openbuildspartstore.com/c-beam-linear-rail/ Link 3 C-Beam extrusion - 500mm - Black https://openbuildspartstore.com/c-beam-linear-rail/ Link 2 C-Beam extrusion - 250mm - Black https://openbuildspartstore.com/c-beam-linear-rail/ Link 10 C-Beam end mount https://openbuildspartstore.com/c-beam-end-mount/ Link 20 90 degree joining plate https://openbuildspartstore.com/90-degree-joining-plate/ Link 18 Double L-bracket https://openbuildspartstore.com/l-bracket/ Link 4 Adjustable V-Slot Hinge https://openbuildspartstore.com/adjustable-v-slot-hinge/ Link 2 20x20 V-Slot extrusion - 1500mm - Black https://openbuildspartstore.com/v-slot-20x20-linear-rail/ Link 1 20x20 V-Slot extrusion - 500mm - Black https://openbuildspartstore.com/v-slot-20x20-linear-rail/ Link 1 20x20 V-Slot extrusion - 250mm - Black https://openbuildspartstore.com/v-slot-20x20-linear-rail/ Link Cut 2 80mm portions for the panel 260 M5 8mm low profile screw https://openbuildspartstore.com/low-profile-screws-m5-10-... Link My math may be wrong 246 M5 T-nuts https://openbuildspartstore.com/tee-nuts-m5-10-pack/ Link My math may be wrong 40 M8 20mm low profile screw https://openbuildspartstore.com/low-profile-screws-m5-10-... Link 6 Laser cut acrylic panels https://www.ponoko.com/ Link 0 Various arcade control parts Link Various websites, have had them on hand for years at this point 1 Computer https://www.asrock.com/nettop/AMD/DeskMini%20A300%20Series/ Link self built using the ASROCK Deskmini A300 1 VESA arm mount https://www.amazon.com/gp/product/B07V1W5C7Z/ref=ppx_yo_d... Link 1 LCD monitor https://www.amazon.com/gp/product/B01BX3FCJG/ref=ppx_yo_d... Link I chose this specific model for its thin bezels on all four sides 1 RGB led strip https://www.amazon.com/gp/product/B07Y35MZLD/ref=ppx_yo_d... Link Just a generic RGB strip 1 Adafruit Trinket 5v https://www.adafruit.com/product/1501 Link used to control the RGB light under the trackball 1 Neopixel Jewel https://www.adafruit.com/product/2226 Link LED light for the trackball 1 Sound bar https://www.amazon.com/gp/product/B07RNNXJ13/ref=ppx_yo_d... Link chosen primarily for the easy mounting holes on the rear of the soundbar, fit the heads of the M5 low profile screws perfectly 1 Flip down Cupholders https://www.amazon.com/gp/product/B07TXKBWV1/ref=ppx_yo_d... Link Had to drill out the mounting holes ever so slightly to fit the M5 screws, but then mounted securely 6 various 3D printed mounts and brackets Link Self drafted

