This router should be operational with a week or two. I will be making modifications to it down the road, so I thought it would be a good idea to solicit community feedback.
I plan to use the machine to cut foam, MDF, plywood, and carbon fiber epoxy. At the moment, the Y axis is belt driven, and the X and Z axis’ are lead screw driven. I really want to switch the Y axis to rack and pinion, but don’t have time right now to figure that out. The gantry will be two C beams. I don’t have time to mess around with custom plates right now, so everything is off the shelf. The table will be enclosed and the air will be filtered through a harbor freight dust collector with a merv 15 canister filter.
Since I don’t have a background in metalworking, the table took me an enormous amount of time to fabricate. I chose to use steel for the table since it is economical and because it is extruded at relatively high tolerances. Just bring an 8ft level with you to the metal dealer to make sure your pieces haven’t gotten banged up on the forklift! Aluminum is extruded to higher tolerances than steel (probably because it’s extruded at a lower temperature) and is more corrosion resistant, but it was out of my price range. I didn’t think I was going to be able to get a flat enough table using dimensional lumber since I only have a 6” planer. If I were to do it over again, I would build the table frame with plywood and cut the plywood with a track saw (I didn’t have a track saw when I started this project). Even though the metal frame was a lot of work, I think it turned out pretty nice! My friend cut the miters for the beams and welded them together. All other metal joints are epoxied so as to avoid warping the 14 gauge metal. It was a major pain to prep the metal for gluing. Stitch welding would have been way faster, but I’m not sure if the heat distortion would have been acceptable or not. The beams are 2”x4”, and the joists are 1”x1”. I would probably use 2”x2” joists if I were doing it again, but I was trying to save money, and I thought I would be better off by having a lot of 1” joists rather than a small amount of 2” joists. I got really nervous when I cut a joist down to size and found out that it wasn’t as rigid as I thought it would be. However, adding the plywood on top and a support beam on bottom greatly increased the area moment of inertia, and now it doesn’t seem to flex at all when I stand on the table. I will also be screwing a vacuum plenum board and spoiler board to the plywood, which will further increase stiffness, mass, and stress distribution. I used cabinet screws to go up from under the joists into the plywood. They only go 1/2” into the plywood and don’t have much bite, but I used over 150 of them. I put too much design emphasis on being able to replace the plywood tabletop. If I did it over again, I would use wood to metal screws to go in from the top. I did however use wood to metal screws to go in from the top of the plywood into the 2”x4” beams and they did get good bite. I countersunk them of course. Using epoxy on the leg braces was superfluous—I would have been fine with just sheet metal screws. I used a metal brake to bend the some of the corner leg braces, but if you don’t have a brake, you can get just as good if not better results by using two unconnected pieces of sheet metal.
I chose a plywood tabletop so that I could enclose the top half of the machine, and so that in the future I could reconfigure the C beam rails as I desired without having to worry about mounting them onto metal. The plywood also provides a nice damping layer, not that my machine will be precise enough to benefit greatly from it. I used 3/4” “cabinet grade”/ radiata pine from Home Depot. It has some voids in it. Baltic Birch would have been worth the extra money since it doesn’t have as many voids, resists warping better, and comes in 1500mm sheets, so I could have built the tabletop with two panels instead of four.
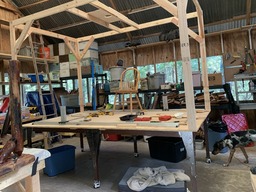
4x8 CNC Router for Composites
Build in 'Cartesian Style CNC' published by Paul Amelang, Nov 24, 2021.
Router for making plugs for composite part production, and for cutting CFRP.
-
-
Build Author Paul Amelang, Find all builds by Paul Amelang
-
- Loading...
-
Build Details
- Build License:
-
- CC - Attribution - CC BY


