Welcome to Our Community

Some features disabled for guests. Register Today.

H-Bot CoreXY Cube with Fixed Build Plate-

Discussion in '3D printers' started by TomH, Apr 3, 2015.
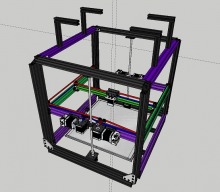
  1. TomH

    TomH Well-Known
    Builder

    Joined:
    Mar 10, 2015
    Messages:
    108
    Likes Received:
    11

    I bought some extra belts to have options when it goes together - if the single belt isn't long enough, I can go with two belts as well..

    I hope to have the main structure together this week and will hopefully have some pics posted by this weekend. Cheers!
     
  2. TomH

    TomH Well-Known
    Builder

    Joined:
    Mar 10, 2015
    Messages:
    108
    Likes Received:
    11
    And so it begins... Encountered a couple of slight delays - 1) The heads of the stainless self tapping screws I ordered from amazon were a fraction of mm wider than would fit in the corner angles and cubes; 2) I apparently forgot to increment the order quantity to 2 (sold in packs of 25) when I ordered them so I was a few short; and 3) the slots on the stepper mounting plates from RobotDigg are a fraction of a mm smaller than needed to accept M5 mounting screws...

    But Dremel tools are awesome and another Amazon order should get me further on my way this week!

    After looking at the real vs drawn model, I am also reconsidering the threaded rod attachments to the frame or gantry. In lieu of likely required offsets from the frame or gantry, I am investigating the use of RobotDigg Nema17 stepper mounting brackets and KFL08 pillow blocks for the lower mounts. I'll take a look after my frame is assembled and then make a decision - I also have KP08 pillow blocks.... May the best bracket/pillow block assembly win!

    Of course after designing, cutting, and assembling my filament spool holders, I came across a Thingiverse design (http://www.thingiverse.com/thing:408288) that got me thinking. Though I liked the Thingiverse design as is (and could easily use them to replace my top spool rails), I thought of another great use of KFL08 (or larger - just have those on hand) pillow blocks - if I cut 100+ mm lengths of 8mm rod, I could make very stiction-free spool holders that would also be small enough to fit Taulman spools (which my 20mm rails won't but the Thingiverse ones would). I could also mount a single rail on each side on top of the vertical spool spires and use KP08 pillow blocks mounted on top for the rods to mount from - the horizontal rail would then also act as a de facto lifting handle.

    IMG_0236.JPG
    IMG_0237.JPG
     
  3. TomH

    TomH Well-Known
    Builder

    Joined:
    Mar 10, 2015
    Messages:
    108
    Likes Received:
    11
    Yes, I agree - though the concept got me thinking about a bearing based spool holder. I will probably end up replacing mine with one of the pillow block arrangments noted above. I am also a fan of an all metal approach (as I am attempting with my entire build though will still likely require a 3D printed hotend mounting bracket and cooling fan duct). Thanks for the input!
     
  4. TomH

    TomH Well-Known
    Builder

    Joined:
    Mar 10, 2015
    Messages:
    108
    Likes Received:
    11
    I had wondered if that may be an issue....thanks for saving me the trouble of verifying that for myself! I still have to figure out something for the Taulman spools - will have to look at some additional 3D printed options or replace my topmost rails with metal rods... Or just ream out the Taulman spools so they fit the rails I have....won't likely use t-glase or bridge that often anyway....we'll see, I hate to break the symmetry of the openbuild v-slot fab...
     
  5. TomH

    TomH Well-Known
    Builder

    Joined:
    Mar 10, 2015
    Messages:
    108
    Likes Received:
    11
    Making progress...

    IMG_0241.JPG IMG_0242.JPG

    Everything has gone together fairly painlessly. My amazon order for more screws arrived and I continued the build process. I did have to make some slight modification to get the H bar gantry wheels positioned properly. I had to lengthen the holes in the Openbuilds L brackets by a fraction of a mm and get creative on washer and nut spacing to get things aligned properly. The gantry moves very smoothly in +/- Y directions!

    And the best bracket/pillow block assembly has won! I decided to go with the KFL08 pillow blocks mounted on top of RobotDigg Nema 17 stepper brackets. After building it up to test, it works out quite nicely (haven't finished mounting them yet though). I'll hopefully get Z mechanisms completed next week.

    I can't wait to get the 20mm v-slot gantry plate mounted for X movement and mount the pulleys and belts for Core X/Y motion to see how it works!!!
     
  6. Zootalaws

    Zootalaws Well-Known
    Builder

    Joined:
    Aug 4, 2014
    Messages:
    105
    Likes Received:
    19
    I'm with you... but I'm also with him. Your 'implicitly synced' needs a lot of faith, when compared to a stepper driving a belt - and... by using belts with varying sizes of sprockets, you can get the z-axis as fine as you like. It's also better, electrically and from an engineering perspective - two motors off one driver is always a hack.

    I am designing an H-Bot, but made almost entirely from ply and have been through a few different designs of z-axis and have found that using a small (15T) drive sprocket on a large (32-T) gives a quick and easy doubling of resolution, as well as increased torque. And getting better z-axis resolution is always a good thing.

    Initially I saw the engagement of the sprockets as being a problem too difficult to justify the design work, but then realised that once you have solved the connection problem (easy - the sprockets are epoxied to a short piece of carbon rod and sitting in a bearing - because I have a lot of 5mm carbon rod - and using the same flexible coupling as you would for a stepper to screw connection) it is as easy as any serpentine belt on the front of your car's engine. There's a single idler, which can be used for tensioning, and it's cheap, being nothing more than a bolt, a bearing and a couple of washers.

    And if I could get this Piece'O'Shite (tm) forum software to allow me, I would have posted a picture.
     
  7. TomH

    TomH Well-Known
    Builder

    Joined:
    Mar 10, 2015
    Messages:
    108
    Likes Received:
    11

    Agreed - as you can see I finally gave in and went to three belt driven screws with geared down sprockets for both added torque and increased resolution :thumbsup: (and now I have an extra stepper for an additional extruder :) ). It did, of course, increase my cost by $30 or so (even with dropping a stepper). Belts aren't without issues either - I'm sure that my dual driven design would have worked fine. Yes, belt driven screws are different and less complex electrically but more complex mechanically. But other than less motors and wires, how is one stepper better electrically than two steppers driven by a single driver (assuming that either ones are matched/sized appropriately to the driver and the load)?

    However, my new design is more robust mechanically and could be replicated much more inexpensively if desired - a three or four screw (lead or ball) design could be made with inexpensive structural components (like your ply approach) with only the main gantry requiring higher tolerance linear rail components - a four screw design could dispense with the vertical linear rails completely. I still like my design for ease of build, dimensional tolerances, and rigidity (I think it will look 'pretty' too).

    I'm looking forward to seeing your design once you figure out how to get the pictures posted (try saving smaller/lower but not too low resolution images). My arrangement is similar (16T/32T sprockets) though the openbuilds lead screws were long enough to directly mount my sprockets (will hopefully get to that this weekend). If I had went down this path from the beginning I would have went the ball screw route as I later found a vendor who would have made me 4 (end machined as desired) ball screws for $72 shipped - which is almost as cheap as it cost me for just 2 of my 3 lead screws o_O.
     
    #67 TomH, Jun 26, 2015
    Last edited: Jun 26, 2015
  8. TomH

    TomH Well-Known
    Builder

    Joined:
    Mar 10, 2015
    Messages:
    108
    Likes Received:
    11
    Mechanical construction nearly complete! Just need to add the pulleys and belts. All the of axis slide smoothly :thumbsup:. I need to add spacers between the nut blocks and the lead screws (as I shortened each side rail by 4mm) - also need to pay close attention to top and bottom alignment before I tighten everything down!

    IMG_0245.JPG IMG_0246.JPG IMG_0247.JPG
     
  9. TomH

    TomH Well-Known
    Builder

    Joined:
    Mar 10, 2015
    Messages:
    108
    Likes Received:
    11
    Haven't had much time to work on the printer. But I did modify the wheel arrangement on the carriage so that now the wheels are on all eight corners of the corner vertical v-slot braces. Absolutely no over-constraint issues (if anything a slight under constraint, though it can probably be tightened up when everything is in place).

    Also mounted the extruders. Checked out the belt arrangement/alignment - everything looks great! Just need to mod my carriage mount a bit (extend some of the belt slots a tad). I had to go with a two belt arrangement for the Z axis - ordered the 2nd belt which should be here soon. Then it will be time to hook up some electronics and check it out! My BBP 1S KickStarter was delayed about a month so I ordered a cheap MKS board to test things out (http://www.banggood.com/MKS-Gen-V1_2-3D-Printer-Control-Board-With-DRV8825-Driver-p-973826.html).

    IMG_0268.JPG
     
  10. adamcooks

    adamcooks Well-Known
    Builder

    Joined:
    Nov 6, 2014
    Messages:
    244
    Likes Received:
    65
    That is looking really nice. I cant wait to see it move.
     
  11. TomH

    TomH Well-Known
    Builder

    Joined:
    Mar 10, 2015
    Messages:
    108
    Likes Received:
    11
    Thanks! Me too...unfortunately my electronics haven't arrived yet... I'm heading out on vacation though...hopefully a control board will have arrived by the time I get back!!!
     
  12. TomH

    TomH Well-Known
    Builder

    Joined:
    Mar 10, 2015
    Messages:
    108
    Likes Received:
    11
    IMG_0271.JPG IMG_0272.JPG FullSizeRender.jpg

    Getting closer! X, Y, & Z belts installed and manual movement looks great! All 6 end stops installed and functional!

    Moved the extruder locations to optimize bowden tube placement and length. This is unfortunately at the loss of about 20mm or so of Z movement. I will experiment with static extruder placement on top but a quick look shows it would require significantly longer bowden tubes which I am trying to avoid (and would rather lose a few mm than make the bowden tubes that long).

    My Kickstarter board isn't here yet (https://www.kickstarter.com/projects/1177488680/bbp-making-your-3d-printer-faster/description) but I did just receive a shipping information request (yay!). My backup board arrived (MKS Gen V1.2) so my plan is to check out functionality with this board first (and also avoid potentially burning out anything on my BBP 1S during initial wiring and experimentation). Just need to finish wiring it up! Unfortunately again, a friend of my son borrowed my soldering iron and I need to extend all of the stepper and end stop wires to fit this beast!
     
    adamcooks likes this.
  13. TomH

    TomH Well-Known
    Builder

    Joined:
    Mar 10, 2015
    Messages:
    108
    Likes Received:
    11
    screenshot_31.png
    After playing around a bit, though it will require a slight frame modification, I have found a fixed extruder location that provides a host of benefits from my original plan:
    1. It may actually reduce the bowden tubes by a few mm
    2. It makes the primary spool holders and extruders face the front of the unit which is great for accessibility
    3. It makes the filament runs from the spools to the extruders basically a matter of a few mm!
    4. And finally, it will remove Z axis constraints returning potentially lost Z movement - I may get pretty close to my original design goals of 400 x 400 x 400mm!
    It will require the purchase of one additional v-slot rail but such is life (and another $5.50 plus shipping). A fit check with available components shows that it will accept regular sized (diameter) spools with no issue - deep spools are no problem either.
     
  14. PrecariousPhoto

    Builder

    Joined:
    Aug 26, 2015
    Messages:
    1
    Likes Received:
    0
    Great looking build!

    I've been working on my own design for a CoreXY with a fixed build plate but you're miles ahead. Very interested in the results.
     
  15. TomH

    TomH Well-Known
    Builder

    Joined:
    Mar 10, 2015
    Messages:
    108
    Likes Received:
    11
    Appreciate the kind words. I'm foaming at the mouth to get it running! I have been busy with work and then on vacation. I will certainly post as soon as I make more progress...
     
  16. TomH

    TomH Well-Known
    Builder

    Joined:
    Mar 10, 2015
    Messages:
    108
    Likes Received:
    11
    I got it wired up last night and was hoping to do some movement tests with my cheap MKS 1.2 board...however, though the board appears to initialize and the LCD comes on, the LCD is blank. In addition, when I tried to connect Simplify 3D to it I could see the MKS board LED's blinking when it was being polled by Simplify but it did not respond. I'm thinking that perhaps no firmware is installed on the board though I thought it was supposed to come with marlin preinstalled.... Will post as soon as I figure out what is going on...

    Worst case, my BBP1S (https://www.kickstarter.com/projects/1177488680/bbp-making-your-3d-printer-faster) is supposed to ship next week :)! In the mean time I need to install the build plate, mount the hotend, and make all my wires pretty ;)...
     
  17. TomH

    TomH Well-Known
    Builder

    Joined:
    Mar 10, 2015
    Messages:
    108
    Likes Received:
    11
    Sort of yay...o_O It turned out the board was brain dead! :sleepy: Took forever to find a comm setup that it liked to upload firmware....got marlin loaded up and could talk to board but it had no display and did not appear to respond to commands... Then I uploaded a custom configured repetier firmware and SUCCESS! :D sort of... :confused: The LCD is functional and I can talk to the board with Simplify 3D....got X and Y to home for the most part but current Z homing speed would probably take about a half hour to go 400mm!!! :duh: Time to pack it in for the night but at least I have confirmed stepper wiring and motion functionality....need to get it working a bit better before it is worth taking some videos to post... stay tuned... ;)
     
  18. TomH

    TomH Well-Known
    Builder

    Joined:
    Mar 10, 2015
    Messages:
    108
    Likes Received:
    11
    Almost there... It turned out the default Z home step rate was 2mm/s...and since I have a 2:1 gear ratio on my Z belts turning ACME lead screws they were absolutely crawling... Bumped it up to about 2,000 for Z homing moves and 400 for X/Y and it is starting to look pretty sweet. I still need to unhook everything and make all the wires pretty so I don't get one caught it my belts or something. :rolleyes: I may also just finish mounting my hot end and wiring everything else up. I got a shipping confirmation on my BBP 1S so I may wait for final test with the desired production control board - just wish I had an LCD touch panel for it.... Will just have to wait a few months for that finishing touch... :cool:
     
  19. adamcooks

    adamcooks Well-Known
    Builder

    Joined:
    Nov 6, 2014
    Messages:
    244
    Likes Received:
    65
  20. TomH

    TomH Well-Known
    Builder

    Joined:
    Mar 10, 2015
    Messages:
    108
    Likes Received:
    11
    Appreciate your concern and heads up! :thumbsup:

    I saw the links on the Kickstarter comment section and already ordered a 5V regulator to mod the board. Looks like I may go the thermocouple route or use a PID controller I have on hand until the firmware issues are sorted out a bit better...
     
  21. Adam Filipowicz

    Adam Filipowicz Journeyman
    Builder

    Joined:
    Dec 21, 2014
    Messages:
    259
    Likes Received:
    129
    This is a sweet build. please post a video of it running. when you get it moving :)
     
  22. Adam Filipowicz

    Adam Filipowicz Journeyman
    Builder

    Joined:
    Dec 21, 2014
    Messages:
    259
    Likes Received:
    129
    Why not 4 screws one on each corner. vs 3
     
  23. TomH

    TomH Well-Known
    Builder

    Joined:
    Mar 10, 2015
    Messages:
    108
    Likes Received:
    11
    Adam,

    Originally it really boiled down to cost (and part) minimization. But if I had it to do over again I would likely do 4 ballscrews. This approach would allow you to build the main frame from inexpensive materials with no wheels required - plus I found a supplier who would make four 500mm ballscrews with nuts for $72 (less expensive than 2 of my 3 lead screws). The just the gantry itself could be made with linear rails/wheels as desired. Openbuild rails are great for prototyping though and I am very happy with the results so far from my build. I am traveling this week so I won't have time to complete it but I finished all my wire routing over the weekend and my Kickstarted BBP1S arrived so I assembled it's case and mounted it. I just need to attach all the wires and mount my build plate and it should be ready to rock and roll...hoping to squeeze in enough time next weekend to finish it!
     
  24. Adam Filipowicz

    Adam Filipowicz Journeyman
    Builder

    Joined:
    Dec 21, 2014
    Messages:
    259
    Likes Received:
    129
    ive been looking at your cad and photos. trying to figure out your belt layout. can you post a close up shot of the rail with the XY Steppers including the idlers on the ends.
    in CoreXY configs ive seen the belts at the back always cross over each other. but im having trouble seeing if your setup has the cross over.

    is this true CoreXY or a Hbot belt setup?
     
  25. TomH

    TomH Well-Known
    Builder

    Joined:
    Mar 10, 2015
    Messages:
    108
    Likes Received:
    11
    Yes, this is a true CoreXY (http://www.corexy.com/theory.html). I have modified the belt layout slightly to relocate the XY steppers and allow the entire gantry to move in Z so that the build plate is fixed. The belts don't actually 'cross' as they are at two different levels vertically. I'm out of town but I'll take some pics when I get back home...
     
    #85 TomH, Sep 23, 2015
    Last edited: Oct 5, 2015
  26. James_Hopkins

    Builder

    Joined:
    Jul 16, 2015
    Messages:
    28
    Likes Received:
    6
    Did you get it printing yet?
     
  27. TomH

    TomH Well-Known
    Builder

    Joined:
    Mar 10, 2015
    Messages:
    108
    Likes Received:
    11
    Here are some close-ups...
    IMG_0321.jpg IMG_0322.jpg IMG_0324.jpg IMG_0325.jpg IMG_0326.jpg IMG_0327.jpg
     
  28. TomH

    TomH Well-Known
    Builder

    Joined:
    Mar 10, 2015
    Messages:
    108
    Likes Received:
    11
    And, it's alive!!! Haven't printed yet but I'm almost there...
     

    Attached Files:

    Mark Carew likes this.
  29. Adam Filipowicz

    Adam Filipowicz Journeyman
    Builder

    Joined:
    Dec 21, 2014
    Messages:
    259
    Likes Received:
    129
  30. Adam Filipowicz

    Adam Filipowicz Journeyman
    Builder

    Joined:
    Dec 21, 2014
    Messages:
    259
    Likes Received:
    129
    Those Idlers are they openbuilds.. didnt realize they came in that colour
     

Share This Page

  1. This site uses cookies to help personalise content, tailor your experience and to keep you logged in if you register.
    By continuing to use this site, you are consenting to our use of cookies.
    Dismiss Notice