Welcome to Our Community

Some features disabled for guests. Register Today.

A simple XY laser engraver/cutter

Discussion in 'Laser Cutters' started by HPB, Nov 2, 2016.
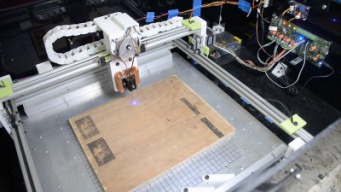
  1. HPB

    HPB Well-Known
    Builder

    Joined:
    Nov 28, 2015
    Messages:
    80
    Likes Received:
    52
    Yep thats true. Best to make those holes as slots just in case you need some final adjusting.
    I'd love to see that design.
     
    Derekz likes this.
  2. Anthony Bolgar

    Anthony Bolgar Journeyman
    Builder

    Joined:
    Jan 14, 2016
    Messages:
    354
    Likes Received:
    198
    Yup, slots are the way to go, thanks for the idea. I have a 3d printed Z axis slide kicking around that uses a nema 17 motor and 3/8" threaded rod. I need to find the original stls, and I will post it along with pics of the printed item.
     
  3. Mike Piechowski

    Builder

    Joined:
    Jun 11, 2016
    Messages:
    33
    Likes Received:
    22
    Size-wise? I don't really have a suggestion, it all comes down to the intended use. In my case, I am not sure I need a work area much larger than 300X500.

    Really interested in your thoughts about the DTR diode and driver. I very nearly ordered those same parts last week. I have the remainder on hand, as well as a smaller diode laser.
     
    Derekz likes this.
  4. Anthony Bolgar

    Anthony Bolgar Journeyman
    Builder

    Joined:
    Jan 14, 2016
    Messages:
    354
    Likes Received:
    198
    DTR sells some great products. the 6.8W (really at least 8W) laser diode is a beast. Just make sure you get a PWM driver from him, makes engraving images so much nicer when using good software like LaserWeb
     
    Derekz likes this.
  5. HPB

    HPB Well-Known
    Builder

    Joined:
    Nov 28, 2015
    Messages:
    80
    Likes Received:
    52
    I'll have to try one of those. I'm currently designing my own but it'll be nice to benchmark it against something that works. I tried LaserWeb cursorily but found it a little unstable. It kept freezing and losing the serial connection. I'll do some more in-depth testing this weekend.
     
  6. Anthony Bolgar

    Anthony Bolgar Journeyman
    Builder

    Joined:
    Jan 14, 2016
    Messages:
    354
    Likes Received:
    198
    I do not know when you last tried LaserWeb, but it has matured into a very stable project, and the next version LW4 has an incredible dev team behind it, look for some really nice CNC features to be added, now that Todd Flemming of JSCUt fame is on board as a lead developer.
     
    HPB likes this.
  7. Anthony Bolgar

    Anthony Bolgar Journeyman
    Builder

    Joined:
    Jan 14, 2016
    Messages:
    354
    Likes Received:
    198
    HPB and JustinTime like this.
  8. jon wells

    jon wells New
    Builder

    Joined:
    Mar 24, 2015
    Messages:
    4
    Likes Received:
    0
    hi i build this one but im using arduino uno r3 with a cnc shield. could you send me your grbl.hex or help me unload grbl to run the laser cutter.
     
  9. HPB

    HPB Well-Known
    Builder

    Joined:
    Nov 28, 2015
    Messages:
    80
    Likes Received:
    52
    I erased my version of grbl with their beta version that I'm testing. Where are you getting stuck? Their wiki explains in detail how to upload grbl to an Arduino.
     
  10. jon wells

    jon wells New
    Builder

    Joined:
    Mar 24, 2015
    Messages:
    4
    Likes Received:
    0
    The problem I'm having is flashing grbl to my arduino and Cnc shield. I've tried grbl 0.9 and I just got grbl 1.1 from there site. So this is a good build over all cheap and flexible to make it bigger. I've Cnc the x and y gantry out of aluminum and painted them black. I went all black theme.
     
  11. HPB

    HPB Well-Known
    Builder

    Joined:
    Nov 28, 2015
    Messages:
    80
    Likes Received:
    52
    Where are you stuck? You need to download the zip from their github site. Once extracted, you'll see a folder named grbl inside the main folder. You need to copy this to your Arduino libraries (usually called 'libraries' under the Arduino folder where your sketches are saved). Then open Arduino, choose grbl from File > Examples and then hit upload. Once the upload completes, open your serial monitor and hit '$$' to get all the options and set values. I use this settings calculator or the Prusa calculator.
    Thanks! That is what it was meant for. I'd love to see the Aluminium plates. I'm sure they look really nice and they'll be super stable.
     
  12. jon wells

    jon wells New
    Builder

    Joined:
    Mar 24, 2015
    Messages:
    4
    Likes Received:
    0
    So I got it to flash on the first time. thank for helping me here is my setting got grbl 1.0. This is only my second time programming arduino and the first time didn't go very good lmao. But my Cnc machine runs on grbl firmware and software, So if you could give me some input on my setting.

    Grbl 1.0c ['$' for help]
    $0=10 (step pulse, usec)
    $1=25 (step idle delay, msec)
    $2=0 (step port invert mask:00000000)
    $3=0 (dir port invert mask:00000000)
    $4=0 (step enable invert, bool)
    $5=0 (limit pins invert, bool)
    $6=0 (probe pin invert, bool)
    $10=3 (status report mask:00000011)
    $11=0.020 (junction deviation, mm)
    $12=0.002 (arc tolerance, mm)
    $13=0 (report inches, bool)
    $20=0 (soft limits, bool)
    $21=0 (hard limits, bool)
    $22=0 (homing cycle, bool)
    $23=0 (homing dir invert mask:00000000)
    $24=25.000 (homing feed, mm/min)
    $25=400.000 (homing seek, mm/min)
    $26=250 (homing debounce, msec)
    $27=1.000 (homing pull-off, mm)
    $30=1000. (rpm max)
    $31=0. (rpm min)
    $100=16.000 (x, step/mm)
    $101=16.000 (y, step/mm)
    $102=0.000 (z, step/mm)
    $110=6000.000 (x max rate, mm/min)
    $111=6000.000 (y max rate, mm/min)
    $112=0.000 (z max rate, mm/min)
    $120=500.000 (x accel, mm/sec^2)
    $121=500.000 (y accel, mm/sec^2)
    $122=500.000 (z accel, mm/sec^2)
    $130=200.000 (x max travel, mm)
    $131=200.000 (y max travel, mm)
    $132=200.000 (z max travel, mm)
     
  13. HPB

    HPB Well-Known
    Builder

    Joined:
    Nov 28, 2015
    Messages:
    80
    Likes Received:
    52
    For the steps/mm ($100, $101, $102) settings you'll need to set it as per the microstepping resolution you've set. Are you using the A4988 stepper boards? Their microstep resolution can be set using jumpers. Check out the polulu page for A4988 for more details on which jumpers select what microstep value (Also works for DRV8825 stepper boards is thats what you are using, except here the placement of jumpers and the corresponding microstep resolution is different from what its for A4988).

    I had mine set at 1/16 microstep. This combined with a 1.8 deg, 200 steps/rev NEMA 17 stepper motor and a GT2 2mm pitch belt resulted in steps/mm of 80. Your acceleration settings seem fine. I would tone down the X and Y max rate ($110, $111) to 4000.
     
  14. e.s.tokarev

    Builder

    Joined:
    Dec 28, 2016
    Messages:
    4
    Likes Received:
    0
    Hello! Please tell me, is there any option to get the source files 3D models? and tell me why the lower holes more? if the v-slot profile standardny and can be tough to do everything.
     
  15. HPB

    HPB Well-Known
    Builder

    Joined:
    Nov 28, 2015
    Messages:
    80
    Likes Received:
    52
    I'm not sure I understand. All my 3D models are in Fusion 360 but the STLs should work for all purposes.
     
  16. e.s.tokarev

    Builder

    Joined:
    Dec 28, 2016
    Messages:
    4
    Likes Received:
    0
    Sorry for my english)))
    stl files can not be edited, so I wanted to ask for the source files.
    also I like to change the x-axis for example by a laser here
    500 МВт НМ фокусировка синий фиолетовый лазерный модуль лазерная гравировка TTL модуль 500 МВт лазерной трубки Лазерный диодный модуль купить на AliExpress 2114.30010708.3.94.TYMLf0 & ws_ab_test = searchweb0_0, searchweb201602_3_10065_10068_10000009_10084_10083_10080_10082_10081_10060_10061_10062_10056_10055_10037_10054_10059_10032_10099_10078_10079_10077_427_10093_426_10103_10073_10102_10096_10052_10107_10050_10106_10051-10050, searchweb201603_2, afswitch_4_afChannel & btsid = 83eeb4da-b4e9-4f37-9f43-3cf569d11e1f was also thought was to do the x-axis of 2 parts, one will be attached motor, a second laser is mounted with the possibility of adjusting at height.
     
  17. HPB

    HPB Well-Known
    Builder

    Joined:
    Nov 28, 2015
    Messages:
    80
    Likes Received:
    52
    Attached here.
     

    Attached Files:

  18. Robert Kirkpatrick

    Builder

    Joined:
    Jan 3, 2017
    Messages:
    32
    Likes Received:
    7
    @HPB

    Hello. I am interested in this build but unfortunately I do not have a 3d printer. Could your please put a price together to supply the printed parts? Many thanks in advance
     
  19. HPB

    HPB Well-Known
    Builder

    Joined:
    Nov 28, 2015
    Messages:
    80
    Likes Received:
    52
    @Robert Kirkpatrick Just sent you a private message about this.
     
  20. e.s.tokarev

    Builder

    Joined:
    Dec 28, 2016
    Messages:
    4
    Likes Received:
    0
    Hello! Thank you for providing the files, I have not much modified and added others, in my opinion it was necessary to strengthen the structure.
    PS. Sorry for my english )))
     

    Attached Files:

  21. e.s.tokarev

    Builder

    Joined:
    Dec 28, 2016
    Messages:
    4
    Likes Received:
    0
    Photos willing to pay later, still did not all printed.
     
  22. ImagClaw

    ImagClaw New
    Builder

    Joined:
    Oct 20, 2016
    Messages:
    5
    Likes Received:
    0
    I have a C-Beam CNC setup already, How difficult would it be to create a modified router holder for a laser and use the current configuration I have to laser engrave/cut material? Would using the xPro CNC driver be decent for laser engraving/cutting?
     
  23. HPB

    HPB Well-Known
    Builder

    Joined:
    Nov 28, 2015
    Messages:
    80
    Likes Received:
    52
    Are the rails for the laser slide just stuck to the main plate? There is a good chance they'll come off once the system is running and a running laser falling off the gantry is not a good thing. I think there is a post somewhere above where a Z-axis slide mount is suggested with a Thingiverse link. A modified version of that might be more reliable. Also they seem to be blocking the nuts. At the very least the rails should have a chamfer at the bottom to increase the gluing surface area and without the slots on the plate.
     
  24. HPB

    HPB Well-Known
    Builder

    Joined:
    Nov 28, 2015
    Messages:
    80
    Likes Received:
    52
    I wouldn't know about the C-beam CNC since I do not have one but I'm guessing it has a plate for attaching the router holder? If it does, you could just swap out the holder for a laser module mounted in a SK8 or SK12-type mountings (the laser diode is mounted in a 12/20/25mm copper module which is then fit in the SK8/12/20 mount). I designed my own CNC driver to control the laser. I think the xPro runs on grbl and grbl uses the D11 pin of the Arduino to control the spindle speed through a PWM signal and the M3/M5 Gcode command. You could use the same pin to instead control the laser (if its brought out on the board somewhere).
     
  25. Robert Kirkpatrick

    Builder

    Joined:
    Jan 3, 2017
    Messages:
    32
    Likes Received:
    7
    @HPB

    Hello. What brand of white PETG did you use to make your printed parts for the build? Thanks
     
  26. HPB

    HPB Well-Known
    Builder

    Joined:
    Nov 28, 2015
    Messages:
    80
    Likes Received:
    52
    I think it was a no-name Chinese brand. Doesn't really matter as long as it's PETG.
     
  27. Skibo

    Skibo New
    Builder

    Joined:
    Jan 24, 2017
    Messages:
    10
    Likes Received:
    3
    Hi, I just wanted to say thank you for taking the time to document all this. I'm really looking forward to trying this.

    After being burned on a failed KickStarter and receiving an incomplete box of parts for a 3d printer I have most of the materials I have most of what I need to build this.

    I'm comfortable with the building, the printing (I've since gotten a working printer), and the wiring. I'm a little nervous about the software setup. I've only mucked around with an Arduino a little. I was hoping to be able to use the RAMBo board I have for something like this, but I haven't found a lot of information on people using one for anything other than 3d printers. It's a shame, but I'm not ready to get lost trying to figure that out at the moment. Instead, after looking at the documentation you provided for your board, I think I'll just buy that.

    Thanks again, and hopefully I won't be posting here too much with newbie questions.
     
  28. HPB

    HPB Well-Known
    Builder

    Joined:
    Nov 28, 2015
    Messages:
    80
    Likes Received:
    52
    Happy to help and there are no newbie questions when building anything :) This build was designed to be very minimal. This made it very easy to add-on modifications. For e.g. I recently made an add-on for cable management.

    I've been acquainted with 3D printing very recently and if I read it right, the RAMBo board runs the Marlin firmware and folks have modified it to use it with a laser as well. I haven't been brave enough to attempt this though.

    My boards are pre-flashed with the grbl firmware v0.9j so you don't really have to do anything other than hook it up to the motors and get started. I've brought the D11 (spindle speed pwm) pin out on the board and you can use this to control any laser driver using the M3 and M5 gcode commands. The pwm is scaled using the S attribute along with M3.

    The good folks at grbl have come up with a new version which has a specific laser mode. Since the hardware configuration is still the same, my boards do support this version. I've been tinkering to figure out how it works in the software and G-code.
     
    #58 HPB, Jan 24, 2017
    Last edited: Jan 25, 2017
  29. Skibo

    Skibo New
    Builder

    Joined:
    Jan 24, 2017
    Messages:
    10
    Likes Received:
    3
    So, here is my first dumb question. Told you I'd have them.

    I'm moving right along on this project. Just finished printing all my parts and waiting on some additional ones I had to buy (had less on hand than I thought - wow those mini V wheels came to more than I thought). Anyway, I was over at Tindie about to buy the control board you designed. However, I couldn't find any reference on the Class B project site or here (I also looked up your earlier project on Indestructibles) as to how the laser driver is connected to the board. I'm assuming it's one of the optional headers in the middle of the board. I've PWM controlled LEDs with an Arduinio before, I'm assuming it's similar with a laser, but that was with pretty simple that code I wrote. I'm still shakey on how all these thing "talk" to each other.

    I guess my question is how hard is it to set up your board to modulate a laser and have it be recognized by grbl?

    I think your design is a lot more elegant than using an Arduino and all the other boards needed to bring it all together, I just need to make sure I can figure it all out.

    I'm not getting the laser until I can get this thing plotting away. I have a lot to digest there too (but the DTR NUBM44 looks the way to go, now I have to figure out what driver I should get).

    Thanks again
     
  30. HPB

    HPB Well-Known
    Builder

    Joined:
    Nov 28, 2015
    Messages:
    80
    Likes Received:
    52
    I should really write a post Here is the link to the hookup guide on my website. On Tindie, there is a link called Documentation on the bottom right and that points to this page. Its really easy to connect the board to the laser driver. Here is a simplified block diagram that shows how to connect the laser to the board. Essentially you need to connect your laser to the board using the "Spindle PWM" (bottom right corner on the headers on the board) and GND pins. Most laser drivers have a PWM input or at minimum some form of input that would let you switch it on and off through software. These pins go on that input. My laser driver accepts a 12V power supply but this can vary with other drivers.

    If this were a CNC machine (which use the industry standard Gcodes), grbl would control the router spindle speed using this pin by sending out a PWM waveform (and hence an average DC voltage between 0V and 5V). With a laser, this pin can be used to control the amount of current that the laser driver feeds to the laser. For e.g. if your laser can take a maximum of 2A, then the 0V on the pin would correspond to 0A while 5V would feed the full 2A. Anything in between would linearly scale the current delivered to the laser. grbl manipulates this pin through the M3 S<number> Gcode. In grbl v0.9j a gcode of M3 S1000 would output a full 5V on the spindle pwm pin and M3 S0 (or just M5) would output 0V.

    There are plenty of interfaces that convert your image/vector diagram to a Gcode, one that grbl can interpret. Piclaser is a good one though its paid, I came across another one called Image2gcode which seems easy to use and apparently is developed for low power lasers such as these. There is also another web-based program called LaserWeb which shows a lot of promise. There is also the tried and tested Inkscape plugin called gcodetools (it comes inbuilt with Inkscape) however, this can only output gcode for line drawings and vector images and not raster images such as photographs. All these programs let you set the Gcode you want to use to turn the laser on and off and scale its power. Once you get this Gcode you'll need something that streams the Gcode to the hardware and move the machine, so to speak. Plenty of options here again: UniversalGcodeSender, Candle, grblPanel, bCNC etc. (look at the grbl Wiki. There is a whole list there). I personally use Candle and grblPanel.

    In the new v1.1, grbl has a special laser mode. I think this was implemented to prevent scorch marks that appear around corners when you are cutting or engraving materials such as wood. I'm not fully sure, but with this new mode all you need to do to operate the laser is use just the S<number> Gcode. You can also set the minimum and maximum S value that would correspond to 0V and 5V (instead of using the older default values of 1000 and 0. You could set these too in the older version but they had to be tweaked through the firmware configuration files before the upload to the board). grbl then takes care of scaling the laser power between corner moves to prevent material scorching. If this mode is too confusing, you can always disable the laser mode and use it as the older versions. My boards support both.

    A lot depends on the laser driver as well. Though I have uploaded schematics to a driver on my build page, it does not support scaling of current and it can either turn the laser ON at full power or switch it off completely. I'm designing a new driver and still in the midst of some testing.

    Hope I haven't confused you even further!
    One of the reasons I made this board was to prevent all the messy wiring between an Arduino and a separate motor driver board. Something would come off and all hell would break loose. DTR also sells drivers with his lasers.
     

Share This Page

  1. This site uses cookies to help personalise content, tailor your experience and to keep you logged in if you register.
    By continuing to use this site, you are consenting to our use of cookies.
    Dismiss Notice