Welcome to Our Community

Some features disabled for guests. Register Today.

Lead Screw Driven Ox Derivative (850x1500)

Discussion in 'CNC Mills/Routers' started by Giarc, Mar 23, 2016.
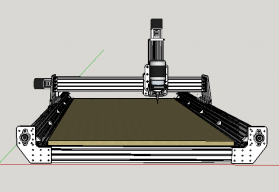
  1. Giarc

    Giarc OpenBuilds Team
    Staff Member Moderator Builder Resident Builder

    Joined:
    Jan 24, 2015
    Messages:
    2,915
    Likes Received:
    1,619
    After cutting with this thing since August, I figured I should probably calibrate it. It seemed to cut fairly accurately, but I figured this would be a quick little project that would put my mind at ease. My calculated steps/mm for both the 1/2"-10 five start (Y axis) precision Acme Screws and the 3/8"-8 four start Acme screws (X and Z Axis) were 125.984 at 1/8 microstepping. They both move the nut 1/2" per revolution. To calculate this I used this formula: step per inch = (motor steps * microstepping) / (travel at one turn of the motor in inches) .

    So, (200 * 8) / (.5)=3200 steps per inch. Converted to millimeters: 3200/25.4 = 125.984251968504 steps/mm

    Prior to calibration, when I sent the Y axis 1000 mm it traveled about 1000.3 mm. The X axis went about 500.99(ish) when sent 500 mm. To obtain the correct steps per mm, I used the following formula:

    (Commanded distance/Measured distance) * Calculated Steps/mm = New steps/mm

    Y axis:

    1000/1000.3 = 0.999700089973
    0.999700089973 * 125.984 = 125.946216135158
    New Y: 125.946 steps/mm

    X axis:

    500 / 500.99 = 0.998023912653
    0.998023912653 * 125.984 = 125.735044611676

    New X : 125.735 Steps/mm

    The Z did not seem to need correction, although I could probably use the new X axis value since the Z screw was cut off of the X screw. I put this info in the video, but if you want to watch it after reading this, feel free to fast forward.:thumbsup:
     
    Rodm likes this.
  2. Rodm

    Rodm Well-Known
    Builder

    Joined:
    Jan 3, 2017
    Messages:
    121
    Likes Received:
    42
    Master diver Gairc.....
    Was that a scuba dry suit in the background of you video? Or is there a cnc hazmat warning I should know about??
     
  3. Giarc

    Giarc OpenBuilds Team
    Staff Member Moderator Builder Resident Builder

    Joined:
    Jan 24, 2015
    Messages:
    2,915
    Likes Received:
    1,619
    Close. Good eye. It is a dry suit, but for kayaking. Well, technically, it is for kayak fishing. I get bored "just kayaking", but at least if I don't catch anything I still had a good day kayaking. ;) The ocean off the Oregon coast and the mouth of the Columbia River are both very cold so even in the summer I wear one. Big shout out to the inventor of Goretex.
    Columbia River mouth fish porn (old drysuit): DSCN0231.JPG :
     
  4. Rodm

    Rodm Well-Known
    Builder

    Joined:
    Jan 3, 2017
    Messages:
    121
    Likes Received:
    42
    Wow!! That puts my cabin fever in hi gear. It's seldom we see fish that nice in Lake michigan but we have a great fishery. Kayak Fishing is getting pretty popular here. I know your area pretty well. My mother lived in Astoria for many years and my sister has been out that way longer - school then work. She's in Newport OR now. A professor - marine ecologist at the University of O's science center. Every time I'm out there I don't want to come back.
     
  5. Giarc

    Giarc OpenBuilds Team
    Staff Member Moderator Builder Resident Builder

    Joined:
    Jan 24, 2015
    Messages:
    2,915
    Likes Received:
    1,619
    This was just across the river from Astoria at Dismal Nitch. I think Lewis and Clark either ran out of happy names, or were just sick and tired of traveling when they got there. The rain probably didn't help.
     
  6. Giarc

    Giarc OpenBuilds Team
    Staff Member Moderator Builder Resident Builder

    Joined:
    Jan 24, 2015
    Messages:
    2,915
    Likes Received:
    1,619
    AAACK! I dropped my old laptop. It wasn't the first time, but it ended up being the last. Apparently, it isn't recommended. It would not fire up and I thought I lost all my files and photos of my build. I took out the hard drive and, using some tools a co-worker had access to at work, we were able to image it (after some time in the freezer) and I recovered what I wanted. Phew! I got smart and uploaded them here finally. I thought I had already, and my plan was just to re-download them. I was wrong--and worried. They are here now. :thumbsup:
     
  7. David the swarfer

    David the swarfer OpenBuilds Team
    Staff Member Moderator Builder Resident Builder

    Joined:
    Aug 6, 2013
    Messages:
    3,275
    Likes Received:
    1,833
    And so another person discovers that backups are not optional ;)

    There are some really cheap solutions, so price is not an excuse.
    Even though cheap, it is easy too.
    Easiest is to work on a cloud drive (given enough network connectivity of course), next is to automate with a scheduled synctoy run or similar.

    What I mean by cheap is any old pic with a couple of harddrives in it. Boot it off a flash stick using any of a number of NAS operating systems like
    FreeNAS Storage Operating System | Open Source - FreeNAS - Open Source Storage Operating System
    Free NAS Software | NAS4Free - The Free Network Attached Storage Project
    Set up the 2drives as a mirror, share the mirror on the network via samba. All done via a web interface, very easy.
    Job done.
    (If you are a Linux user, then you can share the drive via ftp and use rsync to sync the files, among other ways.)

    My new ADSL router has 2 USB sockets and I could set up some harddrives on it to serve as a backup device. In fact I have a spare 3tb drive and I will set this up over the weekend!

    Want smaller and quieter? A raspberry pie will serve but setup is a bit more manual.

    Synctoy is a free download from Microsoft. It allows you to set up pairs of folders that get synchronized when you run the job. It only transfers changed files.

    In summary, there is no valid excuse for not having backups!

    My mantra to the phd students at work....
    Code:
    If you have one copy of a file, you only 'think' you have the file.
     
    Serge E. likes this.
  8. Giarc

    Giarc OpenBuilds Team
    Staff Member Moderator Builder Resident Builder

    Joined:
    Jan 24, 2015
    Messages:
    2,915
    Likes Received:
    1,619
    Sadly, I knew better. One is none, two is one. I had been backing everything up on my google drive and a thumb drive, but laziness prevailed and I forgot. I may try your suggestions with an old PC. I have a couple.
     
    David the swarfer likes this.
  9. Giarc

    Giarc OpenBuilds Team
    Staff Member Moderator Builder Resident Builder

    Joined:
    Jan 24, 2015
    Messages:
    2,915
    Likes Received:
    1,619
    The Amazon Fairy came today! I got my new mister as mentioned by mcbuilder22 here C-Beam "2" XLarge CNC Router has arrived Amazon.com: Mist Coolant Lubrication Spray System For 8mm Air Pipe CNC Lathe Milling Drill: Home Improvement along with some bits for milling pcbs.
    DSC_0189.JPG

    This thing is seems to be made for v-slot.:thumbsup: It mounted in about 1 minute. two 25mm M5 screws and two drop in t-nuts and it was on.
    DSC_0190.JPG

    DSC_0193.JPG

    I am not 100% sure this is where it will stay, but it looks like it will work. I will loose about 10 mm on the x axis, but I could never afford to buy a 26.25 inch wide piece of aluminum anyways. ;)


    DSC_0192.JPG
     
    David the swarfer likes this.
  10. Giarc

    Giarc OpenBuilds Team
    Staff Member Moderator Builder Resident Builder

    Joined:
    Jan 24, 2015
    Messages:
    2,915
    Likes Received:
    1,619
    I slightly re-positioned it at an angle to make it easier to attach the hose. It works awesome. Now I just need to add a vacuum system because it blows the chips far better than I expected. My helper doing a quality control inspection. DSC_0194.JPG
    Right now it is tied into my main air hose spool on the garage ceiling. I may get one of those cheap Harbor Freight 1/4 in. x 25 ft. Coiled Polyurethane Air Hose and hang it directly above. It will be lighter and will stretch then return to its original position.
    DSC_0215.JPG
     
    #70 Giarc, Apr 30, 2017
    Last edited: Apr 30, 2017
    drxlcarfreak likes this.
  11. Giarc

    Giarc OpenBuilds Team
    Staff Member Moderator Builder Resident Builder

    Joined:
    Jan 24, 2015
    Messages:
    2,915
    Likes Received:
    1,619
    I needed a better dust shoe that was adjustable. I tried one that fit around the router and had magnets holding on a bottom piece, but it never stayed on very well. There are lots of other great ones on Thingiverse - some specifically for the Makita even - but all were designed for 3D printed mounts, or the Openbuilds-type mount with a 3D printed shim. At the time I built my CNC I had no 3D printer, so I bought an aluminum mount from China. I chose this one because it is 124 mm wide and my x-gantry plate was 125 mm wide.
    mount.jpg

    I had to drill my own mount holes, but that was pretty easy being made from aluminum. Anyways, I have been using Fusion 360 to design the dust shoe and mount. I wanted to make it adjustable and easily removable. I made it a 4 piece design for ease of printing rather than 2. The shoe, the pipe, and the part that mounts to the spindle mount are printed. The fourth piece will be milled from some 2 mm acrylic I found in my garage. It is nearly complete.

    The shoe has 5/16 inch threaded rod threaded into it at two points and the tube will be inserted into it. I was impressed at the ability of my printer to print threaded holes. These components will slide up and down on the part that is mounted to the spindle. The acrylic will be super-glued into place upon completion. Here is what it should look like, but at 0.2mm layer height, not quite so pretty:
    Dust collector system.png
     
  12. Cncpro

    Cncpro New
    Builder Resident Builder

    Joined:
    Nov 1, 2017
    Messages:
    31
    Likes Received:
    11
    Greeting. First I would like to congratulate you on your great addition to OX- Metal CNC router mill.
    I was planning on building the OX who was build by :'Cartesian Style CNC' and published by Schematix, Dec 13, 2016.

    Is it possible for you to list all the additional parts I'm going to need to modify their build to build yours.
    Also, Can you cut the aluminum platates and drill the holes and charge me for them now you have your CNC machine?
    Where to get the 3D printed v-slot connectors?
    What is the best way to turn down the 3/8 inch acme rod to 8mm. (Can I just purchase them, if so from where?).
    Basically, I need a lot of your help to build this. lol
    Thank you very much.
     
    #72 Cncpro, Nov 1, 2017
    Last edited: Nov 2, 2017
  13. Giarc

    Giarc OpenBuilds Team
    Staff Member Moderator Builder Resident Builder

    Joined:
    Jan 24, 2015
    Messages:
    2,915
    Likes Received:
    1,619
    Thanks for the kind words. I will try to answer your questions:

    I do not know what parts were used in the Ox-Metal by Schematix. I already had mine built by the time he posted his build so I have never bothered to look at it closely. Sadly, I do not know every part that went into mine because I did not make a parts list. I drew the modeI in Sketchup and physically counted on the drawing how many screws and of what size I would need using the Ox screw lengths as a reference. I also bought extra (which still was not enough). I know OB Ox uses 15 mm screws to mount their plates to beams, but I believe I used 25 mm for attaching plates to beams. It was easier and cheaper to buy them in bulk from the OB Parts Store. A lot of changes and additions were made as I built it. Although a majority of parts are available in the files section of this build, for me to make an accurate parts list, I would have to disassemble the whole thing to count and measure some of them that are not readily visible.

    Also, when I started this build, and placed my first order in the Fall of 2015, C-beam was relatively new (and frequently out of stock). My original design was going to use C-beam but due to it being hard to keep in stock at the 1500mm length I changed the design. It would have looked similar to Kyo's C-beam CNC (but not as sexy) which has become known as the Sphinx .


    I would love to be able to do this, but I have a job that has me working way more than I would like to right now, and kids that keep me busy on weekends. I have not had a chance to use it for myself for a few months now. I could not even give you a fair estimate of when I would ever get around to it, or even how much it would cost. I have no idea where you are since you did not list it in your profile. If you were local to me that would make it easier because you could source the aluminum and get it to me which would save me a few hours of my time. Then, if the cuts did not turn out right I could easily repair or replace them. I personally don't feel comfortable cutting something for someone out of aluminum and shipping it off to find out there was an unknown flaw. I have very little experience thus far with cutting aluminum on my machine. I have done a few smaller items, but I would hate to ruin a $20-30 piece of aluminum due to my inexperience.

    I paid someone to 3D print them. It was well worth it. However, if C-beam is used (ie. Sphinx type build), you do not need them. I got the STL file here: V-Slot connector

    I had a co-worker that owed me a favor and he had a lathe and was willing to try turning the ends down. Also, you would need to find the right anti-backlash nuts for the thread pitch you choose. 8mm nuts are far easier to get and so are 8mm threaded rods. The only reason I used 3/8" was because for some reason, that particular size and thread was really cheap in a 6 foot length and because I was buying 1/2 inch from the same place (McMaster-Carr). Because I needed at least 1/2 inch for a 1500 mm axis, I knew I was already going to have to get the rods turned down on a lathe or spend a lot of money for a 1/2 inch shaft coupler. Metric couplers are way cheaper.

    I do not want to discourage you, or anyone else from trying this build. It is a great machine that has worked pretty much flawlessly from the time I first started it up. However, If I were to do it again, I would build something like the Sphinx. C-beam Sphinx Also, according to the last time I added everything up, I have spent approximately $1700 on it including the bench it sits on. I have added a couple other things like the blower nozzles, but those weren't that expensive.

    Although I have a 670x1270 mm cutting area, I have only used the full size once to make a Halloween gravestone out of two inch foam board. Usually, I use about 1/4 of the cutting surface. If I were to do this all over again, I would build it about 850x1000mm or 1000x1000mm and out of C-beam. That way everything would be off the shelf parts-wise. The beautiful thing about the Sphynx is that Kyo made a detailed parts list and an actual build manual. He also made great instructional videos. You can also order the plates from someone that really knows what he is doing C-Beam cnc . Many people have built this proven design in sizes up to 1000mmx1000mm.


    For me a lot of this build was done to see if I could do it without a CNC machine using only my existing tools. I have spent significantly more time building this thing than I have using it to make stuff. If you want a machine built quickly, and with the availability of great support here on this forum, I would choose one of the commonly built ones that have parts lists and manuals.

    -Craig
     
    GrayUK and Anthony Bolgar like this.
  14. Giarc

    Giarc OpenBuilds Team
    Staff Member Moderator Builder Resident Builder

    Joined:
    Jan 24, 2015
    Messages:
    2,915
    Likes Received:
    1,619
    I finally got around to trying the Xbox controller with Estlcam. I should have done it a long time ago. This is the kind of jogging that is actually fun! Also my knees don't hurt afterwards. ;) I need to mark this build as "done."
     
  15. Gary Caruso

    Gary Caruso OpenBuilds Volunteer
    Staff Member Moderator Builder

    Joined:
    May 19, 2016
    Messages:
    1,185
    Likes Received:
    531
    Gota have it!

    Knees don't hurt after, lol
     
  16. Michael.M

    Michael.M Veteran
    Staff Member Builder Resident Builder

    Joined:
    Jan 21, 2017
    Messages:
    432
    Likes Received:
    264
    Hey nice work. I was looking in to those threaded inserts also. At this point I'm still not sure what to do about work holding. I'm thinking about some sort of 2 piece low profile vise. Something that would allow me to place the non moveable jaw on one side of the work and the moveable jaw on the other side regardless of material size but it would either need a sub plate with a million holes or a lot of t-slots.
     
  17. Giarc

    Giarc OpenBuilds Team
    Staff Member Moderator Builder Resident Builder

    Joined:
    Jan 24, 2015
    Messages:
    2,915
    Likes Received:
    1,619
    I did not like the threaded inserts in the particle board. I had several start to pop out when tightening clamps. Maybe they work better in MDF. They would probably work better in plywood. I prefer the particle board because I have a lot of it left over from shelves of old cabinets I removed, and full sheets are very economical. I think if you inserted them into the spoil board and then flipped it so they were underneath, they would be more secure.

    This is my most recent upgrade, as of yesterday. I purchased a sheet of 5/8" particle board to make strips. I wanted 3/4", but the lumber yard was all out. I ripped half the sheet into sixteen 2 3/4" inch strips and three 1 5/16 inch strips on a table saw. This way I will have several spares to replace worn out strips.
    [​IMG]

    [​IMG]
    The tracks called for #6 cap head screws. I went with #6 pocket screws (which had a nice low profile head) at 1 1/4" long to make sure they would to come loose. I have two layers of 3/4" particle board below the t-tracks.
    [​IMG]

    I should be able to come up with a way to secure this vice fairly well for larger aluminum chunks, or rocks in case I go crazy and try carving them. I have bought bits to try.
    [​IMG]

    However, for day to day use, I plan to put a 90 degree corner piece in the 0,0,0 corner then I have an idea for clamps that will act like the adjustable part of a vice that can be used on the other two sides. This is why I put so many tracks on. I wanted lots of places to secure the vice part. I will try to get a mock-up done in the next few days to show you.

    I also designed a couple sizes of cam clamps with 1/4" holes to bolt into the t-track. I cut a couple out of scrap plywood and they seem to work, but it was cheap plywood so my faith is not high in them. I may try oak next. I literally have a ton of oak (or more). My dad used to build cabinets and my job was to salvage oak out of pallets. Actually, my perception at the time was that it was more slave labor than a job since no money changed hands. But the knowledge I have gained from him has more paid off. I plan to also make some out of ABS since the local Tap Plastics has a lot in their scrap bin all the time. They practically give it away where I go. The fuller the bin, the more generous they are because I was told they count on people like me (or should I say us) coming in for small quantities. I will also try with aluminum.

    This clamp is about 4 inches. I also have one that is about 6 inches.
    [​IMG]
     
    GrayUK and Michael.M like this.
  18. Michael.M

    Michael.M Veteran
    Staff Member Builder Resident Builder

    Joined:
    Jan 21, 2017
    Messages:
    432
    Likes Received:
    264
    That's awesome dude. I have seen those cam lock clamps. They look handy. That's really convenient that you have a TAP plastics near by. I have to order everything. I did score a massive block of delrin from eBay though. That stuff is great.
     
  19. Giarc

    Giarc OpenBuilds Team
    Staff Member Moderator Builder Resident Builder

    Joined:
    Jan 24, 2015
    Messages:
    2,915
    Likes Received:
    1,619
    I will add the DXF file to this build for the clamps if you want to try one out.

    I just ordered a Whiteside 1" surfacing bit since Woodcraft was all out. I did buy some of these 1/4-20 T-nuts from them though. I felt I had to buy something since I wasted the time driving all the way there. :rolleyes:
    [​IMG]

    And one of these Dustoppers to help my dust collector. I had to 3D print an adaptor though.
    [​IMG]
     
    Michael.M and GrayUK like this.
  20. Michael.M

    Michael.M Veteran
    Staff Member Builder Resident Builder

    Joined:
    Jan 21, 2017
    Messages:
    432
    Likes Received:
    264
    Those t-nuts look similar to some M6 2525 series nuts I ordered from 8020inc a while back. That dust collector looks sweet. Does it fit on a 5 gallon bucket?
     
  21. Giarc

    Giarc OpenBuilds Team
    Staff Member Moderator Builder Resident Builder

    Joined:
    Jan 24, 2015
    Messages:
    2,915
    Likes Received:
    1,619
    Yes. It is for a 5 gallon bucket. A friend bought one and said it works great. I have been using a shop vac because my dust collector plugs due to a screen to keep out larger flakes. I want to go back to the dust collector because it is so much quieter.
     
  22. Michael.M

    Michael.M Veteran
    Staff Member Builder Resident Builder

    Joined:
    Jan 21, 2017
    Messages:
    432
    Likes Received:
    264
    I do everything from my apartment (turned in to a shop lol) so noise is definitely an issue. How loud is this collector?
     
  23. Michael.M

    Michael.M Veteran
    Staff Member Builder Resident Builder

    Joined:
    Jan 21, 2017
    Messages:
    432
    Likes Received:
    264
    The toolpath I used was Contour
     
  24. Giarc

    Giarc OpenBuilds Team
    Staff Member Moderator Builder Resident Builder

    Joined:
    Jan 24, 2015
    Messages:
    2,915
    Likes Received:
    1,619
    The collector seems much quieter, but it is also a lower pitch which is less annoying to me. Somebody on this forum asked me the same question about two years ago so I made a quick video showing the two side by side. For some reason over 1200 people felt it necessary to watch it, and five took the time out of their day to let me know they didn't like it. I get a chuckle every time I see it :).

     
  25. Michael.M

    Michael.M Veteran
    Staff Member Builder Resident Builder

    Joined:
    Jan 21, 2017
    Messages:
    432
    Likes Received:
    264
    You're right, it's definitely a lower pitch. What is the duty cycle? Can it run for an hour at a time? I read that most shop vacs (and probably dust collectors) produce most their noise through the exhaust. I've a ctually seen suppresors for shop vacs.
     
  26. Michael.M

    Michael.M Veteran
    Staff Member Builder Resident Builder

    Joined:
    Jan 21, 2017
    Messages:
    432
    Likes Received:
    264
    That collector looks and sounds like a beast though. Way more suction than a shop vac. Could it be enclosed or installed in a closet?
     
  27. GrayUK

    GrayUK Openbuilds Team Elder
    Staff Member Moderator Builder

    Joined:
    May 5, 2014
    Messages:
    1,668
    Likes Received:
    627
    I've always felt it was a shame that the input and output, of a vac, cannot be used as a blower and sucker on a CNC.
    I did try it once om my Mum's vac, by fitting a tube directly from one port to the other, many years ago, and saw what they call "run-away".
    It just got faster and faster as its own exhaust supplied air to its inlet port. I stopped as the bearings began to screech!!
    My Mum couldn't understand why the Vac was so noisy afterward. Still, it was under guarantee.
     
    Giarc likes this.
  28. Giarc

    Giarc OpenBuilds Team
    Staff Member Moderator Builder Resident Builder

    Joined:
    Jan 24, 2015
    Messages:
    2,915
    Likes Received:
    1,619
    The dust collector is by no means quiet, but the pitch is far less irritating to me or - I assume- the neighbors. I was thinking of installing it in an enclosure outside my garage in a small lean-to type shed attached to the wall. It would be cheap to construct and all dust would go outside. Due to my central air unit being outside along the same wall, there is about 4 feet of space along the wall I can't really utilize (ie park next to) anyways.
     
  29. Giarc

    Giarc OpenBuilds Team
    Staff Member Moderator Builder Resident Builder

    Joined:
    Jan 24, 2015
    Messages:
    2,915
    Likes Received:
    1,619
    This sounds like fun!
     
  30. jeffmorris

    jeffmorris Journeyman
    Builder

    Joined:
    Nov 6, 2017
    Messages:
    483
    Likes Received:
    112

Share This Page

  1. This site uses cookies to help personalise content, tailor your experience and to keep you logged in if you register.
    By continuing to use this site, you are consenting to our use of cookies.
    Dismiss Notice