
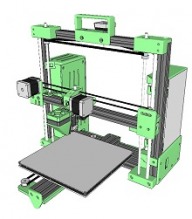
This is the final (i3) version of the OneZ series.
![[IMG]](proxy.php?image=http%3A%2F%2F3dwrx.com%2Fopenbuilds%2Fi3%2Fpics%2Fright.jpg&hash=4e7f1c9a49f63ef96e2f4fbfcfa263b5)
The basic concept of the OneZ is use of a single Z axis motor running two Z axis screws with a synchronizing belt. Keeping the two Z screws locked in sync prevents any bed leveling problems.
In fact, I set these up with a dial indicator attached to the extruder to synch the Z screws left and right, then use the dial indicator to do micro adjustment on each corner of the build plate. More that a thousand hours of printing later and the dial indicator test shows that the bed is still level. I have 11 OneZs running, 7 with customers, and they all remain permanently level, 3 of them with over 1000 hours printing each. The synchronized screws are half of the leveling solution. The other half is to rely only on full step graduation for the Z axis motor, eliminating microstepping creep. With the i3 that is done with a 6mm screw which has a 1mm per revolution pitch resulting in a 0.005mm lift per full step.
The i3 uses an aluminum MK3 heat bed instead of the common PCB. If you by from the source in China the difference is $2.80. The i3 also has the same lift-off-removal print cooling fan as the earlier OneZs.
The extruder is a hybrid. It starts out as a Chinese E3D clone with a 2mm hole in the aluminum fin body for a 1.75mm filament. I bore that out to 4mm and fit a 4mmOD x 2mmID PTFE tube down it to the top of the nozzle. The printer is shipped with a barrel that also has a 3mmOD x 2mmID PTFE liner down to the nozzle. That barrel is excellect for ABS, PLA, and other low temp filaments. I also ship a stainless steel barrel for high temp filament and it takes about 15 minutes to swap from one barrel to the other. The PTFE through the fin body extends up to the filament drive gear (MK8) for easy filament threading even for flexible filament. The secret to this setup is how I prevent the PTFE tube from rising on retraction or filament removal. The slot that the PTFE tube rests in has room for fitting a M4x10mm set screw parallel to the tube in each side of the tube - then another screw at 90 degrees cams those three tight enough to grasp the tube and the walls of the slot. Pic below...
There are two unique things about building the OneZ i3. First, the two upright 20x20 V-Slot rails are bolted to the 20x80 frame piece. A 6mm hole is drilled through the center of each 20x20 just 10mm from the bottom end. A M5x6m bolt and slide nut are fitted to the 20x80 front v-slot and the 20x20 upright v-slot is slid down over the bolt head. The bolt is then tightened through the hole with hex driver. Second, for drilling holes in the Openbuilds Build Plate for mounting full size wheels on a 20x20 extrusion, I bolt an Openbuilds Universal Gantry Plate to the center two holes (yellow) for a drilling template, drilling the 4 red holes.
BOM (right click to open in new tab) , Zip files (click to download)
OneZ-i3-clickable-BOM
OneZ-i3-assembly.zip
OneZ-i3-SKP.zip
OneZ-i3-STL.zip
OneZ-i3-frame.zip
Marlin_2in1_onezi3.2.zip (200 step motors)
Marlin_2in1_onezi3.4.zip (400 step motors for X & Y axis)
Marlin_2in1_dual.zip (dual extruder, 200 step motors)
There is an Assembly Instruction Manual
OneZ i3
Build in 'Cartesian Style Bots' published by Keith Davis, Apr 19, 2017.
A quiet, 8inx8in build area, Cartesian printer with permanently level bed. This is a compact, solid, inexpensive printer that will reliably print any type filament for thousands of hours while you sleep, fish, or play ball in the park.
-
-
Build Author Keith Davis, Find all builds by Keith Davis
-
- Loading...
-
Build Details
- Build License:
-
- CC - Attribution NonCommercial - Share Alike - CC BY NC SA
![[IMG]](proxy.php?image=http%3A%2F%2F3dwrx.com%2Fopenbuilds%2Fi3%2Fpics%2F1.jpg&hash=fb72690c16403b5d392d8257df840915)
![[IMG]](proxy.php?image=http%3A%2F%2F3dwrx.com%2Fopenbuilds%2Fi3%2Fpics%2F2.jpg&hash=cc2df961ff3a81142cbdf1eea7385fd6)
![[IMG]](proxy.php?image=http%3A%2F%2F3dwrx.com%2Fi3%2Fpics%2FA.jpg&hash=46e7fdb6d651fc1db055714bcd94cac1)
![[IMG]](proxy.php?image=http%3A%2F%2F3dwrx.com%2Fopenbuilds%2Fi3%2Fpics%2Fleft.jpg&hash=344273f27296fc37aad85508b6906671)
![[IMG]](proxy.php?image=http%3A%2F%2F3dwrx.com%2Fi3%2Fpics%2FB.jpg&hash=2839de3d8345aaf485ee8a64766f5dcd)
![[IMG]](proxy.php?image=http%3A%2F%2F3dwrx.com%2Fopenbuilds%2Fi3%2Fpics%2Fz-axis-idlers.jpg&hash=dd65d9a053268ef3260c43fd4032b01f)
![[IMG]](proxy.php?image=http%3A%2F%2F3dwrx.com%2Fopenbuilds%2Fi3%2Fpics%2Fptfe.jpg&hash=a4b1baac206d9a12051bed4b6dd5ae40)
![[IMG]](proxy.php?image=http%3A%2F%2F3dwrx.com%2Fopenbuilds%2Fi3%2Fpics%2Fxtrdr.jpg&hash=c39cb0c7a797164292c7e312e996fd2d)
![[IMG]](proxy.php?image=http%3A%2F%2F3dwrx.com%2Fopenbuilds%2Fi3%2Fpics%2Fubp.jpg&hash=30392820a7547b89e3893133a9338c74)